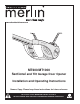
www.chamberlainanz.com MT 100 0 MT600/MT1000 Sectional and Tilt Garage Door Opener Installation and Operating Instructions Owners Copy: Please keep these instructions for future reference This manual contains IMPORTANT SAFETY information. DO NOT PROCEED WITH THE INSTALLATION BEFORE READING THOROUGHLY.
START BY READING THESE IMPORTANT SAFETY INSTRUCTIONS WARNING • Failure to comply with the following instructions may result in serious personal injury or property damage. • Read and follow all instructions carefully. • The garage door opener is designed and tested to offer safe service provided it is installed and operated in strict accordance with the instructions in this manual. These safety alert symbols mean WARNING : A possible risk to personal safety or property damage exists.
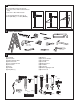
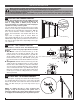
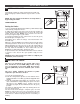
1 DOOR TYPES A. Sectional Door with curved track B. One-Piece Door with Horizontal Track Only C. One-Piece Door without track B A C To suit spring balanced doors up to 16.5m2 (MT1000) or 13.5m2 (MT600). 2 TOOLS REQUIRED 1 2 10mm, 8mm, 4.
BEFORE YOU BEGIN: 1. Look at the wall or ceiling above the garage door. The header bracket must be securely fastened to structural supports. 2. Do you have a finished ceiling in your garage? If so, a support bracket and additional fastening hardware (not supplied) may be required. 3. Do you have an access door in addition to the garage door? If not, Model CM1702 Outside Quick Release Accessory is required. This accessory allows manual operation of the garage door from outside in case of power failure. 4.
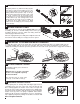
7 INSERT CHAIN/BELT INTO RAIL & ASSEMBLE HEADER SLEEVE Slide pulley bracket (1) and inner trolley (2) into back (opener end) of rail assembly (3), be sure to insert pulley bracket as shown with arrow (4) pointing toward front (header end) of rail (5). Push bracket toward front (header end) of rail (5). Insert carriage bolt (6) through header sleeve bracket (7). Loosely thread spring nut (8) and flat washer (9) onto carriage bolt.
INSTALLATION SECTION Wear protective goggles when working overhead to protect your eyes from injury. Disengage all existing garage door locks to avoid damage to the garage door. To avoid serious personal injury from entanglement, remove all ropes connected to the garage door before installing the opener. It is recommended that the opener be installed 2.1m (7 feet) or more above the floor where space permits.
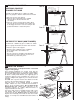
15 POSITION THE OPENER Door A Rail Header 50mm (2”) Bracket above the highest SECTIONAL DOOR OR TRACKED TILT DOOR point of travel You will need a 50mm piece of timber or similar spacer to gauge the distance between door and rail. 50mm spacer should be used to determine the correct mounting position Door 1. Raise the opener onto support. 2. Open the door completely, place a 50mm spacer between the door and the rail (as shown). 3.
17 ATTACH EMERGENCY RELEASE ROPE & HANDLE Thread one end of rope (1) through hole in top of red handle so "NOTICE" reads right side up as shown (3). Secure with an overhand knot (2). Knot should be at least 25mm (1") from end of the rope to prevent slipping. Thread other end of rope through hole in release arm of the outer trolley (4). Adjust rope length so that handle is less than 1.8m (6 feet) above the floor. Secure with an overhand knot.
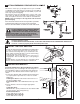
20 ASSEMBLE DOOR ARM A 7 A. ONE-PIECE DOOR INSTALLATION: 4 5 1 Fasten the straight (1) and curved (2) door arm sections together to the longest possible length (with a 2 or 3 hole overlap) using carriage bolts (3), lock washers (4) and hex nuts (5). With the door closed connect the straight door arm section (1) to the door bracket with clevis pin (6). Secure with ring fastener (7). Disconnect the inner and outer trolley.
ADJUSTMENT SECTION 22 SETTING THE LIMITS Travel limits regulate the points at which the door will stop when moving up or down. Follow the steps below to set the limits. NOTE: The door must be in the mid or closed position to begin setting the limits. TURN POWER ON. Setting the limits : 1. Press and hold the black button until the yellow indicator light starts flashing slowly then release. 2. Adjust the position of the door to the desired up position by using the black button.
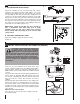
24 TEST THE SAFETY REVERSE SYSTEM The safety reverse system test is important. Garage door must reverse on contact with a 40mm obstacle laid flat on the floor. Failure to properly adjust opener may result in serious personal injury from a closing garage door. Repeat test once a month and adjust as needed. Procedure: Place a 40mm obstacle (1) laid flat on the floor under the garage door. Operate the door in the down direction. The door must reverse upon contact with the obstruction.
26 INSTALL THE PROTECTOR SYSTEM™ (IR BEAMS) Install this accessory for all installations on Canopy doors, One-Piece Door with Horizontal and Vertical Track, doors over 2.5m and when the closing force as measured on the bottom of the door is over 400N (40kg). After opener has been installed and adjusted, the Protector System™ accessory can be installed. Instructions are included with this accessory.
27 WIRELESS PROGRAMMING Activate the opener only when door is in full view, free of obstruction and properly adjusted. No one should enter or leave garage while door is in motion. Do not allow children to operate push button(s) or transmitter(s). Do not allow children to play near the door. NOTE:The transmitters supplied with your opener are pre-programmed to your receiver in the factory. If you purchase additional transmitters, you will need to program them into your opener using the steps below.
29 KEYLESS DEVICE PROGRAMMING (OPTIONAL ACCESSORY) 1 Activate the opener only when door is in full view, free of obstruction and properly adjusted. No one should enter or leave garage while door is in motion. Do not allow children to operate push button(s) or transmitter(s). Do not allow children to play near the door. O – 60 s 180 s 120 s NOTE: Your new keyless entry system must be programmed to operate your garage door opener. Program the receiver to match additional transmitter code.
30 SPECIAL FEATURES 1. Flashing light connection The flashing light can be installed anywhere. Connect light leads to quick connect terminals, white terminal is ground. 2. Auto Close The Protector SystemTM must be installed to use this function (refer section 26). 3. Door within a door connection (If this feature is not installed, the jumper must remain intact.) If installed, the door must be closed during door within a door operation, and wiring must be correct. Remove jumper from terminal leads.
32 REPLACEMENT PARTS 12 Pb Cd C VD Hg 144C0077 171A0028 041A5801 (2.3m) 041A5801-2 (2.5m) 041A5801-3 (3.0m) 012C0810 083A0011 031D0525 041B4103-1 012B0906 041A5800 012B0905 041B4494-1 7423CR3 041A6398 Inner trolley repair kit 183D0177 3 7C R 70 1 3C R 3 70 2 0C R 3 70 3 183D0178 178B0034B 8423CR3 8430CR3 041B4103 012C0855 8023CR3 8025CR3 8030CR3 041A5414-4 012C0778 178B0086B 041A2828 NOT ICE 109A0046 1” 031D0537 041A5844 (2.3m) 041A5844-1 (2.5m) 041A5844-2 (3.
33 REPLACEMENT PARTS If the supply cord is damaged, it must be replaced by the manufacturer, its service agent or similarly qualified persons in order to avoid hazard.
TROUBLE SHOOTING 1. Opener doesn't operate from either door control or transmitter: • Does the opener have electric power? Plug lamp into outlet. If it doesn't light, check the fuse box or the circuit breaker. (Some outlets are controlled by a wall switch.) • Have you disengaged all door locks? Review installation instruction warnings on page 1. • Is there a build-up of ice or snow under door? The door may be frozen to ground. Remove any obstruction. • The garage door spring may be broken. Have it replaced.
CARE OF YOUR OPENER OPERATION OF YOUR OPENER Your opener can be activated by any of the following devices: • The Lighted Door Control Button. Hold the button down until door starts to move. • The outside keyswitch or keyless entry system (if you have installed either of these accessories). • The Transmitter. Hold the push button down until the door starts to move. Opening the Door Manually: Door should be fully closed if possible. Weak or broken springs could allow an open door to fall rapidly.
CHAMBERLAIN 2 YEAR LIMITED WARRANTY Merlin MT600,MT1000 Garage Door Opener Liability – Australia only Under no circumstances shall the Seller be liable for consequential, incidental or special damages arising in connection with the use, or inability to use, the Unit. In no event shall the Seller's liability for damages or injury arising from breach of law or contract or for negligence, exceed the cost of repairing or replacing the Unit or refunding the purchase price of the Unit.