Merrychef ® ® GB 32Z3765GB 402s V4 Service Handbook Issue 1 1
CONTENTS Safety instructions 1.0 Operating Instructions How it works 1.1 Quick Start Guide 1.2 Cleaning Instructions 1.3 Installation & commissioning Electrical Installation Parts Explosion 2.1 Firmware/Software & MenuKey 3.0 Troubleshooting Users are cautioned that maintenance and repairs should be performed by a Merrychef authorized service agent using genuine Merrychef replacement parts.
IMPORTANT SAFETY INSTRUCTIONS PLEASE READ THE FOLLOWING SAFETY INSTRUCTIONS CAREFULLY This manual is designed to assist engineers who have been on a recognised product familiarisation and training course run by Merrychef. It has been prepared to offer technical guidance for the 402s range of Ovens. Please remember that it is wiser not to attempt a service task if you are unsure of being able to complete it competently, quickly, and above all safely.
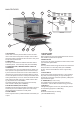
Standard Features Accelerated Cooking Technology® combines three heat technologies: • Convection • Microwave • Impingement • Ventless operation • Up to15x faster than a conventional oven • Stainless Steel construction • Easy to use Digital Control Panel • MenuKey ®technology allows users to upload & download cooking menu items in up to 256 Programs • In-built diagnostics • Easy to clean interior • Cool to touch door Options & Accessories • Griddle Pan • Rack • Cool Down Pan • Vitreous Enamel Oven Tray
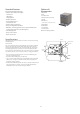
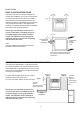
MAIN FEATURES 7 6 12 1 11 8 1 2 13 3 Rear view 4 10 9 5 1 AIR OUTLETS These vents on the rear panels enable air which has been used to cool internal components to escape. It will not allow microwave energy to escape into the environment. They must be kept free from obstruction. 2 OVEN CAVITY The cavity is constructed from stainless steel and vitreous enamelled panels. It must be kept clean (see CLEANING).
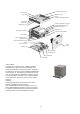
Low Voltage Transformer Control Panel Magnetron Fuse Logic PCB Fuses & Power supply/Mains filters Relay Board Control Box Hot Box & Catalytic Converters Upper Heater Elements [x3] Magnetron Fuse Temperature Sensor Magnetron LH Microswitch Assembly Convection Hot Air Motor Stirrer Motor Cavity Overheat Sensor Magnetron RH Lower Heater Elements [x2] Hot Air Motor Controller Rear Panel Cooling Fan HV Capacitor HV Transformer HV Transformer HV Capacitor Oven software The 402s Oven uses 2 types of so
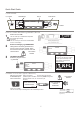
Quick Start Guide CONTROL PANEL COOL DOWN PROGRAM PADS BREAKFAST DISPLAY FUNCTION PAD CATEGORIES CANCEL USING A COOKING PROGRAM e.g. BREAKFAST/BACON 1 Switch the oven ON 2 Select the Category e.g BREAKFAST Taking all the necessary precautions to ensure you do not burn yourself, place the food onto the rack in the hot oven and close the door. Hot surface Hazard 3 TO BEGIN COOKING Select the program name e.g.
CLEANING: • ALWAYS switch off at the electrical supply and allow oven to cool before cleaning • Complete COOL DOWN procedure and allow the oven and accessories to cool before commencing cleaning WARNING: DO NOT use caustic cleaners on any part of the oven or oven cavity as it will cause permanent damage to the Catalytic Convertors Equipment: Merrychef oven cleaner, heat proof gloves, protective rubber gloves, non–abrasive nylon scrub pad, cleaning towel and cloths, eye protection and dust mask (optional) C
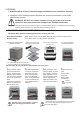
Install Guide BUILT IN INSTALLATION GUIDE The Merrychef 402s is primarily designed for counter top installation and is not recommended for built-in enclosures. Should it be necessary to enclose the oven then please observe the following clearance and ventilation requirements. The clearances specified in the diagram are minimum, increased clearances will aid reliability and improve the life of the product.
Filter Base: If the filter is not correctly installed the Magnetic reed switch will trip the contactor and the main power supply to the oven will be disconnected.
Recommended Electrical Installation Guide WARNING This appliance must be earthed. Failure to do so may result in electric shock and death. EQUIPOTENTIAL An Equipotential Earth point is provided on the rear panel of the oven for independent Earth (GND) connection WARNING: HIGH LEAKAGE CURRENT Earth connection is essential The Oven must be connected to a separate electrical supply and installed by a qualified and approved electrician.
Troubleshooting Guide OVEN NOT FUNCTIONING: COOKING ISSUES: 1. Is the oven plugged in and the If food products are not cooking correctly then please use the following questions to try to pinpoint the problem. Merrychef service technicians can only change oven settings by the use of the correct Menukey. Please note that not all questions may be applicable to the issue you are experiencing: ON/OFF switch in the ON position? 2.
Standard Tests Before carrying out diagnostics on the oven. 1. Check the Power Supply and confirm the Voltage is within +/- 10% of the nominal supply rating. 2. Check that the Oven is installed properly 3. The Filter is installed correctly postioned in the Filter Base ( Incorrect fitting will cut the power to the oven 4. The oven is plugged in to the correct type of power supply. 5.
Circuit Flow Diagram: Motors, Fans and Low Voltage Circuit Terminal Block 36 37 Terminal Block Fuse 6 [10A] 41 Mains Filter MF3 Mains Filter Mf3 56 51 31 Power Switch 30 Power Switch Fuse 1 1.
Circuit Flow Diagram: Cavity Heaters Live Phase Power In Terminal Block Power Switch 38 Fuse 2 [20A] 40 31 Mains Filter MF1 29 58 SSR JP17 Logic PCB Fuse 9 [1A] Blue/Red 06 Relay switch Low Voltage Transformer Relay PCB 05 5x Heating Element 3250W 49 32 Mains Filter MF1 Terminal Block Overheat Sensor Power Return Connections Live Phase 15
Circuit Flow Diagram: Magnetrons and HV Circuit Live Phase Power In Neutral Live 2 Terminal Block Terminal Block 35 33 Fuse 4 [20A] Mains Filter MF2 42 Mains Filter MF2 50 SW1 SW2 OPEN [RHS] CLOSED [LHS] 18 17 SW3 CLOSED 19 13 Gold Resistor 220Ω 10 9 7 Relay PCB 14 15 11 12 Fuse 7 [10Amp] Fuse 8 [10Amp] 46 44 Mains Filter MF4 Mains Filter MF5 Magnetron LHS Magnetron RHS T1 Filament voltage T2 62 60 53 FO1 Filament voltage 54 52 61 16 Phase Light 55 63 FO2 Fibr
L3 L2 L1 35 37 38 36 32 33 34 BLACK N 35 37 38 36 32 33 34 Issue 17 REMOVE WIRE 37 FOR TWIN PHASE WIRING L2 L1 BROWN BLUE MAINS IN EUROPE/REST OF WORLD WHITE BLACK 36 34 F6 3 F2 40 1 2 4 58 49 INTERCONNECTOR 44 01 02 03 JP5 JP1 JP2 JP3 34 F4 42 1 3 2 5 05 04 4 05 04 6 06 06 HEATERS 1 7 07 07 2 4 50 51 56 58 08 220 OHMS 09 10 MICROWAVE SSR 1 2 6 12 13 12 13 14 14 31 20 22 24 26 28 30 15 16 15 16 31 30 11 12 13 14 15
SWITCH OFF THE HEATERS (Disable PREHEAT) The oven has a constant operating temperature for cooking shown as the PREHEAT TEMPERATURE in the display when the oven is switched on. When the cold oven is switched on it heats up to the PREHEAT temperature before cooking with programs can commence. This temperature is set initially at 275°C. 1. Switch oven OFF Switch the oven ON and press and hold the Edit Preheat Temp function key to display OVEN TEMPERATURE.
OPERATING INSTRUCTIONS: MANUAL MODE WARNING: DO NOT APPLY MICROWAVE ENERGY WHEN OVEN IS EMPTY DO NOT USE THE OVEN WITHOUT CLEAN AIR FILTERS IN POSITION To familiarize yourself with the controls place a heatproof bowl containing approximately 1.5 litres of water in the oven. The oven can be operated in manual or programmed mode. In order to use the manual controls MANUAL MODE should be set to ON in the oven profile.
CodeKey: Firmware download 1 Ensure the power switch is OFF. 2 Lift the MenuKey cover in the top front panel of the oven and put the Codekey in the slot. 3 Warning: During the next step the screen will go blank for approximately 1 minute during this time. DO NOT REMOVE THE CODEKEY/DO NOT TURN THE OVEN OFF as this will permanently damage the Logic Board. With the key still in place, switch the power switch ON. After 1 minute the oven will boot up, press pause to hold the OVEN INFORMATION screen.
MenuKey : CHANGING OVEN MENU PROGRAMS The MenuKey System automatically changes all the cooking programs on the oven from a pre-programmed electronic key. To change the menus on the oven: WARNING Downloading from a MenuKey will clear all the existing programs Do not remove the key during download sequence as this could corrupt the data on the key MENUKEY2 Check that the key has the correct number/code for the programs you want to load into the oven memory 1 Ensure the power switch is OFF.
PCB Connections & LED Indicators Relay PCB: D15 Magnetron active Cavity Temperature Sensor Input D15 Magnetron active D16 Magnetron soft start D16 Magnetron soft start D19 Heating elements heating up D20 ON when Low Voltage power is on, is OFF when microwave is operated. D19 Heater ON Magentron Overheat sensor Inputs D20 LED ON when power is on OFF when Microwave is operated.