
User's Manual
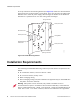
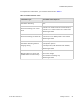

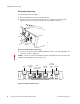
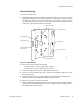
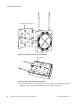
Table Of Contents
- About This Guide
- Meru Access Points and Radio Switch
- Installing the RS4000
- Installing the AP200
- Installing the AP150
- Specifications
- Regulatory Information
- Channels
- Mounting Bracket Stencils

Installing the Access Points
© 2007 Meru Networks, Inc. Installing the AP200 35
Most installations receive the best coverage using the following guidelines:
Install APs toward the center of the building.
z Do not install APs near metal objects, such as heating ducts, metal doors, or
electric service panels.
z Relative to the ground, orient the antenna up or down, not sideways.
The AP200 is only intended for installation in Environment A as defined in IEEE
802.3af. All interconnected equipment must be contained within the same building,
including the interconnected equipment's associated LAN connection.
Attaching the AP200 Antennas
The AP200 is provided with external antenna ports. Make sure that all external
antennas and their associated wiring are located entirely indoors. The external
antennas are not suitable for outside use.
If the AP200 does not have external antennas, attach the antennas to the connectors
on the AP200 (see Figure 21). Rotate the knurled ring at the base of the antenna
clockwise to attach the antenna. The ring should be finger-tight.
Mounting the Access Point
You can mount an AP200 in the following ways:
z Horizontally, as described in the “Horizontal Mounting” section.
z Vertically, as described in the “Vertical Mounting” section.
z Below a hanging ceiling, as described in the “Mounting Below a Suspended
Ceiling” section.
z Above a tiled hanging ceiling, as described in the “Mounting Above a Suspended
Ceiling” section.
Note:
The previous guidelines are general guidelines. Each site has its own unique
environment. Place access points accordingly.
Caution!
When changing the orientation of the antennas, be sure to slightly loosen
the knurled ring before moving the antenna. Retighten the ring afterward.
Otherwise, you might damage the internal cabling in the AP.