
Technical data


Configuring Meru Captive Portal
© 2012 Meru Networks, Inc. Captive Portals for Temporary Users 171
Create Custom Pages
The easiest way to create your own set of custom pages is to download Meru default
files and use the two customizable ones (Login page and Success page) as templates,
giving the two altered HTML pages new names. To do this, follow these steps:
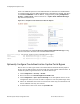
1. Get the template files. Click Maintenance > Captive Portal > Customization >
Get Files.
A zip file called zip.tar.gz is downloaded to your computer. When the zip.tar.gz
file is unzipped, you see the folder html.vpn that contains these six default files:
— Login page can be customized (default filename is loginformWebAuth.html)
— Successful login page can be customized (default filename is
auth_web_ok.html)
— Your login failed - try again page (default filename is
loginformWebAuthRetry.html)
— Web authentication succeeded; do you want to log off? (default filename is
logoff User.html)
— You are now logged off page (default filename is loggedoff.html)
— Your logoff failed - try again page (default filename is logoffUserFailed.html)
2. You can only create two custom files per Captive Portal interface: a replacement
for the Login page loginformWebAuth.html and a replacement for the Successful
Login page auth_web_ok.html. Locate the two customizable HTML files on your
computer and use them as templates to create your own custom HTML files. Use
a program such as Notepad, make your changes, and then save the files with
unique names.
— CSS, JavaScript, and HTML are supported.
— You can upload graphics up to 50K each in the formats .html .gif, .jpg, .png,
.bmp .css, .js.
To replace the first Meru logo graphic, look for the line that reads:
src="Images.vpn/img_merulogo.gif" width=133 border=0></A></TD>
Change the text "Images.vpn/img_merulogo.gif" to
"Images.vpn.custom/your_image.gif" (Note that you are specifying a new
directory for the .gif file, which is Images.vpn.custom).
To replace the second graphic (the mountain), look for the line that reads:
src="Images.vpn/img_aboutmeru.jpg" width=326 border=0></TD></TR>
Change the text "Images.vpn/img_aboutmeru.jpg" to
"Images.vpn.custom/your_image2.gif" (Note that you are specifying a new
directory for the .gif file, which is Images.vpn.custom).
Possible edits include changing logos, text, and formatting. The only lines that
cannot be altered are the login communication process between the controller
and the Radius server in the file loginformWebAuth.html.
3. Import all new Captive Portal files (HTML, CSS, JS, and graphics) to the controller
one by one. Click Maintenance > Captive Portal > Import File > enter the
location/file in the text box > Import File. Be sure that the files have unique
names; they will all be placed in the same directory.
Tell the controller to use custom pages. Click Configuration > Captive Portal and
select the radio button Customization.
The custom HTML, CSS, JS, and graphic files are now on the controller.