
Technical data


Configuring Rogue AP Mitigation with Web UI
© 2012 Meru Networks, Inc. Rogue AP Detection and Mitigation 187
3. To add an AP to the blocked list, click Add.
a. In the BSSID box, type the BSSID, in hexadecimal format, of the access point.
b. Add the BSSID to the ACL, by clicking OK.
4. The blocked BSSID now appears on the list with the following information:
— BSSID The access point's BSSID.
— Creation Time The timestamp of when the blocked AP entry was created.
— Last Reported Time The time the AP was last discovered. If this field is blank,
the AP has not been discovered yet.
5. To remove a blocked BSSID from the ACL, select the checkbox of the blocked AP
entry you want to delete, click Delete, and then click OK.
Configure Scanning and Mitigation Settings with the Web UI
To configure rogue AP scanning and mitigation settings, follow these steps:
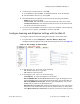
1. From the Web UI click Configuration > Wireless IDS/IPS > Rogue APs.
The Rogue AP screen appears with the Global Settings tab selected. See Figure 29.
Figure 29: Web UI Rogue AP Global Settings
2. In the Detection list, select one of the following:
— On: Enables scanning for rogue APs.
— Off: Disables rogue detection.
3. In the Mitigation list, select one of the following:
— No mitigation: No rogue AP mitigation is performed.
— Block all BSSIDs that are not in the ACL: Enables rogue AP mitigation of all
detected BSSIDs that are not specified as authorized in the Allowed APs list.
— Block only BSSIDs in blocked list: Enables rogue AP mitigation only for the
BSSIDs that are listed in the Blocked APs list.
— Block Clients seen on the wire: Enables rogue mitigation for any rogue station
detected on the wired side of the AP (the corporate network, in many cases).
When Block clients seen on the wire is selected, clients seen on the corporate