
User Manual
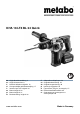


ENGLISH en
9
Reduce dust exposure:
Some dust created by using this power tool
may contain chemicals known to cause
cancer, allergic reaction, respiratory disease, birth
defects or other reproductive harm. Some
examples of these chemicals are: Lead from lead-
based paints, crystalline silica from bricks and
cement and other masonry products, arsenic and
chromium from chemically-treated lumber, hard
wood like oak or beech, metals, asbestos.
The risk from these exposures depends on how
long you or bystanders are being exposed.
Do not let particles enter the body.
To reduce your exposure to these chemicals: work
in a well ventilated area, and work with approved
safety equipment, such as dust masks that are
specially designed to filter out microscopic
particles.
Observe the relevant guidelines for your material,
staff, application and place of application (e.g.
occupational health and safety regulations,
disposal).
Collect the generated particles at the source, avoid
deposits in the surrounding area.
Use suitable accessories for special work (see
chapter 9.), thus less particles enter the
environment in an uncontrolled manner.
Use a suitable extraction unit.
Reduce dust exposure with the following measures:
- Do not direct the escaping particles and the
exhaust air stream at yourself or nearby persons
or on dust deposits.
- Use an extraction unit and/or air purifiers
- Ensure good ventilation of the workplace and
keep clean using a vacuum cleaner Sweeping or
blowing stirs up dust
- Vacuum or wash the protective clothing Do not
blow, beat or brush
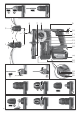
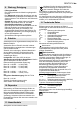
See page 2.
1 Keyless chuck *
2 Keyless chuck sleeve *
3 Chuck lock
4Tool lock
5SDS chuck
6Spindle
7 Additional handle
8Depth stop
9 Metabo VibraTech (MVT)
10 Rotation selector switch
11 Trigger switch
12 Lock
13 Switch button (for changing the operating
mode)
14 Guide groove for the dust extraction
ISA 18 LTX
15 B
attery pack release button
16 Rubber cover for dust protection of the power
supply for the dust extraction ISA 18 LTX
17
LED light to illuminate the workplace
18 Capacity indicator button
19 Capacity and signal indicator
20 Battery pack
* depending on model
6.1 Assembly of the additional handle
For safety reasons, always use the additional
handle supplied.
Open the clamping ring by turning the additional
handle (7) anticlockwise. Push the additional
handle onto the collar of the machine. Insert the
depth stop (8). Securely tighten the additional
handle at the angle required for the application.
6.2 Battery pack
Charge the battery pack (20) before use.
Recharge the battery pack if performance
diminishes.
The ideal storage temperature is between 10°C and
30°C.
Li-Ion battery packs “Li-Power, LiHD“ have a
capacity and signal indicator (19):
- Press the button (18); the LEDs indicate the
charge level.
- The battery pack is almost flat and must be
recharged if one LED is flashing.
6.3 Removing and inserting the battery pack
Removing:
Press the battery pack release (15) button and
remove the battery pack (20).
Inserting:
Slide in the battery pack (20) until it engages.
7.1 Depth Stop Setting
Loosen the additional handle (7). Set depth stop (8)
to the desired drilling depth and retighten additional
handle. (7)
7.2 Switching On and Off
To start the machine, press the trigger (11). The
speed can be changed at the trigger.
Release the trigger (11) to switch off.
7.3 Operating mode selection
Press (12) the lock and turn the thumbwheel (13).
Drilling
Hammer drilling
(only set if using (5) SDS chuck)
Chiselling
(only set if using SDS chuck (5))
5. Overview
6. Initial Operation
7. Use