
User Manual
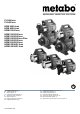


ENGLISHen
10
button (4) (ON/OFF) briefly. The pump
switches to fault and the red LED lights up if this
is not observed, see section 7.1.
Only with the P 6000 Inox:
if the pump is activated
by a ballast (e.g. Hydromat, timer), it needs to be
switched to "mode A", see section 7.1.
Domestic water automatic system
(Device designation HWA..., HWAI...)
Principle of operation: the device switches on
when the removal of water causes the water
pressure to fall below the switch-on pressure; it
switches off again when switch-off pressure is
reached.
1. Insert the mains plug.
2. Fill the pump if necessary - see section 6.7
3. Switch on the device:
To switch on the device, press button (4) (ON/
OFF) briefly, the LED lights up green (blue in
operating mode "A").
4. Open the discharge line (open the water tap or
spray nozzle).
5. Check that water emerges! The device is not
ready for operation.
6. The device switches on and off as required.
(See section 7.1)
Domestic water works
(Device designation HWW..., HWWI...)
Principle of operation: the device switches on
when the removal of water causes the water
pressure to fall below the switch-on pressure; it
switches off again when switch-off pressure is
reached. The pressure vessel contains rubber
bellows that are under air pressure ("pilot
pressure") when delivered; this permits the
removal of small volumes of water without the
pump starting up.
1. Insert the mains plug.
2. Fill the pump if necessary - see section 6.7
3. Switch on the device:
Devices without electronics (see table 1, E):
Turn on the device at the switch (1).
Devices with electronics (see table 1, E):
To switch on the device, press button (4) (ON/
OFF) briefly, the LED lights up green (blue in
operating mode "A").
4. Open the discharge line (open the water tap or
spray nozzle).
5. Check that water emerges! The device is not
ready for operation.
6. The device switches on and off as required.
(See section 7.1)
Danger! Prior to all work on the device:
- Disconnect the mains plug.
- Ensure that the device and connected
accessories are depressurised.
- Repair and maintenance work other than that
described in this section should only be carried
out by qualified specialists.
8.1 Regular maintenance
- Check device and accessories for damage, in
particular electrical and pressurised
components, and repair if necessary.
- Check suction and discharge lines for leaks.
- Clean the intake filter and filter element (if
installed) and replace if necessary if the
conveying capacity decreases.
- Check the pilot pressure of the pressure vessel
(7) (equipment-specific) and increase it if
necessary (see section 9.4 Increasing the pilot
pressure).
8.2 Cleaning the suction filter (equipment-
specific)
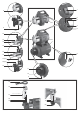
1. Unscrew the cover (16) (using the key (15) if
necessary).
2. Pull the filter unit (17) vertically upwards.
3. Disassembling the filter unit: hold the
receptacle (18), turn the filter (19) clockwise
and remove it from the receptacle (bayonet
fitting).
4. Clean the receptacle (18) under running water
and the filter (19) with a soft brush.
5. Assembly again in reverse order. Make sure
that the filter unit (17) is inserted until it stops.
8.3 If there is a risk of frost
Caution! Frost (< 4 °C) destroys the pump
and accessories as both always contain
water!
- Disassemble the pump and accessories and
store them in frost-free conditions (see the
following section) if there is a risk of frost.
8.4 Disassembling and storing the device
- Switch off the device. Disconnect the mains plug.
- Open the discharge line (open the water tap or
spray nozzle), allow water to drain off completely.
- Completely drain the pump (6) and vessel (7) as
follows:
- unscrew the water drain screw (9).
- remove the suction and discharge lines from the
device.
- store the device in a frost-free room (min. 5 °C).
f
Danger!
- Prior to all work on the device:
- Disconnect the mains plug.
- Ensure that the device and connected
accessories are depressurised.
9.1 Pump does not run
• No mains voltage.
- Check the on/off switch, cables, plug, socket
and mains fuse.
• Mains voltage too low.
- Use an extension cable with an adequate
conductor diameter.
• Dry run protection has tripped - red LED lights
up (only devices with electronics, devices see
table page 3 - E)
- Ensure that enough water is available.
- Press button (4) (ON/OFF) briefly to switch
the device on again.
• P 6000 Inox: safety switch-off when the
discharge line is closed - red LED lights up
- Open the discharge line
- Press button (4) (ON/OFF) briefly to switch
the device on again.
• Motor overheated; motor protection relay has
tripped.
- After cooling the pump will switch ON again.
- Ensure that there is adequate ventilation,
keep air slots free.
- Observe the maximum supply temperature.
• Motor hums, but does not start.
- Insert a screwdriver or similar object through
the air slots on the motor when the motor is
switch off and turn the fan impeller.
• Pump clogged or defective.
- Disassemble and clean the pump. Clean the
diffuser and replace if necessary. Clean the
impeller and replace if necessary. See
section 11.
9.2 Pump not drawing in correctly or
running very loudly:
•Lack of water.
- Ensure that there is an adequate supply of
water.
• Lack of water, dry run protection is activated.
(Devices with electronics (see table 1E)
Red LED flashes, green LED lights up
continuously, see section 7.1
- Ensure that enough water is available.
• Pump not sufficiently filled with water.
-See section6.7.
• Suction line leaking.
- Seal the suction line, tighten the screw
couplings.
• Suction height too high.
- Observe the maximum suction height.
- Insert the check valve, fill the suction line with
water.
• Intake filter (accessories) obstructed.
- Clean and replace if necessary.
• Check valve (accessories) blocked.
- Clean and replace if necessary.
• Water discharge between motor and pump,
shaft seal leaking. (Minor discharge of water
(max. approx. 30 drops per day) is normal with
the use of shaft seals).
- Replace the shaft seal. See section 11.
• Pump clogged or defective.
-See section 9.1.
9.3 Pressure too low or pumps runs
continuously (continuous switch-on/
off):
• Suction line leaking or suction height too high.
- See section 9.2.
• Pump clogged or defective.
- See section 9.1.
• HWW...: pressure switch adjusted.
- Read off the switch-on and switch-off
pressure on the pressure gauge (11) and
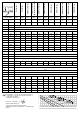
check the values (see section 13 Technical
Specifications). Please contact Metabo
Customer Service if a modification is required.
See section 11.
• HWW...: pump starts up even after a small
volume of water is removed (approx. 0.5 l).
- Check whether the pilot pressure in the
pressure vessel is too low. Increase the
pressure if necessary. See section 9.4.
• HWA..., HWAI...: pump continuously switches
on/off because of a low flow rate (less than
approx. 60 l/h, depending on the model).
- The use of an expansion tank is required
when small volumes are removed.
- Domestic water works (HWW..., HWWI...) are
suitable for the removal of small volumes of
water.
• HWW...: water is running out of the air valve.
- Rubber bellows in the pressure vessel are
leaking, replace them. See section 11.
• All devices with electronics, see table 1 E: LED
(3) lights up blue.
- "Mode A" is activated. See section 7.1
9.4 Increasing the pilot pressure (only
HWW...)
If – in the course of time – the pump starts up even
after the removal of a small volume of water
(approx. 0.5 l), the pilot pressure in the vessel must
be restored.
Note:
the vessel pilot pressure (air pressure)
cannot be read on the pressure gauge (water
pressure) (11).
1. Disconnect the mains plug.
2. Open the discharge line (open the water tap or
spray nozzle), allow water to drain off
completely.
3. Unscrew the plastic cap on the front face of the
pressure vessel; the air valve is located behind
it.
4. Mount the air pump or compressor hose with a
"tyre valve" connection and pressure gauge on
the air valve.
5. Pump up to the specified pilot pressure
(1.5 bar; see section 13. Technical
Specifications).
6. Connect the device again and check it works.
f
Use only genuine Metabo accessories.
Use only accessories that fulfil the requirements
and specifications listed in these operating
instructions.
See www.metabo.com or the catalogue for a
complete range of accessories.
Danger! Repairs to this device must be
carried out by qualified electricians only!
Please contact your Metabo service centre if you
have Metabo devices that require repairs. See
www.metabo.com for addresses.
For shipment: drain the pump and vessel
completely (see section 8.4).
You can download a list of spare parts from
www.metabo.com.
Observe the national regulations on
environmentally compatible disposal and on the
recycling of disused tools, packaging and
accessories.
Only for EU countries: never dispose of
power tools in your household waste! Used
power tools must be collected separately
and handed in for environmentally compatible
recycling in accordance with European Directive
8. Maintenance
9. Troubleshooting
10. Accessories
11. Repairs
12. Environmental Protection