
User Manual


ENGLISHen
8
- Ensure good ventilation of the workplace and
keep it clean using a vacuum cleaner. Sweeping
or blowing stirs up dust.
- Vacuum or wash protective clothing. Do not blow,
beat or brush.
See page 2.
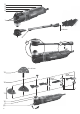
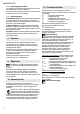
1LED lights
2 Release lever
3Slide switch
4Handle
5 Setting wheel for speed adjustment
6 Extractor connection piece *
7 Dust extraction *
8Adapter for FEIN
®
-tools *
9Gear box flange
10 Tool holder
11 Accessories *
12 Spring pin
13 Sanding disc *
*depending on the features / model
Before plugging in, check that the rated mains
voltage and mains frequency, as stated on the
rating label, match with your power supply.
Always install an RCD with a max. trip current
of 30 mA upstream.
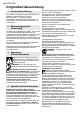
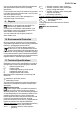
7.1 Attach dust extraction (only when working
with triangular sanding plate)
See figure, page 2
- Remove tool (11).
- Place the dust extraction (7) onto the gear box
flange (9):
Fit as illustrated in the graphic.
- Connect a suitable extraction unit with its
extraction hose to the inserted intake socket (6) .
7.2 Attaching the accessory
Disconnect the mains plug before changing
any accessories.
Danger of injury due to the sharp accessories.
After stopping work, the tool may still be hot.
Danger of crushing when changing the tool. Wear
protective gloves.
Use only accessories with an OIS holder or a
compatible holder.
Use only sharp, undamaged saw blades. Do
not use accessories that are cracked or that
have changed their shape. Use an accessory that is
suitable for the material being sawn.
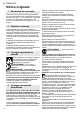
See Fig. A, page 2.
1. Open the release lever (2) until the stop.
2. Remove the spring pin (12) .
3. Place the accessory (11) in the desired position
onto the tool holder (10) . Ensure that it engages
in the cams of the tool holder (10) .
4. Insert the spring pin (12) until the stop.
5. Caution! The clamping lever (2) can snap back
and crush your fingers. Handle with care. Wear
protective gloves.
Close the release lever (2) until the stop and
lock. (The release lever has to be in contact with
the housing).
6. Check the accessories for firm hold.
Note:
For FEIN
®
-accessories place the supplied
adapter (8), as shown, on the tool holder (10) . See
figure, page 2.
7.3 Installation of sanding disc
Simple attachment and removal thanks to the
velcro-type fastening. Simply press on the sanding
disc (13) such that the holes in the sanding disc are
aligned with the support plate.
7.4 Switching On and Off
Switch on first, then guide the accessory
towards the workpiece.
Avoid inadvertent starts: always switch the
tool off when the plug is removed from the
mains socket or if there has been a power cut.
Avoid the machine swirling up or taking in dust
and chips. After switching off the machine,
only place it down when the motor has come to a
standstill.
Machines with slide switch:
Switching on: Push the slide switch (8) forwards
(continuous operation).
Switching off: Push the slide switch (8)
backwards.
7.5 Setting the oscillating frequency
Set the oscillating frequency on the adjustment
wheel (5). This can also be done during operation.
The best way to determine the ideal setting is
through a practical trial.
7.6 Working Directions
Sanding: The best way to determine the ideal
setting is through a practical trial. Apply moderate
pressure on the machine and move it to and fro
across the surface.
Cutting, sawing: Set high oscillating frequency.
Press down the machine evenly. Avoid jamming!
For plunge cuts: A light tilting movement increases
the work progress.
Scraping: Set medium to high oscillating
frequency.
Hold the accessory at a flat angle to the workpiece.
Use only genuine Metabo accessories.
5. Overview
6. Commissioning
7. Use
8. Accessories