
User Manual


ENGLISH en
9
7.4 Working with Depth Stop
Set torque setting 10 at setting collar (1).
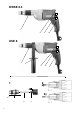
To preset screw insertion depth, one of the screws
to be inserted is fitted on the tool. Adjust stop sleeve
(6) by turning as follows (see page 3, Figure 2):
a) Screws whose heads are to sit on the material
(socket-head screws, oval head screws, hex
screws):
The surface area of the screw head is 2 mm outside
the stop sleeve.
b) Countersunk screws:
The surface of the countersunk screw head is 2 mm
outside the stop sleeve.
Insert a screw as a test. Correct the insertion depth
if necessary:
When the stop sleeve (6) is inserted, the insertion
depth changes by 0.25 mm per notch. If screw
insertion has to be deeper: insert stop sleeve. If the
screw has been too deeply inserted: unscrew stop
sleeve.
Removal of the depth stop (7) does not alter the set
screw insertion depth. After refitting, work can
continue at the same insertion depth.
When screwing in cross-head screws, press
the machine with the screwdriver bit firmly
against the screw until the screw is fully inserted;
otherwise the bit could slip out of the cross recess
and damage the material.
If the machine is not held exactly vertical in relation
to the tool, the depth stop counterbalances this
(to a certain extent).
7.5 Working with torque setting
Remove depth stop (7).
Make torque setting at setting collar (1).
Torque setting:
Position 1-10, :
Once the pre-selected torque has been achieved,
the screwdriver clutch makes a rattling sound and
the screwing procedure can be stopped.
USE 8:
On the setting collar (1) for torque setting,
position max. and position 1 are arranged beside
each other. The setting collar cannot be turned directly
from Position max. to Position 1 (or from 1 to max.)! Turn
in the opposing direction (i.e. passing through the other
positions).
Position max., (only USE 8):
(turn the setting collar until it engages.)
The
screwdriver clutch is switched off. The maximum
possible torque is available.
USE 8: When working with max. torque,
always use the side handle supplied.
Note that high counter-torques are
possible during work.
Screwing in wood: Once the pre-selected torque
has been achieved, the screwdriver clutch makes a
rattling sound and the screws can slowly be
inserted to the desired insertion depth.
When using short screwdriver bits (25 mm): use a
bit holder. (see Accessories section).
Screw wooden boards with wing screws (Tek) onto
steel: Work at low rotational speeds when drilling
through the wooden board. When you reach the
steel, work at maximum rotational speed.
If it is hard to remove the bit holder from the
toolholder: pull out with pliers.
If the trigger (4) can not be depressed, check to see
that the direction of rotation selector switch (3) is
fully set to the R or L position.
Clean the machine regularly. This includes vacuum
cleaning the ventilation louvres on the motor.
Use only genuine Metabo accessories.
See page 4.
Use only accessories which fulfil the requirements
and specifications listed in these operating
instructions.
A Depth stop sleeves
B Bit holder
C Connector
D Screwdriver bits
E Wrench sockets (commercially available)
F Hexagon wrench socket
For complete range of accessories, see
www.metabo.com or the main catalogue.
Repairs to electrical tools must be carried out by
qualified electricians ONLY!
If you have Metabo electrical tools that require repairs,
please contact your Metabo service centre. For
addresses see www.metabo.com.
You can download spare parts lists from
www.metabo.com.
Observe national regulations on environmentally
compatible disposal and on the recycling of disused
machines, packaging and accessories.
Only for EU countries: Never dispose of
power tools in your household waste! In
accordance with European Directive 2002/
96/EC on waste electrical and electronic equipment
and its implementation in national law, used elec-
trical tools must be collected separately and
handed in for environmentally compatible recycling.
8. Tips and Tricks
9. Troubleshooting
10. Maintenance
11. Accessories
12. Repairs
13. Environmental Protection