P0062_20IVZ.fm P 3000 S P 3300 S P 4000 S HWA 3300 S HWA 4000 S 115 171 9232 / 3907 - 2.0 Betriebsanleitung . . . . . . . . . . . . . . . . . . . . 7 Operating Instructions . . . . . . . . . . . . . . . 13 Instructions d'utilisation . . . . . . . . . . . . . . 19 Handleiding . . . . . . . . . . . . . . . . . . . . . . . 26 Betjeningsvejledning . . . . . . . . . . . . . . . . 32 Manual de uso . . . . . . . . . . . . . . . . . . . . . 38 Οδηγ ες Χρ σης . . . . . . . . . . . . . . . . . .
U2P0062.
D DEUTSCH ENG ENGLISH KONFORMITÄTSERKLÄRUNG Wir erklären in alleiniger Verantwortlichkeit, daß dieses Produkt mit den folgenden Normen übereinstimmt* gemäß den Bestimmungen der Richtlinien** Prüfbericht *** ausstellende Prüfstelle **** Gemessener/ Garantierter Schalleistungspegel***** DECLARATION OF CONFORMITY We herewith declare in our sole responsibility that this product complies with the following standards* in accordance with the regulations of the undermentioned Directives** testreport *** issuing
D DEUTSCH ENG ENGLISH KONFORMITÄTSERKLÄRUNG Wir erklären in alleiniger Verantwortlichkeit, daß dieses Produkt mit den folgenden Normen übereinstimmt* gemäß den Bestimmungen der Richtlinien** Prüfbericht *** ausstellende Prüfstelle **** Gemessener/ Garantierter Schalleistungspegel***** DECLARATION OF CONFORMITY We herewith declare in our sole responsibility that this product complies with the following standards* in accordance with the regulations of the undermentioned Directives** testreport *** issuing
D DEUTSCH ENG ENGLISH KONFORMITÄTSERKLÄRUNG Wir erklären in alleiniger Verantwortlichkeit, daß dieses Produkt mit den folgenden Normen übereinstimmt* gemäß den Bestimmungen der Richtlinien** Prüfbericht *** ausstellende Prüfstelle **** Gemessener/ Garantierter Schalleistungspegel***** DECLARATION OF CONFORMITY We herewith declare in our sole responsibility that this product complies with the following standards* in accordance with the regulations of the undermentioned Directives** testreport *** issuing
D DEUTSCH ENG ENGLISH KONFORMITÄTSERKLÄRUNG Wir erklären in alleiniger Verantwortlichkeit, daß dieses Produkt mit den folgenden Normen übereinstimmt* gemäß den Bestimmungen der Richtlinien** Prüfbericht *** ausstellende Prüfstelle **** Gemessener/ Garantierter Schalleistungspegel***** DECLARATION OF CONFORMITY We herewith declare in our sole responsibility that this product complies with the following standards* in accordance with the regulations of the undermentioned Directives** testreport *** issuing
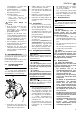
XP0029D1.fm Betriebsanleitung DEUTSCH DEUTSCH 1. Das Gerät im Überblick 8 9 1 2 10 3 11 4 12 5 1 Druckanschluss 2 Wassereinfüllschraube 3 Sauganschluss 4 Wasserablassschraube 5 Pumpe 6 Ein/Aus-Schalter 7 Netzkabel mit Stecker 6 13 7 A Achtung! Bei verschmutztem Fördermedium Ansaugfilter verwenden (siehe "Lieferbares Zubehör"). 3 Hinweis: Bei dieser Pumpe ist ein Rückschlagventil am Sauganschluss empfehlenswert (siehe "Lieferbares Zubehör").
DEUTSCH Inhaltsverzeichnis 1. Für Schäden, die entstehen, weil diese Betriebsanleitung nicht beachtet wurde, übernimmt der Hersteller keine Haftung. Explosive, brennbare, aggressive oder gesundheitsgefährdende Stoffe dürfen nicht gefördert werden. Die Informationen in dieser Betriebsanleitung sind wie folgt gekennzeichnet: Eigenmächtige Veränderungen am Gerät sowie der Gebrauch von Teilen, die nicht vom Hersteller geprüft und freigegeben sind, sind nicht gestattet. Das Gerät im Überblick...............
DEUTSCH x x oder überfahren; vor scharfen Kanten, Öl und Hitze schützen. 2. Adapter (16) auf den Druckanschluss der Pumpe schrauben. Verlängerungskabel so verlegen, dass es nicht in die zu fördernde Flüssigkeit geraten kann. 3. Hydromat (17) auf den Adapter setzen und mit der Überwurfmutter festschrauben. Netzstecker ziehen: vor allen Arbeiten am Gerät; wenn sich Personen im Schwimmbecken oder Gartenteich befinden. 4. Hydromat so ausrichten, dass seine Bedienseite bequem erreichbar ist. 5.
DEUTSCH 5.6 Pumpe befüllen und Ansaugen (Pumpenkennlinie für Saughöhe 0,5 m und 1"-Saugschlauch.) A Achtung! Bei jedem Neuanschluss oder bei Wasserverlust bzw. Luftansaugung muss die Pumpe mit Wasser befüllt werden. Einschalten ohne Wasserfüllung zerstört die Pumpe! P 3300 S 3 Hinweis: Die Saugleitung braucht nicht befüllt zu werden, da die Pumpe selbstansaugend ist. Je nach Leitungslänge und -durchmesser kann es jedoch einige Zeit dauern, bis Druck aufgebaut ist.
DEUTSCH 7.2 Gerät abbauen und aufbewahren 1. Gerät ausschalten, Netzstecker ziehen. 2. Druckleitung öffnen (Wasserhahn bzw. Spritzdüse aufdrehen), Wasser vollständig ablaufen lassen. 3. Pumpe vollständig entleeren, dazu die Wasserablassschraube unten an der Pumpe herausdrehen. 4. Saug- und Druckleitungen Gerät abbauen. 5. Gerät in einem frostfreien Raum (min. 5 °C) lagern. Gefahr! Vor allen Arbeiten am Gerät: 1. Gerät ausschalten. 2. Netzstecker ziehen. 3.
DEUTSCH 12. Technische Daten P 3000 S P 3300 S HWA 3300 S P 4000 S HWA 4000 S Netzspannung V 230 ~ 1 Frequenz Hz 50 Nennleistung W 900 1100 1300 Nennstrom A 3,6 4,5 4,5 Absicherung min. (träge oder B-Automat) A 10 10 10 Betriebskondensator PF 16 16 20 2800 2800 2800 Nenndrehzahl min -1 Fördermenge max. l/h 3000 3300 4000 Förderhöhe max. m 43 45 48 Förderdruck max. bar 4,3 4,5 4,8 Saughöhe max. m 7 8 8 Zulauftemperatur max.
XP0029E1.fm Operating Instructions ENGLISH ENGLISH 1. Pump Overview 8 9 1 2 10 3 11 4 12 5 1 Discharge port 2 Plug, water filler 3 Pump inlet 4 Drain plug 5 Pump 6 On/Off switch 7 Power cable with plug 6 13 7 A Caution! For pumping contaminated fluids use a suction filter (see “Available Accessories”). 3 Note: For this pump a check valve should be installed on the suction port (see “Available Accessories ”).
ENGLISH non-observance of any operating or safety instructions given in this manual. Table of Contents 1. Pump Overview .........................13 2. Please Read First! .....................14 3. Range of Application and Pumping Media..........................14 The information in these instructions is denoted as under: 4. Safety .........................................14 Danger! Risk of personal injury or damage to the environment. 4.1 Specified Conditions of Use ........14 4.
ENGLISH for possible damage. Risk of fatal electric shock! x A damaged pump must be workmanlike repaired before it can be used again. x Do not attempt to repair the pump yourself! Only trained specialists are permitted to service or repair pumps or pressure vessels. The pump is easily assembled and connected. If in doubt, contact your specialist supplier or a qualified electrician. Installing the Hydromat (HWA only) 3 Note: Before initial operation the Hydromat must be installed according to version).
ENGLISH 4. Replace the water filler plug, complete with gasket. 5. Open pressure line (open tap or spray nozzle) for any air to escape during priming. 6. Start pump (see "Operation"). 20 7. Turn pump OFF when water runs out steadily. 21 22 6. Operation Pump and suction line must be connected and filled (see "Prior to Operation"). A Caution! The pump must not run dry. Ensure there is always sufficient pumping medium (water) available.
ENGLISH 2. Open pressure line (open tap or spray nozzle) and drain water completely. Suction line leaky. • Seal suction line, tighten screw fittings. 3. Drain pump completely; to do so remove the drain plug from the pump 4. Disconnect suction and pressure lines from the pump. Suction head too high. • Observe max. suction head. • Install check valve, fill suction line with water. 5. Store pump in a frost-free location (at least 5 °C). Suction strainer (optional accessory) blocked.
ENGLISH 12. Technical Specifications P 3000 S P 3300 S HWA 3300 S P 4000 S HWA 4000 S Mains voltage V 230 ~ 1 Frequency Hz 50 Rated output W 900 1100 1300 Rated current A 3.6 4.5 4.5 Fuse protection min. (time-lag or B-type circuit breaker) A 10 10 10 Running capacitor PF 16 16 20 min 2800 2800 2800 Pump capacity max. l/h 3000 3300 4000 Delivery head max. m 43 45 48 Delivery pressure max. bar 4.3 4,5 4.8 Max.
XP0029F1.fm Instructions d'utilisation FRANÇAIS FRANÇAIS 1. Vue d'ensemble de l'appareil 8 9 1 2 10 3 11 4 12 5 1 Raccord de pression 2 Vis de remplissage d'eau 3 Raccord d'aspiration 4 Vis de vidange de l'eau 5 Pompe 6 Interrupteur marche/arrêt 7 Câble d'alimentation avec fiche 6 13 7 A Attention ! Si le liquide refoulé est sale, utiliser un filtre d'aspiration (voir "Accessoires disponibles").
FRANÇAIS prendre connaissance en cas de besoin. Conserver le justificatif d'achat au cas où vous auriez besoin de faire valoir la garantie. Table des matières 1. Vue d'ensemble de l'appareil ...19 2. À lire impérativement ! .............20 3. Domaine d'utilisation et liquides refoulés........................20 4. Sécurité ......................................20 4.1 Utilisation conforme aux prescriptions................................
FRANÇAIS câble de rallonge doivent se trouver dans une zone non inondable. x Les câbles de rallonge doivent avoir une section de conducteur suffisante (voir "Caractéristiques techniques"). Les tambours de câble doivent être entièrement déroulés. x Ne pas plier, aplatir, tirailler, ni écraser les câbles d'alimentation et les câbles de rallonge et les protéger des arêtes vives, de l'huile et de la chaleur.
FRANÇAIS 5.5 Raccordement au secteur 4. dus à l'électricité ! B Dangers L'appareil ne doit pas être uti- Revisser la vis de remplissage et le joint. 5. Ouvrir la conduite sous pression (tourner le robinet d'eau ou la buse de pulvérisation) afin que l'air puisse s'échapper lors de l'aspiration. 6. Mettre en marche l'appareil (voir "Fonctionnement"). 7. Quand de l'eau sort de manière régulière, éteindre l'appareil. lisé dans un environnement humide.
FRANÇAIS 7.2 1. Éteindre l'appareil, débrancher la fiche secteur. 2. Ouvrir la conduite sous pression (tourner le robinet d'eau ou la buse de pulvérisation), attendre que toute l'eau se soit écoulée. 3. Vider complètement la pompe. Pour cela, dévisser la vis d'évacuation de l'eau en bas de la pompe. 4. Débrancher de l'appareil la conduite d'aspiration et la conduite sous pression. 5. Placer l'appareil dans une pièce à l'abri du gel (5 °C au minimum).
FRANÇAIS 10. Protection de l'environnement H L'emballage de l'appareil est entièrement recyclable. Les appareils et les accessoires usagés contiennent de grandes quantités de matières premières et de matières plastiques précieuses qui peuvent être également recyclées. 11. Accessoires disponibles I J Vous trouverez dans les commerces spécialisés les accessoires suivants pouvant être utilisés avec cet appareil.
FRANÇAIS 12. Caractéristiques techniques P 3000 S P 3300 S HWA 3300 S P 4000 S HWA 4000 S Tension secteur V 230 ~ 1 Fréquence Hz 50 Puissance nominale W 900 1100 1300 Courant nominal A 3,6 4,5 4,5 Protection min. par fusibles (disjoncteur de type B ou fusible à action retardée) A 10 10 10 Condensateur de service PF 16 16 20 tr/min 2800 2800 2800 Débit max. l/h 3000 3300 4000 Hauteur de refoulement max. m 43 45 48 Pression de refoulement max.
XP0029H1.fm Handleiding NEDERLANDS NEDERLANDS 1. Het apparaat in een oogopslag 8 9 1 2 10 3 11 4 12 5 1 Drukaansluiting 2 Watervulschroef 3 Zuigaansluiting 4 Wateraflaatschroef 5 Pomp 6 hoofdschakelaar 7 Netsnoer met stekker 26 6 13 7 A Let op! Bij vervuild transportmedium aanzuigfilter gebruiken (zie "Leverbare toebehoren"). 3 Opmerking: Bij deze pomp is een terugslagklep aan de zuigaansluiting raadzaam (zie "Leverbare toebehoren").
NEDERLANDS Inhoudstafel 1. Het apparaat in een oogopslag.................................. 26 2. Lees dit eerst! ........................... 27 3. Toepassingsgebied en transportmedia.......................... 27 4. Veiligheid................................... 27 Wanneer u het apparaat uitleent of verkoopt, geef dan alle meegeleverde documenten mee. Explosieve, ontvlambare, agressieve of schadelijke stoffen mogen niet worden getransporteerd.
NEDERLANDS tegen scherpe kanten, olie en hitte beschermen. x x Het verlengsnoer mag niet in contact komen met de te transporteren vloeistof. Netstekker uit het stopcontact trekken: vóór alle werkzaamheden aan het apparaat; wanneer zich personen in het zwembad of in de tuinvijver bevinden. A x x x x Controleer het toestel, vooral netkabel en netsteker vóór iedere ingebruikneming op eventuele beschadigingen.
NEDERLANDS 6.2 Verlengsnoeren moeten een voldoende grote aderdoorsnede bezitten (zie "Technische gegevens“). Kabeltrommels moeten volledig afgerold zijn. 5.6 3 Opmerking: De pomp met hydromaat is bedrijfsgereed, zo lang de in-/uitschakelaar is ingeschakeld. Pomp vullen en aanzuigen A Let op! Bij iedere nieuwe aansluiting of bij waterverlies resp. luchtaanzuiging moet de pomp met water worden gevuld.
NEDERLANDS lang ingedrukt houden tot water vrijkomt. 7. Onderhoud en service A Gevaar! Alvorens u met werkzaamhe- Er is geen netspanning. • Controleer het snoer, de stekker, het stopcontact en de zekering. De netspanning is te laag. • Verlengkabel met voldoende aderdoorsnede gebruiken (zie "Technische gegevens"). Motor oververhit, motorbeveiliging geactiveerd. • Na het afkoelen wordt het apparaat automatisch opnieuw ingeschakeld.
NEDERLANDS H 2) 7 m, compleet met snelschroefverbinding en zuigkorf met voetklep; Spiraalslang 1" (professioneel) 1) 1,5 m, compleet, met aan beide zijden snelschroefverbinding; 2) 4 m, compleet met snelschroefverbinding en zuigkorf met voetklep; 3) 7 m, compleet met snelschroefverbinding en zuigkorf met voetklep; I J K L Metalen slang 500 mm Multiadapter 1" ideaal voor de aansluiting op een pomp met 1" IG-aansluiting (AG=buitendraad, IG=binnendraad) Hydrostop, voor het automatische uitschakelen bij w
XP0029C1.fm Betjeningsvejledning DANSK DANSK 1. Maskinen i overblik 8 9 1 2 10 3 11 4 12 5 1 Tilslutning af tryk 2 Vandpåfyldningsskrue 3 Indsugningstilslutning 4 Vandaftapningsskrue 5 Pumpe 6 Start-/stop-kontakt 7 Strømkabel med stik 32 6 13 7 A NB! Ved urene medier skal der anvendes et indsugningsfilter (se "Leverbart tilbehør"). 3 OBS : Det anbefales at der anvendes en kontraventil på indsugningsåbningen på denne pumpe (se "Leverbart tilbehør").
DANSK følge af at denne betjeningsvejledning ikke blev overholdt. Ændringer på apparatet samt ved brug af dele, som ikke er testet eller godkendt af producenten, er ikke tilladte! Informationerne i denne betjeningsvejledning er markeret som følger: Al anden anvendelse er i modstrid med apparatets formål. Producenten påtager sig intet ansvar for skader, som opstår som følge af ukorrekt anvendelse. Indholdsfortegnelse 1. Maskinen i overblik................... 32 2. Læses først! ........................
DANSK pga. mangler på apparaA Fare tet! x x x x Hvis du skulle konstatere en transportskade kontakt da omgående din forhandler. Apparatet må ikke sættes i drift. For at undgå vibrationer, bør apparatet opstilles på et elastisk underlag. Opstillingsstedet skal være godt udluftet og beskyttet mod vejrlig. Kontroller apparatet, især kabel og stik for eventuelle beskadigelser hver gang apparatet tages i brug.
DANSK 2. Hæld langsomt rent vand i, indtil pumpen er fyldt. 3. Såfremt du ønsker at afkorte indsugningstiden, kan indsugningsledningen også fyldes. 4. Vandpåfyldningsskruen skrues igen sammen med pakningen. i 20 5. Åben trykledningen (vandhane eller sprøjtedyse åbnes), så luften kan strømme ud ved indsugningen. 21 6. Tilslut apparatet (se "Drift"). 7. Siver der vand ud, skal apparatet slås fra. (Pumpekarakteristik for sugehøjde 0,5 m og 1"-indsugningsslange.) 6.1 6.
DANSK 3. For at kunne tømme pumpen helt, drejes vandaftapningsskruen ud under pumpen. 4. Afmonter indsugnings- og trykledning fra apparatet. 5. Opbevar apparatet i et rum, der er beskyttet mod frost (mindst 5 °C). 8. Problemer og forstyrrelser A Fare! Før alle arbejder på maskinen: 1. Sluk for apparatet. 2. Træk stikket ud. 3. Kontroller at apparatet og tilsluttet tilbehør er trykløst. 8.1 Hydromaten er slået fra. • Tryk på reset-tasten. Transporteres der intet vand efter ca.
DANSK 12. Tekniske Data P 3000 S P 3300 S HWA 3300 S P 4000 S HWA 4000 S Netspænding V 230 ~ 1 Frekvens Hz 50 Mærkeeffekt W 900 1100 1300 Mærkestrøm A 3,6 4,5 4,5 Sikring min. (træg eller B-automat) A 10 10 10 Driftskondensator PF 16 16 20 min 2800 2800 2800 Pumpekapacitet maks. l/h 3000 3300 4000 Pumpehøjde maks. m 43 45 48 Transporttryk maks. bar 4,3 4,5 4,8 Sugehøjde maks. m 7 8 8 Tilførselstemperatur maks. °C 35 35 35 Rumtemperatur °C 5 ...
XP0029S1.fm Manual de uso ESPAÑOL ESPAÑOL 1. Vista general del aparato 8 9 1 2 10 3 11 4 12 5 1 Toma de presión 2 Tornillo de llenado de agua 3 Toma de aspiración 4 Tornillo de cierre del agua 5 Bomba 6 Interruptor ON/OFF 7 Cable de red con enchufe 38 6 13 7 A ¡Atención! En caso de que el medio de bombeado esté sucio, utilizar un filtro de aspiración (véase Accesorios disponibles”).
ESPAÑOL Indice del contenido 1. Vista general del aparato ......... 38 2. ¡Lea esto en primer lugar!........ 39 3. Campo de aplicación y medios de bombeado............... 39 4. Seguridad .................................. 39 5. 5.2 Montaje ....................................... 40 5.3 Conexión del tubo de aspiración ................................... 40 El fabricante no se hace responsable de los daños debidos a la no observación de este manual de instrucciones.
ESPAÑOL tirar siempre del enchufe y no del cable. x La caja de enchufe con puesta a tierra o la conexión de enchufe con un cable de extensión deben disponer de un seguro contra inundaciones. x Los cables de extensión deben contar con la sección del conductor suficiente (véase “Características técnicas”). Los tambores de cables deben estar totalmente desenrollados. x No doble, aplaste, pise ni tire de los cables de red o extensión; protéjalos contra cantos afilados, aceite y calor.
ESPAÑOL 5.5 Conexión a la red B ¡Peligro por electricidad! Accione el aparato siguiendo estas condiciones previas y nunca en un ambiente húmedo: La conexión debe realizarse siempre en cajas de enchufe con puesta a tierra, instaladas correctamente y comprobadas. La tensión de alimentación y la protección por fusible deben corresponderse con las características técnicas.
ESPAÑOL 20 Lámpara de tensión (verde) 8. Problemas y averías 21 Lámpara de bomba (blanca) A ¡Peligro! Antes de realizar cualquier tra- 22 Tecla RESET bajo en la máquina: 1. Desconecte el aparato. Conecte el enchufe de red. 2. Desenchufe el enchufe de red. 2. Verifique que la lámpara de tensión (20) está encendida. 3. 3. Abrir la tubería a presión. Asegúrese de que el aparato y los accesorios conectados no tengan presión. 4. Presione la tecla RESET (22). La bomba se pone en funcionamiento.
ESPAÑOL A B C D Juego completo de conexión de bombas (MSS 310 – HWA/P), incluido casquillo doble, válvula de retención, filtro corto, cartucho filtrante lavable, tubo flexible con espiral completo de 1 m, cinta hermetizante para roscas. Juego completo de conexión de bombas (MSS 380 – HWW), incluido casquillo doble, válvula de retención, filtro largo, cartucho filtrante lavable, tubo flexible con espiral completo de 1 m, cinta hermetizante para roscas.
ESPAÑOL P 3000 S P 3300 S HWA 3300 S P 4000 S HWA 4000 S bar 1,5 1,5 1,5 mm mm mm 470 250 300 470 / 470 250 / 250 300 / 415 470 / 470 250 / 250 300 / 415 Peso sin carga Peso con carga de agua kg kg 10,1 11,6 10,2 / 11,5 11,7 / 13 10,5 / 11,8 12,0 / 13,3 Valor de emisión de ruido (máxima presión) Nivel de potencia acústica LWAm Nivel de presión acústica LWAd dB(A) dB(A) 89 94 83 90 86 89 Hydromat Presión de puesta en servicio aprox.
XP0029G1.fm ȅįȘȖȓİȢ ȋȡȒıȘȢ DEUTSCH ǼȁȁǾȃǿȀǹ 1. ȈȣȞȠʌIJȚțȒ ʌĮȡȠȣıȓĮıȘ IJȘȢ ıȣıțİȣȒȢ 8 9 1 2 10 3 11 4 12 5 1 ȈȪȞįİıȘ ʌȓİıȘȢ 2 ȇȣșȝȚıIJȚțȩ ʌȜȒȡȦıȘȢ ȞİȡȠȪ 3 ȈȪȞįİıȘ ĮȞĮȡȡȩijȘıȘȢ 4 ȇȣșȝȚıIJȚțȩ İțțȑȞȦıȘȢ ȪįĮIJȠȢ 5 ǹȞIJȜȓĮ 6 ǻȚĮțȩʌIJȘȢ İȞİȡȖȠʌȠȓȘıȘȢ/ ĮʌİȞİȡȖȠʌȠȓȘıȘȢ 7 ȀĮȜȫįȚȠ ȝİ ijȚȢ 6 13 7 A ȆȡȠıȠȤȒ! ǹȞ IJȠ ĮȞIJȜȠȪȝİȞȠ ȣȜȚțȩ İȓȞĮȚ ĮțȐșĮȡIJȠ, ȞĮ ȤȡȘıȚȝȠʌȠȚİȓIJĮȚ ijȓȜIJȡȠ ĮȞĮȡȡȩijȘıȘȢ (įİȓIJİ ıȤİIJȚțȐ ıIJȠ "ǻȚĮșȑıȚȝĮ ȆȡȩıșİIJĮ ǼȟĮȡIJȒȝĮIJĮ").
ǼȁȁǾȃǿȀǹ ȀĮIJȐȜȠȖȠȢ ȆİȡȚİȤȠȝȑȞȦȞ 1. ȈȣȞȠʌIJȚțȒ ʌĮȡȠȣıȓĮıȘ IJȘȢ ıȣıțİȣȒȢ ...................................45 2. ȆȡȑʌİȚ ȞĮ IJȠ įȚĮȕȐıİIJİ!...........46 3. ȆİįȓȠ ȤȡȒıȘȢ țĮȚ ȝȑıĮ ȝİIJĮijȠȡȐȢ .................................46 4. ǹıijȐȜİȚĮ ...................................46 4.1 ȆȡȠȕȜİʌȩȝİȞȘ ȤȡȒıȘ .................46 4.2 īİȞȚțȑȢ İʌȚıȘȝȐȞıİȚȢ ĮıijĮȜİȓĮȢ.46 5. ȆȡȚȞ IJȘȞ ȑȞĮȡȟȘ IJȘȢ ȜİȚIJȠȣȡȖȓĮȢ ................................47 5.1 ȈȣȞĮȡȝȠȜȩȖȘıȘ Hydromat (ȝȩȞȠ ȖȚĮ IJȠ HWA) ......................47 5.
ǼȁȁǾȃǿȀǹ B ȀȓȞįȣȞȠȢ Įʌȩ IJȠȞ ȘȜİțIJȡȚıȝȩ! x Ǿ ĮțIJȓȞĮ IJȠȣ ȞİȡȠȪ įİȞ ʌȡȑʌİȚ ȞĮ țĮIJİȣșȪȞİIJĮȚ ĮʌİȣșİȓĮȢ ʌȡȠȢ IJȘ ıȣıțİȣȒ Ȓ ȐȜȜĮ ȘȜİțIJȡȚțȐ İȟĮȡIJȒȝĮIJĮ! ȀȓȞįȣȞȠȢ șĮȞȐIJȠȣ Įʌȩ ȘȜİțIJȡȠʌȜȘȟȓĮ! x ȃĮ ȝȘȞ ʌȚȐȞİIJİ ȝİ ȣȖȡȐ ȤȑȡȚĮ IJȠ ijȚȢ IJȠȣ țĮȜȦįȓȠȣ ȡİȪȝĮIJȠȢ! ȆȡȑʌİȚ ȞĮ ĮijĮȚȡİȓIJİ IJȠ ijȚȢ Įʌȩ IJȘȞ ʌȡȓȗĮ IJȡĮȕȫȞIJĮȢ ʌȐȞIJȠIJİ IJȠ ȕȪıȝĮ țĮȚ ȩȤȚ IJȠ țĮȜȫįȚȠ. x Ǿ ʌȡȓȗĮ ıȠȪțȠ Ȓ Ș ĮʌȜȒ ʌȡȓȗĮ ȝİ țĮȜȫįȚȠ ʌȡȠȑțIJĮıȘȢ ʌȡȑʌİȚ ȞĮ ȕȡȓıțȠȞIJĮȚ ıİ ʌİȡȚȠȤȒ ʌȠȣ įİȞ ȣʌȐȡȤİȚ țȓȞįȣȞȠȢ ȞĮ ʌȜȘȝȝȣȡȓıİȚ.
ǼȁȁǾȃǿȀǹ ȆȡȑʌİȚ ȞĮ įȚĮıijĮȜȓȗİIJĮȚ ȝȓĮ İʌĮȡțȒȢ IJȡȠijȠįȠıȓĮ ȞİȡȠȪ, țĮȚ IJȠ ȐțȡȠ IJȠȣ ıȦȜȒȞĮ ĮȞĮȡȡȩijȘıȘȢ ʌȡȑʌİȚ ʌȐȞIJȠIJİ ȞĮ ȕȡȓıțİIJĮȚ ȝȑıĮ ıIJȠ Ȟİȡȩ. ȆȡȩțİȚIJĮȚ ȖȚĮ ȝȓĮ ȖİȞȚțȒ ȝĮȢ ıȪıIJĮıȘ ȖȚĮ IJȘȞ ʌȡȠıIJĮıȓĮ ĮIJȩȝȦȞ. ȈȪȞįİıȘ ʌȓİıȘȢ 5.4 ȊʌȩįİȚȟȘ: 3 ǼȓȞĮȚ ʌȚșĮȞȩ ȞĮ ȤȡİȚĮıIJİȓIJİ țĮȚ ȐȜȜĮ ʌȡȩıșİIJĮ İȟĮȡIJȒȝĮIJĮ ȖȚĮ IJȘ ıȪȞįİıȘ (įİȓIJİ ıȤİIJȚțȐ ıIJȘȞ İȞȩIJȘIJĮ "ǻȚĮșȑıȚȝĮ ȆȡȩıșİIJĮ ǼȟĮȡIJȒȝĮIJĮ").
ǼȁȁǾȃǿȀǹ ĬȑıȘ IJȘȢ ĮȞIJȜȓĮȢ ıİ ȜİȚIJȠȣȡȖȓĮ 6.1 ĮʌȠșȘțİȪıIJİ IJĮ ȜĮȝȕȐȞȠȞIJĮȢ ȝȑIJȡĮ ʌȡȠıIJĮıȓĮȢ țĮIJȐ IJȠȣ țȚȞįȪȞȠȣ ĮȣIJȠȪ (įİȓIJİ ıȤİIJȚțȐ ıIJȘȞ İʌȩȝİȞȘ İȞȩIJȘIJĮ). 3 ǾȊʌȩįİȚȟȘ: ĮȞIJȜȓĮ ȜİȚIJȠȣȡȖİȓ, ȖȚĮ ȩıȠ 7.2 ȤȡȠȞȚțȩ įȚȐıIJȘȝĮ İȓȞĮȚ ıIJȘ șȑıȘ ȜİȚIJȠȣȡȖȓĮȢ Ƞ įȚĮțȩʌIJȘȢ İȞİȡȖȠʌȠȓȘıȘȢ/ ĮʌİȞİȡȖȠʌȠȓȘıȘȢ. 1. ȉȠʌȠșİIJȒıIJİ IJȠ ijȚȢ ȡİȪȝĮIJȠȢ. 2. ĬȑıIJİ ıİ ȜİȚIJȠȣȡȖȓĮ IJȘȞ ĮȞIJȜȓĮ ȝİ IJȠ įȚĮțȩʌIJȘ İȞİȡȖȠʌȠȓȘıȘȢ/ ĮʌİȞİȡȖȠʌȠȓȘıȘȢ. 3. ǹȞȠȓȟIJİ IJȠȞ ıȦȜȒȞĮ ʌȓİıȘȢ (ȖȣȡȓıIJİ țĮȚ ĮȞȠȓȟIJİ IJȘȞ țȐȞȠȣȜĮ IJȠȣ ȞİȡȠȪ Ȓ IJȠ ĮțȡȠijȪıȚȠ), 4.
ǼȁȁǾȃǿȀǹ • ȂİIJȐ IJȠ țȡȪȦȝĮ Ș ıȣıțİȣȒ IJȓșİIJĮȚ țĮȚ ʌȐȜȚ ĮȣIJȩȝĮIJĮ ıİ ȜİȚIJȠȣȡȖȓĮ. • ȂİȡȚȝȞȒıIJİ ȖȚĮ IJȘȞ İʌȐȡțİȚĮ IJȠȣ ĮİȡȚıȝȠȪ, țȡĮIJȒıIJİ İȜİȪșİȡȘ IJȘȞ ȠʌȒ ĮȑȡĮ. • ȃĮ IJȘȡİȓIJĮȚ Ș ȝȑȖȚıIJȘ șİȡȝȠțȡĮıȓĮ IJȡȠijȠįȠıȓĮȢ. ǹțȠȪȖİIJĮȚ Ƞ țȚȞȘIJȒȡĮȢ, ĮȜȜȐ įİȞ ȟİțȚȞȐ ȞĮ ȜİȚIJȠȣȡȖİȓ: • Ȃİ IJȠȞ țȚȞȘIJȒȡĮ İțIJȩȢ ȜİȚIJȠȣȡȖȓĮȢ, İȚıȐȖİIJİ ȑȞĮ țĮIJıĮȕȓįȚ Ȓ țȐʌȠȚȠ ʌĮȡȩȝȠȚȠ İȡȖĮȜİȓȠ įȚĮȝȑıȠȣ IJȘȢ ȠʌȒȢ ĮİȡȚıȝȠȪ IJȠȣ țȚȞȘIJȒȡĮ țĮȚ ȖȣȡȓıIJİ IJȘȞ ʌIJİȡȦIJȒ. ǹȞIJȜȓĮ ijȡĮȖȝȑȞȘ Ȓ İȜĮIJIJȦȝĮIJȚțȒ. • ǹʌȠıȣȞĮȡȝȠȜȠȖȒıIJİ țĮȚ țĮșĮȡȓıIJİ IJȘȞ ĮȞIJȜȓĮ.
ǼȁȁǾȃǿȀǹ 12. ȉİȤȞȚțȐ ȋĮȡĮțIJȘȡȚıIJȚțȐ P 3000 S P 3300 S HWA 3300 S P 4000 S HWA 4000 S ȉȐıȘ ȡİȪȝĮIJȠȢ V 230 ~ 1 ȈȣȤȞȩIJȘIJĮ Hz 50 ȅȞȠȝĮıIJȚțȒ ȚıȤȪȢ W 900 1100 1300 ȅȞȠȝĮıIJȚțȒ ȑȞIJĮıȘ ȡİȪȝĮIJȠȢ A 3,6 4,5 4,5 ǼȜȐȤȚıIJȘ ĮıijȐȜİȚĮ (ȤȡȠȞȚțȒȢ țĮșȣıIJȑȡȘıȘȢ Ȓ įȚĮțȠʌȒ țȣțȜȫȝĮIJȠȢ IJȪʌȠȣ Ǻ) A 10 10 10 ȆȣțȞȦIJȒȢ ȜİȚIJȠȣȡȖȓĮȢ PF 16 16 20 2800 2800 2800 ȅȞȠȝĮıIJȚțȩȢ ĮȡȚșȝȩȢ ıIJȡȠijȫȞ min -1 ȂȑȖ. ȚțĮȞȩIJȘIJĮ ȐȞIJȜȘıȘȢ l/h 3000 3300 4000 ȂȑȖ. ȪȥȠȢ ȐȞIJȜȘıȘȢ. m 43 45 48 ȂȑȖ.
A 090 306 1260 B 090 306 1278 C 090 306 1251 D 090 306 1243 E 090 305 0314 F 090 305 0306 G 1) 2) H 1) 2) 3) I 090 306 1340 J 090 301 8410 K 090 305 2597 L 090 302 8521 M 090 102 6319 N 090 302 8440 O 090 302 8360 52 090 306 1227 090 306 1235 090 306 1197 090 306 1100 090 306 1219 www.metabo.com ZINDEL AG - Technische Dokumentation und Multimedia, www.zindel.de U3P0062.