
Operation Manual


13
ENGLISH
3.4 MIG/MAG 170/30 XTC
3.5 MIG/MAG 200/40 XT,
MIG/MAG 250/60 XT,
MIG/MAG 300/45 XT
The welding machine is equipped with a
wheel set. This provides for convenient
relocation of the welding machine com-
plete with gas cylinder to the job site.
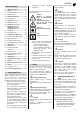
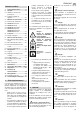
A
Danger!
• Close the cylinder's valve before
moving the machine.
• Bear in mind the welding
machine's heavy weight. Espe-
cially on sloping ground one can
quickly loose control over the
machine!
Walk along the intended way,
before setting out with the weld-
ing machine.
If necessary, let a second person
assist you!
• When on site, secure machine
against rolling away.
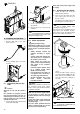
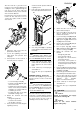
4.1 Hoisting by Crane
The welding machine may be hoisted by
crane.
A
Danger!
• Remove the gas cylinder from the
machine before hoisting.
Crane hoisting with a gas cylin-
der on the machine is prohibited!
• Hoisting at the handle is not per-
missible.
• Position hoisting slings as illus-
trated.
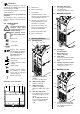
19 Earth cable connector (cable
socket 25)
20 Supply voltage selector
switch
230V – 0 (machine OFF) – 400V.
21 Welding step selector switch
Switches the welding current
(voltage) in six steps.
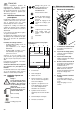
22 Connector for welding gun
Accepts all commercially avail-
able welding guns (Euro con-
nector KZ-2).
23 Earth cable connector (cable
socket 50)
24 Main switch
Position I: Machine turned ON,
if supply voltage of 230V or
400V is selected with the sup-
ply voltage selector switch (26).
Position 0: Machine turned
OFF, earthed outlet opera-
tional.
25 Earthed outlet
Works only with neutral wire in
mains supply line and machine
turned OFF.
26 Supply voltage selector
switch
230V – 0 (machine OFF) –
400V.
27 Welding step selector switch
Switches the welding current
(voltage) in six steps.
23
22
24
25
26
27
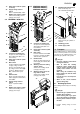
28 Connector for welding gun
Accepts all commercially avail-
able welding guns (Euro con-
nector KZ-2).
29 Earth cable connector (cable
socket 50)
30 Main switch
Position I: Machine turned ON
Position 0: machine turn OFF,
earthed outlet operational
31 Earthed outlet
Works only with neutral wire in
mains supply line and machine
turned OFF.
32 Welding current fine setting
selector switch
Switches the welding current
(voltage) in six steps.
33 Welding current coarse set-
ting selector switch
Switches the welding current
(voltage) in two steps.
29
28
30
31
32
33
34
34 Backburn time potentiometer
Knob turned fully to the
left = minimum backburn time
35 Chain holder
Chain secures gas cylinder on
machine
36 Shielding gas line
37 Power supply cable
4. Transport
35
36
37