
Operation Manual

21
ENGLISH
6.2 Safety
Safety Devices
• Cutterblock guard
The cutterblock cover prevents the rotat-
ing cutterblock from being touched when
surface planing.
For effective protection the cutterblock
cover must always be adapted to the
workpiece.
Information for a safe operation
Risk of kickback!
Risk of injury by workpiece
kickback (workpiece is caught by the
rotating cutterblock and thrown back
against the operator):
− Always use sharp cutter knives.
− If in doubt check workpiece for inclu-
sion of foreign objects (e.g. nails,
screws, lose knots).
− Always plane the workpiece over its
full length.
Risk of injury by touching the
rotating cutterblock:
− always keep your hands well clear
of the cutterblock.
− When jointing, use the jointer
fence to provide firm support for
the workpiece. Use an auxiliary
fence when planing thin or nar-
row stock, to keep your hands at
a safe distance from the cutter-
block.
− Always cover the part of the cutter-
block that is not covered by the
workpiece with the cutterblock
cover.
− Adjust the cutterblock cover exactly
to the dimension of the workpiece.
− Never reach with your hands under
the cutterblock cover when guiding
the workpiece!
− Use workpiece supports (such as
table extensions) to keep long
stock from losing its balance.
− Plane only stock which rests
securely on the table.
− Use a feeding aid (push block) when
planing a small workpiece, which
can not be guided with a sufficient
safety distance to the cutterblock.
− Do not pull the workpiece back over
the unguarded cutterblock!
Risk of injury by cuts with cut-
terblock at standstill:
− Always cover the cutterlock with the
guard extrusion of the cutterblock
cover when the machine is not used
as thickness planer.
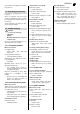
6.3 Operation
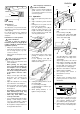
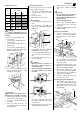
1. Place stock against the jointer fence
(16).
2. Adjust cutterblock guard extrusion
(17):
− Planing the face of a plank or work-
pieces up to 75 mm thick:
Use the adjusting screw (18) to
adapt the guard extrusion to the
height of the workpiece. When guid-
ing the workpiece the hands slide
over the guard extrusion.
− when planing narrow edges (edge
jointing) or workpieces more than
75 mm thick:
Loosen adjusting screw (19) to
adapt the guard extrusion to the
width of the workpiece.
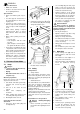
3. Setting the planing thickness at the
infeed table (20):
Loosen locking screw (21);
set planing thickness with the regu-
lating screw (22).
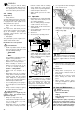
4. When planing thickness is set,
tighten locking screw (21).
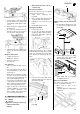
5. Height adjustment of outfeed table
(23):
Loosen locking screw (24);
Set cutter knife setting gauge (26)
as illustrated in direction of arrows
on the outfeed table (27);
The edge (28) of the setting gauge
must fit closely to the edge of the
outfeed table;
adjust height position of the outfeed
table with the regulating screw (25)
– the setting is correct when the cut-
ter knife (29), at the highest point,
barely touches the setting gauge.
6. When the outfeed table is adjusted,
tighten locking screw (24).
7. Set operating mode selector to
planer/thicknesser mode.
8. Start motor.
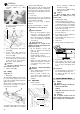
9. Assume proper operating position:
position yourself to one side of the
infeed table.
10. Feed workpiece straight across the
infeed table. Holding your fingers
close together, guiding the work-
piece with the palm of your hands.
11. Switch machine off if no further plan-
ing is to be done immediately after-
wards.
15
16
18
17
19
21 22
20
23
2425
26 28
27
29