
Operation Manual

22
ENGLISH
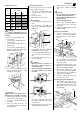
Workpiece dimensions
• Width: max. 309 mm.
• Thickness: at least 4 mm more than
the set planing thickness.
Tips and Tricks
• Plane stock with the grain, if possi-
ble.
• Use roller supports on both sides of
the planer/thicknesser when work-
ing long stock.
• It is better to make several passes
with less chip removal, than making
only a few passes with a high depth
of cut.
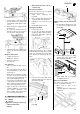
• When surface planing a warped
(twisted) board, place on infeed
table with the hollow side facing
down.
• When surface planing short work-
pieces:
− use push stick;
− feed workpiece with the small
face first;
− guide workpiece turned approx.
20° against the direction of feed.
• Keep surfaces of planing beds clean
– in particular, remove resin residue
with a suitable cleaning and mainte-
nance spray (optional accessory).
• Apply an anti-seize compound to all
planing bed surfaces afterwards.
This makes feeding easier and pro-
vides for a smoother surface finish.
7.1 Setup
Danger!
Before setting the machine up:
− Switch machine OFF.
− Unplug.
− Wait until machine has come to a
complete stop.
Work area preparation
Ensure the removal of all not required
objects from the work area:
1. Saw blade and blade guard fully
retracted and covered by table
insert?
2. Saw set to 45 ° bevel tilt and
locked?
3. Cutter fence completely dis-
mounted?
4. Cutter spindle fully retracted and
covered by table rings and insert?
5. Morticing bit chuck covered?
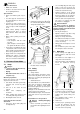
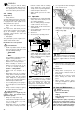
Connecting the dust collection
attachment
1. Unlock the infeed table (30) and
carefully lift it up.
2. Remove the dust chute for jointing.
3. Unlatch the locking lever (31) under
the outfeed table (32) and carefully
swing outfeed table open.
4. Swing dust chute for thickness plan-
ing (33) up and let engage.
5. Connect a suitable dust collector to
the dust chute's suction port.
7.2 Safety
Safety Devices
• Safety switches
Three limit switches prevent the cutter-
block from being driven, unless the cut-
terblock is covered by the planing beds
or the dust chute.
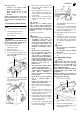
• Anti-kickback lock
The anti-kickback lock (underneath the
dust chute for thickness planing (33))
prevents the workpiece from being
thrown back against the operator by the
rotating cutterblock.
All fingers of the anti-kickback lock must
end in a point on the underside.
All anti-kickback fingers must automati-
cally return to their rest position (down-
wards).
Information for a safe operation
Danger! Drawing-in/trapping
hazard!
− Never reach with your hands into
the machine when guiding the work-
piece!
− Use a feeding aid (push stick) if you
want to feed short stock into the
thicknesser. Stock to be thicknessed
must be at least 200 mm long.
− Guide a workpiece on the outfeed
side if it has been fed so far into the
thicknesser that it can no longer be
safely guided from the infeed side.
− Remove stuck stock only after motor
has come to a complete stop and
the machine is unplugged.
Risk of kickback!
Risk of injury by workpiece
kickback (workpiece is caught by the
rotating cutterblock and thrown back
against the operator):
− Do not jam workpieces.
− Operate machine only with a fully
functional anti-kickback lock.
− Always use sharp cutter knives.
− If in doubt check workpiece for inclu-
sion of foreign objects (e.g. nails,
screws, lose knots).
− Always plane the workpiece over its
full length.
− Do not thickness plane more than
two workpieces at the same time.
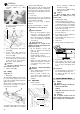
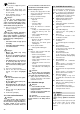
7.3 Operation
1. Loosen locking screw (34) and set
planing thickness with the hand-
wheel (35).
− The thicknesser bed adjusts in a
range from 5 mm to 200 mm.
− One full revolution of the handwheel
moves the thicknesser bed by
6,3 mm.
2. Tighten locking screw (34) again.
3. To thickness plane stock which sur-
faces are not parallel, use suitable
feeding aids (make fitting tem-
plates).
4. Set operating mode selector to
planer/thicknesser mode.
5. Start motor.
6. Assume proper operating position:
to feed the workpiece into the
machine, position yourself offset to
one side of the feed opening.
7. Thickness Planer Mode
30
31
32
33
34 35