
Operation Manual

23
ENGLISH
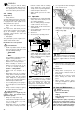
7. Feed workpiece slowly and straight
into the thicknesser. It will then be
automatically fed through the thick-
nesser.
8. Guide workpiece straight through
the thicknesser.
To remove the workpiece from the
machine, position yourself offset to
one side of the outfeed opening.
9. Switch machine off if no further plan-
ing is to be done immediately after-
wards.
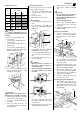
Workpiece dimensions
• Length: min. 200 mm.
• Width: max. 309 mm.
• Thickness: min 5 mm;
max. 200 mm.
Tips and Tricks
• Plane stock with the grain, if possi-
ble.
• Use roller supports on both sides of
the planer/thicknesser when work-
ing long stock.
• When thickness planing it is better
to make several passes with little
chip removal, than making only few
passes with a high depth of cut.
• Keep surfaces of planing beds clean
– in particular, remove resin residue
with a suitable cleaning and mainte-
nance spray (optional accessory).
• Apply an anti-seize compound (for
example WAXILIT) to all planing
bed surfaces afterwards. This
makes feeding easier and provides
for a smoother surface finish.
8.1 Setup
Danger!
Before setting the machine up:
− Switch machine OFF.
− Unplug.
− Wait until machine has come to a
complete stop.
Work area preparation
Ensure the removal of all not required
objects from the work area:
1. Cutter fence completely dis-
mounted?
2. Cutter spindle fully retracted and
covered by table rings and insert?
3. Cutterblock cover lowered on the
table?
4. Morticing bit chuck covered?
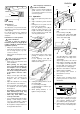
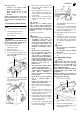
Raising the saw blade
1. Remove table insert.
2. To raise the saw blade, turn blade
guard lever (36) counter-clockwise,
push down and tighten again by
turning clockwise.
Replace the kerf plate. To do so, slightly
bend the table insert apart at its rear and
slide over saw blade and riving knife.
Then fit table insert flush into the saw
table.
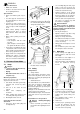
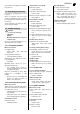
Rip fence installation
1. Place the fence carrier (37) on the
guide bar (38) and secure with the
star-knob screw (39).
2. Cover cutterblock with the cover
plate (40).
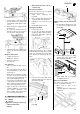
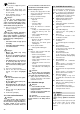
Sliding carriage side extension instal-
lation
1. Fit strut (41) as illustrated into seat
of extension arm (42) and table
bracket (43).
2. Fit table (45) into groove of sliding
carriage and secure at both ends
with a clamping plate (46).
3. Adjust height with the regulating
screw (44) in the strut.
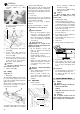
Mitre fence installation
The mitre fence can be used both in
front of or behind the workpiece.
• When used in front of the
workpiece –
especially suitable for cutting ledges
and boards:
8. Operation as Table Saw
36
37
3938
40
41
42
43
44
45
46