
Operation Manual

24
ENGLISH
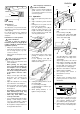
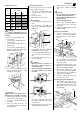
• When used behind the workpiece –
especially suitable for cutting
sheets:
1. Loosen screws (47) until fence car-
rier can be pushed in the groove of
the sliding carriage.
2. Set to desired angle and tighten
screws (47).
3. Loosen screws (48), until fence
extrusion can be pushed on the
fence carrier (49).
4. Shift the wooden end piece, if nec-
essary. The end piece must be fitted
on the end of the fence extrusion
that reaches to the saw blade.
Caution!
The fence extrusion must not
extend into the line of cut!
5. Tighten screws (48).
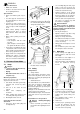
8.2 Safety
Safety Devices
• Riving knife
The riving knife (50) prevents the work-
piece from being caught by the rising
teeth of the saw blade and being thrown
against the operator.
When sawing, the riving knife must be
positioned at a distance of 3 mm to
8 mm from the saw blade.
• Blade guard
The blade guard (51) protects against
accidental contact with the saw blade
and from chips flying about.
When using the saw, the blade guard
must alway be positioned so that the dis-
tance between the workpiece and lower
front edge of the blade guard is not more
then 2 mm.
• Push stick
The push stick serves as an extension of
the hand and protects against accidental
contact with the saw blade.
Always use push stick if distance
between
rip fence and saw blade is ≤ 120 mm.
Information for a safe operation
General Hazard:
− Never cut several workpieces at the
same time – and also no bundles
containing several individual pieces.
Risk of personal injury if individual
pieces are caught by the saw blade
uncontrolled.
Risk of kickback!
Workpiece is caught by the
rotating saw blade and thrown back
against the operator:
− Do not attempt to stop the saw
blade by pushing the workpiece
against its side.
− Always hold the workpiece down on
the table and do not jam it.
− always work with a properly set riv-
ing knife.
− Always use sharp saw blades. If in
doubt check workpiece for inclusion
of foreign objects (e.g. nails, screws,
lose knots).
Danger! Drawing-in/trapping
hazard!
− Use a feeding aid (push stick) if you
want to cut short stock.
− Never cut stock to which ropes,
cords, strings, cables and wires are
attached or which contain such
materials.
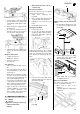
8.3 Operation
1. Set bevel angle:
− Loosen lock lever (52).
− Tilt the sawhead to obtain the
desired bevel angle.
− Tighten lock lever (52) to hold the
saw blade in position.
Caution!
When working with a tilted
sawblade, the auxiliary fence (53)
must be used.
2. Cutting height setting:
− Turn lever (54) counter-clockwise.
− Set desired cutting height by raising
or lowering the lever – the distance
between the workpiece and lower
front edge of the blade guard must
not be more than 2 mm.
− Turn lever (54) clockwise to secure
it in the position set.
3. If necessary use fence, sliding car-
riage or table extension.
4. Set operating mode selector to cir-
cular saw mode.
5. Start motor.
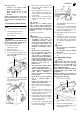
6. Assume proper operating position:
7. Cut workpiece in a single pass.
8. Stop machine and lower the saw
blade guard fully, if no further cutting
is to be done immediately after-
wards.
Tips and Tricks
• Use roller supports on both sides of
the saw when cutting long stock.
• To simplify repetitive cut-off work
use a stock stop.
9.1 Setup
Danger!
Before setting the machine up:
− Switch machine OFF.
− Unplug.
− Wait until machine has come to a
complete stop.
Caution!
In spindle moulder mode the
cutter spindle speed must be selec-
ted according to the cutter diameter!
47
4849
5150
52
53
54
9. Spindle Moulder Mode