
Operation Manual


26
ENGLISH
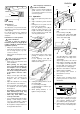
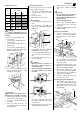
2. Make a test pass with the sliding
carriage (motor OFF, without stock):
The guard plate must always stay
clear of the cutter by at least 10 mm.
9.2 Safety
Safety Devices
• Safety switches
A safety switch prevents the cutter spin-
dle from being driven while the lock pin
is engaged in the cutter spindle or the
drive guard hood is opened.
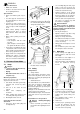
• Cutter fence with lateral pressure
shoe
The cutter fence and lateral pressure
shoe provide a support for the safe guid-
ing of the workpiece, protect against
accidental contact with the cutter and
chips flying about.
• Guard plate
The guard plate protects against acci-
dental contact with the cutter.
Information for a safe operation
General Hazard:
− Install only suitable cutters. A cutter
must correspond to EN 847-1 and
carry the follwing markings:
− "HAND FEED"
or
− "MAN".
The installation of grinding or polish-
ing disks is not permissible.
− Before switching on check to see
that the tool is securely clamped.
− Before switching on check to see
that the tool can turn freely. To do
so, turn tool carefully by hand –
Caution – cutting hazard!
− Always work one workpiece at a
time.
− Depending on the job use suitable
safety devices, which prevent unin-
tentional contact with the rotating
cutter. Adapt these safety devices
exactly to the respective application
and the workpiece dimensions.
− Use a feeding aid if you are going to
work a workpiece less than 300 mm
long.
− Always feed the workpiece against
the cutter’s direction of rotation.
Risk of kickback!
Workpiece is caught by the
rotating cutter and thrown back
against the operator:
− Always use sharp cutters only.
− If in doubt check workpiece for inclu-
sion of foreign objects (e.g. nails,
screws, lose knots).
− Depending on the job use suitable
safety devices, which prevent unin-
tentional contact with the rotating
cutter. Adapt these safety devices
exactly to the respective application
and the workpiece dimensions.
− Adapt spindle speed to the cutter
diameter.
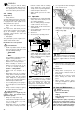
9.3 Operation
1. Depending on job, install and adapt
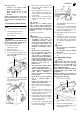
cutter, cutter fence, lateral pressure
shoe and/or guard plate.
Also use sliding carriage, G-cramps
or table extension, if necessary.
2. Adjust spindle speed relevant to the
cutter diameter.
3. Set operating mode selector to spin-
dle moulder mode.
4. Start motor.
5. Assume proper operating position:
6. Loosen locking screw (69) and set
cutting height with handwheel (70)
(any possibly fitted auxiliary fence
will be cut by this process). Tighten
locking screw (69).
Note:
The auxiliary fence is a wearing
part. It is therefore necessary to fabri-
cate a new auxiliary fence if the clear-
ance zone around the cutter has
enlarged the extent that the workpiece
can no longer be safely guided.
7. Work the workpiece.
8. Use a push block when working the
ends of narrow stock.
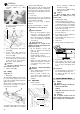
9. When working across the grain
(making slots and tenons), use ten-
oning table, stock clamp (71) and
sliding carriage (72).
Note:
Further information on installation
and operation is found in the operating
instructions supplied with the Tenoning
Table.
10. Switch machine off if no further plan-
ing is to be done immediately after-
wards.
Tips and Tricks
• Always make several passes if a
large amount of material needs to
be removed.
• Make trial cuts on a piece of scrap
before working the actual work-
piece.
• When working complex shapes,
make jigs and guides to guide the
workpiece properly.
Danger!
Prior to all servicing:
− Switch machine OFF.
− Unplug.
− Wait until machine has come to a
complete stop.
Replace defective parts, especially of
safety devices with genuine replace-
ment parts only. Parts not tested and
approved by the equipment manufac-
turer can cause unforeseen damage.
69
70
10. Care and Maintenance
71 72