
Operation Manual

27
ENGLISH
After all servicing:
− Check to see that all safety
devices are operational.
− Make sure that no tools or other
parts remain on or in the
machine.
Repair and maintenance work other
than described in this section should
only be carried out by qualified speci-
alists.
10.1 Replacing Cutter Knives
Note:
Worn cutter knives are noticeable
by
− reduced planing performance;
− increased risk of kickback;
− motor overloads.
Danger!
Risk of personal injury by cuts
from the cutter knives! Wear gloves
when changing cutter knives.
To remove the cutter knives:
1. Unplug power cable.
2. Remove the fence.
3. Remove the cutterblock cover.
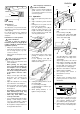
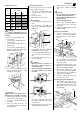
4. Loosen locking screw (73) and raise
outfeed table (74) fully with the regu-
lating screw (75).
5. Turn the four square-head bolts (76)
of the cutter knife lockbar (77) all the
way in (wear gloves!).
6. At first remove cutter knife (78), then
cutter knife lockbar (77) from the
cutterblock (79).
7. In the cutterblock’s groove there are
still two springs. Note exact position
of the springs (for reassembly), then
remove them.
8. Clean all surfaces of cutterblock and
cutter knife lockbar with a suitable
solvent.
Danger!
Do not use cleaning agents
(e.g. to remove resin residue) that
could corrode the light metal compo-
nents; the stability of the light metal
components would be adversely
affected.
To install the cutter knives:
Danger!
− Use only suitable cutter knives
conforming to EN 847-1 (see
"Available Accessories") – unsui-
table, incorrectly mounted, blunt
or damaged cutter knives can
work loose or increase the risk of
kickback considerably respec-
tively.
− Always replace all cutter knives.
− On the cutterblock and cutter
knife lockbar the numbers "1"
and "2" and "3" respectively are
punched in. When reassembling,
ensure that the numbers on cut-
terblock and cutter knife lockbar
match, otherwise damage to the
bearings could occur by a
balance error.
− Only cutter knives marked "HSS"
or "HS" can be resharpened!
When resharpening, remove the
same amount of material from all
cutter knives, otherwise a
balance error may cause damage
to the bearings.
− Cutter knives can only resharpe-
ned to a minimum width of
12 mm.
− Install cutter knives using only
genuine replacement parts.
9. Place spring clips back into their ori-
ginal position in the cutterblock’s
groove.
10. Place the cutter knife lockbar in the
cutterblock’s groove. Turn the four
square-head bolts so far out that the
cutter knife will just slide in.
11. Insert a sharp cutter knife and adjust
position with the cutter knife lockbar,
so that neither protrudes over the
edge of the cutterblock.
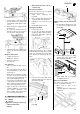
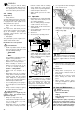
12. Set cutter knife setting gauge (80)
as illustrated in direction of arrows
on the outfeed table (81);
The setting gauge must rest with its
edge (82) against the front edge of
the infeed table.
13. Adjust position of cutter knife (83):
The setting is correct when the cut-
ter knife, at the highest point, barely
touches the setting gauge.
14. Make adjustment at both ends of the
cutter knife.
15. To tighten the cutter knife, turn the
four square-head bolts of the cutter
knife lockbar fully out. Start with the
two outer bolts, then tighten the cen-
tre bolts.
Danger!
− Do not extend tool when tighte-
ning the bolts.
− Do not tighten bolts by striking
the wrench.
16. Install the cutterblock guard extru-
sion.
10.2 Saw blade change
Danger!
Directly after cutting the saw
blade can be very hot – burning
hazard! Let a hot saw blade cool
down. Do not clean the saw blade
with combustible liquids.
Risk of injury, even with the blade at
standstill. Wear gloves when chan-
ging blades.
When assembling, the direction of
rotation of the saw blade and outer
flange must be observed!
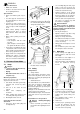
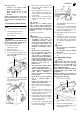
1. Remove table insert (84).
2. Lift saw blade up and lock in posi-
tion.
3. Remove the blade guard (85).
4. Hold the saw spindle with the reten-
tion pin (86) to lock it.
73
74
75
767778
79
80 82
81
83
84
85
86
87