
User Manual


ENGLISH en
9
4.5 Hazard generated by tool defects!
– Keep tool and accessories in good repair.
Observe the maintenance instructions.
– Prior to each use check the tool for any eventual
damage: Before continuing to use the tool,
safety devices, protective devices or lightly
damaged parts must be carefully inspected for
correct and proper operation. A damaged
device must only be reused after it has been
correctly repaired.
– Check to see that all moving parts work properly
and do not jam. All parts must be correctly
installed and fulfil all conditions necessary to
ensure perfect operation of the unit.
– Damaged protection devices or parts must be
repaired or replaced by a qualified specialist.
4.6 Additional Safety Instructions
– Please also observe the special safety
instructions in the respective chapters.
– Observe any particular health and safety or
accident prevention regulations governing the
use of compressors and compressed air tools.
– Observe the legal provisions for the operation of
systems requiring monitoring.
– Keep in mind that escaping condensate and
other consumables contaminate the
surrounding area and may trigger damage to the
environment during operation and storage of the
tool.
– Consider environmental conditions:
4.7 Symbols on the machine (depends
on model)
Read the operating instructions.
Warning of personal injury by touching hot
parts.
Wear eye goggles
Wear ear protectors.
Warning of automatic startup.
Danger - electrical voltage.
Guaranteed sound power level.
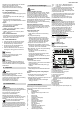
4.8 Safety devices
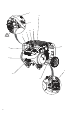
Safety valve
The spring-loaded valve (4) reacts if the permitted
maximum pressure is exceeded.
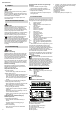
See page 2.
1compressor
2 pressure vessel
3 condensate outlet
4 safety valve
5 connection for compressed air (quick
coupling), regulated compressed air
6 manometer control pressure
7 pressure regulator
8 manometer boiler pressure
9ON/OFF Switch
10 air filter / air filter housing
11 transport handle *
12 crane eyelet *
13 fixture point for MetaLoc, Sortimo/LBoxx *
14 cable winder *
* depends on model / equipment
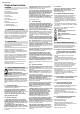
6.1 Assembly (depending on model)
1. Mount the tyres as shown (see fig. A, page 3).
2. If required, mount the crane eyelet (12) as
shown (see fig. B, page 3).
6.2 Check condensate outlet
Ensure that the condensate outlet (3) is closed.
6.3 Installation
The positioning site of the device has to meet the
following requirements:
– Dry, protected from frost
–Stable, horizontal and even surface
Danger!
Wrong positioning might cause serious accidents.
– Secure the device against rolling away, tilting
and slipping.
– Safety installations and operating elements
have to be easily accessible at any time.
6.4 Transport
– Do not pull the device from the hose or mains
cable. Transport the device at the transport
handle (11).
– Check the crane eyelet (12) for secure
fastening. If required fasten securely.
Extendable transport handle (depending on
model):
1. Place device on rear rubber feet.
2. Loosen the locking screws of the transport
handle and pull out transport handle (11).
3. Retighten the locking screws of the transport
handle.
4. Pull the device, while on its wheels, behind
you from the transport handle (11).
7.1 Power-supply connection
Danger! High voltage.
Operate the device in dry surroundings only.
Operate the device only at a power source
meeting the following requirements: Wall sockets
installed according to regulations, earthed and
tested; fuse protection according to the technical
data.
Position power supply cable so it does not
interfere with the work and is not damaged.
Check every time if the device is switched off,
prior to plugging the mains plug into the socket
outlet.
Protect power supply cable from heat, aggressive
liquids and sharp edges.
Use only extension cables with sufficient core
cross-section (see chapter 12. Technical Data).
Use extension cables for outdoor areas. When
working outdoors, only use the correspondingly
marked extension cable approved for this
purpose.
Do not switch off the compressor by pulling the
mains plug, but use the ON/OFF switch.
Always install an RCD with a maximum trip
current of 30 mA upstream.
7.2 Generate compressed air
1. Switch on the device using the ON/OFF switch
(9) and wait, until the maximum boiler
pressure has been reached (compressor
switches off). The boiler pressure is shown at
the boiler pressure manometer (8) .
Set the control pressure at the pressure reducer
(7) . The current control pressure is shown at the
control pressure manometer (6) .
Attention!
The set control pressure must not exceed the
maximum operating pressure of the connected
compressed air tools!
2. Connect the compressed air hose at the
compressed air inlet (5) .
3. Connect the compressed air tool. Now you
can work with the compressed air tool.
4. Switch off the tool if you don't want to continue
working immediately. Afterwards pull the
mains plug.
5. Drain the condensed water of the pressure
vessel at the condensate outlet (3) on a daily
basis.
Danger!
Prior to all servicing:
Switch machine off. Disconnect the mains plug.
Wait until the device has stopped. Ensure that
there is no more pressure on the device and all
used compressed air tools and accessories.
Leave the device and all used compressed air
tools and accessories to cool down.
After to all servicing:
Put back into operation and check all safety
installations. Ensure that there are no tools or
similar at or in the device.
Repair and maintenance work other than
described in this section should only be carried
out by qualified specialists.
8.1 Important information
Maintenance and test have to be planned and
carried out in accordance with the legal
provisions in line with the setup and mode of
operation of the device.
Regulatory authorities may ask to view respective
documentation.
8.2 Regular maintenance
Prior to every start
– Check compressed air hoses for damage and
replace, if necessary.
– Check that all screw fittings are seated securely,
and tighten if necessary.
– Check connection cables for damage, and, if
necessary, have it replaced by a qualified
electrician.
Daily
– Drain the condensed water of the pressure
vessel at the condensate outlet (3).
Every 50 hours of operation
– Clean air filter (10) (see fig. C, page 3).
Every 250 hours of operation
– Clean air filter (10) or replace (see fig. C, page
3).
Every 1000 hours of operation
– Have an inspection carried out in an authorised
service centre. This significantly increases the
service life of the compressor.
8.3 Storage of device
1. Switch off the device and pull mains plug.
2. Depressurise the pressure vessel and all
connected compressed air tools.
3. Drain the condensed water of the pressure
vessel at the condensate outlet (3).
4. Store the device in such a way that
unauthorised persons cannot start it.
Attention!
Do not store the tool outdoors or in damp
conditions without protection.
Danger of frost
Attention!
Frost (< 5 °C) destroys the pump and accessories
as both always contain water! If there is a danger
of frost disassemble pump and accessories and
store in frost-free conditions.
5. Overview
6. Commissioning
7. Operation
8. Care And Maintenance