
Instructions
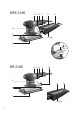
Table Of Contents

ENGLISHen
10
10 End cap*
* depending on the model / equipment
Before plugging in, check that the rated mains
voltage and mains frequency, as stated on the
type plate match your power supply.
Always install an RCD with a maximum trip
current of 30 mA upstream.
6.1 Installation of sanding disc
Sanding sheet with velcro-type fastening
Simple attachment and removal thanks to the
velcro-type fastening. Simply press on the sanding
disc such that the holes in the sanding disc are
aligned with the sanding plate (1).
Sanding sheet without velcro-type fastening
Push both clamping elements (2) up. Secure the
sanding disc using a clamping element. Pull it
across the sanding plate (1) so it is taut; then fasten
in place with the other clamping element.
7.1 Switching On and Off
Press the trigger switch (5) to switch on the
machine.
The trigger switch can be locked using the lock
button (7) for continuous operation. Press the
trigger switch again to stop the machine.
7.2 Setting the oscillating frequency
(depending on the model)
Set the oscillating frequency on the adjustment
wheel (4). This can also be done during operation.
The best way to determine the ideal setting is
through a practical trial.
7.3 Dust extraction
Fit the sanding disc so that the holes on the sanding
disc and sanding plate (1) are aligned to optimise
the dust extraction performance.
Note:
We recommend connecting a suitable
extraction device when sanding abrasive material
(e.g. plaster, etc.).
Own extraction units:
Fit dust bag (8) to the ejection nozzle (3). Pull the
dust bag (8) backwards to remove it.
Empty the dust bag (8) in good time to optimise dust
extraction.
(The dust bag is dependent on the equipment and
therefore may not be included with the delivery. It is
available as an accessory: see page 2 for order no.)
Third-party extraction units:
Pull the dust bag (8) or end cap (10) backwards.
Connect a suitable extraction device to the ejection
nozzle (3).
Emptying the dust bag (depending on the
equipment): remove the closure band (9). Empty
the dust bag (8), clean with an extraction device if
necessary. Close the dust bag again with the
closure band (9).
Clean the machine regularly. This includes
vacuum cleaning the ventilation louvres on the
motor.
Clean the sanding sheet with velcro-type
fastening as required (vacuum off the dust). This
increases the service life of the velcro-type
fastening.
Use only genuine Metabo accessories.
Note:
Metabo accessories are adapted to suit the
machine's velcro-type fastening. This increases the
service life of the velcro-type fastening.
Use only accessories which fulfil the requirements
and specifications listed in these operating
instructions.
See www.metabo.com or the catalogue for a
complete range of accessories.
Repairs to electrical tools must be carried out by
qualified electricians ONLY!
A defective mains cable must only be replaced with
a special, original mains cable from metabo, which
is available only from the Metabo service.
If the mains connection cable of this machine is
damaged, it must be replaced by the manufacturer or
an authorized service centre to avoid hazard.
If you have Metabo electrical tools that require
repairs, please contact your Metabo service centre.
For addresses see www.metabo.com.
You can download spare parts lists from
www.metabo.com.
Observe national regulations on environmentally
compatible disposal and on the recycling of disused
machines, packaging and accessories.
Only for EU countries: never dispose of
power tools in your household waste! Used
power tools must be collected separately and
handed in for environmentally compatible recycling
in accordance with European Directive 2012/19/EU
on waste electrical and electronic equipment and its
implementation in national legal systems.
Explanatory notes on the specifications on page 3.
Changes due to technological progress reserved.
P
1
=Rated input power
6. Commissioning
7. Use
8. Cleaning, Maintenance
9. Accessories
10. Repairs
11. Environmental Protection
12. Technical Specifications