
Full Product Manual


Page of 24
10
NOTE:
- Metal thinner than 24 gauge cannot be welded with this machine. Attempting to do so will cause
burn through in the metal you are intending to weld.
- Do not use rusty wire. Remove any wire that is rusty. If the whole spool is rusty, discard it and use
another roll.
4.2 Installing the wire
Electrical Shock
Electric shock can kill! Always turn the POWER switch OFF and unplug the power cord
from the AC power source before installing wire.
NOTE:
- Before installing, make sure that you have removed any old wire from the torch assembly. This will
help to prevent the possibility of the wire jamming inside the gun liner.
- Be very careful when removing the welding nozzle. The contact tip on this welder is live whenever
the torch trigger is pulled. Make certain POWER is turned OFF.
4.2.1 Remove the nozzle and contact tip from the end of the torch assembly.
4.2.2 Make sure the proper groove on the drive roller is in place for the wire installed. If not,
change the drive roller as described in Section 3.
4.2.3 Remove the packaging from the spool of wire and then identify the leading end of the wire
secured on the edge of the spool. DO NOT UNHOOK IT AT THIS TIME.
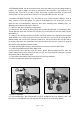
4.2.4 Place the spool on the spool hub so the wire will pull off the bottom of the spool. The
welding wire should always come off the bottom of the spool into the drive mechanism. See
following figure.