213189_Cover.
STILE IMPORTANT INFORMATION THE APPLICATION AND DETAIL DRAWINGS IN THIS MANUAL ARE STRICTLY FOR ILLUSTRATION PURPOSES AND MAY NOT BE APPLICABLE TO ALL BUILDING DESIGNS OR PRODUCT INSTALLATIONS. ALL PROJECTS SHOULD CONFORM TO APPLICABLE BUILDING CODES FOR THAT PARTICULAR AREA. IT IS RECOMMENDED TO FOLLOW ALL BUILDING REGULATIONS AND STANDARD INDUSTRY PRACTICES.
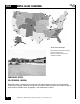
STILE METAL SALES' LOCATIONS *METAL SALES LOCATIONS Note: Shaded areas represent regions served by each location. Arizona is served bt Fontana and Longmont branches. CORPORATE OFFICE SELLERSBURG, INDIANA Metal Sales offers a complete line of metal roof, wall, and fascia panel systems for the commercial, architectural, industrial, residential, and agricultural markets. Metal Sales offers over 30 profiles with a wide selection of widths, colors, and gauges - new construction or retrofit.
STILE CUSTOMER SERVICE METAL SALES LOCATIONS DENVER BRANCH 7990 E. I-25 Frontage Rd Longmont, CO 80504 (303) 702-5440 (800) 289-7663 (800) 289-1617 /FAX JACKSONVILLE BRANCH 7110 Stuart Avenue Jacksonville, FL 32254 (904) 783-3660 (800) 394-4419 (904) 783-9175 /FAX JEFFERSON BRANCH 352 East Erie Street Jefferson, OH 44047 (440) 576-9070 (800) 321-5833 (440) 576-9242 /FAX (800) 233-5719 /FAX INDEPENDENCE BRANCH 1306 S.
STILE TABLE OF CONTENTS PAGE NO. Panel Overview Slope ............................................................................................................ 6 Substructures ................................................................................................ 6 Coverage ....................................................................................................... 6 Length ..........................................................................................................
STILE TABLE OF CONTENTS PAGE NO. Condition Detail Explanation ................................................................................ 35 Formed Ridge/Hip Detail ............................................................................... 36 Ridge/Hip Detail ........................................................................................... 37 Formed Rake Detail ...................................................................................... 38 Rake Detail ........................
STILE SLOPE PANEL OVERVIEW The minimum recommended slope for any Stile roofing panel is 3:12. SUBSTRUCTURE The recommended substrate is 5/8" plywood with a #30 felt moisture barrier. To avoid panel distortion, use a properly aligned and uniform substructure. If your application is over a substrate other than 5/8" plywood, please contact the Metal Sales location servicing you (refer to page 2). COVERAGE Each panel has a coverage of 39.4" (1 meter).
STILE FLASHING OVERVIEW HIGH SIDE PARAPET (SEE DETAIL PAGE 48) VALLEY (SEE DETAIL PAGE 47) HIGH SIDE PITCH BREAK RIDGE/HIP OR FORMED RIDGE/HIP (SEE DETAILS PAGE 36,37) (SEE DETAILS PAGE 45,46) FORMED RIDGE/HIP AT HIP CONDITION (SEE DETAILS PAGE 36,37) RAKE OR FORMED RAKE (SEE DETAILS PAGE 38,39) SIMPLE EAVE OR EXTENDED EAVE GUTTER (SEE DETAILS PAGES 40,41) (SEE DETAIL PAGE 42) The above building represents the most common conditions of a residental metal roof.
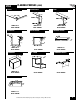
STILE FLASHING PROFILES STILE C-CLOSURE RAKE STARTER LENGTH 10'-2" 26 GA. GALVALUME RIDGE/HIP COVER LENGTH 10'-2" 26 GA. PAINTED FORMED RIDGE LENGTH 10'-2" 26 GA. PAINTED REGLET FLASHING LENGTH 3'-6" 26 GA. PAINTED COUNTER FLASHING LENGTH 10'-2" 26 GA. PAINTED CLEAT RAKE LENGTH 10'-2" 26 GA. PAINTED 8 LENGTH 10'-2" 26 GA. PAINTED STILE STARTER LENGTH 10'-2" 26 GA. PITCH BREAK LENGTH 10'-2" 26 GA. PAINTED FORMED RAKE LENGTH 3'-6" 26 GA. PAINTED VALLEY COVER LENGTH 10'-2" 26 GA.
FLASHING PROFILES (CONT) STILE EXTENDED EAVE VALLEY LENGTH 10'-2" 26 GA. PAINTED LENGTH 10'-2" 26 GA. PAINTED BOX GUTTER END BOX GUTTER LENGTH 10'-2" 26 GA. PAINTED 26 GA. PAINTED 95O ELBOW DOWNSPOUT EAVE LENGTH 10'-2" 26 GA. PAINTED UNIVERSAL GUTTER/ DOWNSPOUT STRAP LENGTH 1'-4" 26 GA. PAINTED DOWNSPOUT BRACKET 4" LENGTH 10'-2" 26 GA. PAINTED 26 GA. PAINTED 26 GA. PAINTED JUNCTION SHEET LENGTH 1'-11" 26 GA.
STILE ACCESSORIES STILE FORMED RIDGE CLOSURE STILE CLOSURE UNIVERSAL CLOSURE OUTSIDE/ INSIDE CLOSURE SYNTHETIC RUBBER RUBBER ROOF JACK #2 #3 #6 #8 (11/4" TO 3" O.D. PIPE) (3" TO 6" O.D. PIPE) (6" TO 9" O.D. PIPE) (7" TO 13" O.D. PIPE) STILE ROOF VENT SYNTHETIC RUBBER TUBE SEALANT 10.3 oz.
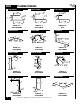
STILE FASTENER SELECTION GUIDE POP RIVET SIZE /8" x 3/16" 1 WOODSCREW XL SELF DRILLER XL FINISH APPLICATION Stainless Steel Painted Attaching Flashings to Panels or Flashings SIZE TYPE FINISH APPLICATION /4-14 x 1" ABMP XL-Painted /4-14 x 11/2" ABMP XL-Painted Attaching Panels or Flashings to wood roof deck on Exposed TYPE FINISH APPLICATION Driller XL-Painted Attaching Panels or Flashings to metal decking TYPE FINISH APPLICATION Stitch XL-Painted Attaching Flashings to Pan
STILE DESIGN / INSTALLATION CONSIDERATIONS GENERAL Metal Sales' Stile panel is recommended to be installed directly over a wood substrate (minimum 5/8") with 30# felt moisture barrier. Always check with local building codes prior to all installations for any additional requirements that may be specific to your area. CONDITION OF SUBSTRUCTURE The roof should be inspected for any trapped moisture or structural damage such as warped or loose roof decking.
STILE DESIGN / INSTALLATION CONSIDERATIONS (CONT) VENTILATION Proper design and installation of vapor barriers and ventilation systems are important to prevent condensation and the resulting problems of moisture damage and loss of insulation efficiency. On buildings that have an attic space, vents should be placed at both the eave and peak of the roof in order to prevent a buildup of moisture (humidity) in the attic space.
STILE DESIGN / INSTALLATION CONSIDERATIONS (CONT) ROOF SLOPE FACTOR CHART This chart should be used when specifying and ordering Panels and Flashings. It will help you determine overall required length of material on sloped applications. PEAK S H L EAVE HIP OR VALLEY L (L) X (HIP VALLEY MULTIPLIER) = H (L) X (SLOPE FACTOR) = S SLOPE SLOPE FACTOR HIP/VALLEY MULTIPLIER SLOPE SLOPE FACTOR HIP/VALLEY MULTIPLIER 1:12 1.0035 1.4167 7:12 1.1577 1.5298 2:12 1.0138 1.4240 8:12 1.2019 1.
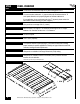
STILE PACKAGING STANDARD PACKAGING BLOCKED AND BANDED - This method is utilized for standard packaging of Stile roofing panels. Panels are stacked on a wood skid with a cover sheet on top. Boards are placed on top of the cover sheet. Banding is then placed around the skid, panel, and board.
HANDLING MATERIAL STILE RECEIVING MATERIAL It is the responsibility of the installer to unload material from the delivery truck. The installer is not responsible for providing suitable equipment for unloading of material from the delivery truck. After receiving material, check the condition of the material, and review the shipment against the shipping list to ensure all materials are accounted for. If damages or shortages are discovered, it should be noted on the Bill of Lading at the time of delivery.
STILE HANDLING MATERIAL (CONT) MANUAL HANDLING Installers should wear rubber sole shoes to keep from scuffing material while walking on the roof. Handling of individual panels should be done carefully and properly to avoid bending or damaging. Stile panels should be carried by grasping the edge of the panel so that the Stile panel is vertical to the ground. The panel should not be carried with the flat of the panel horizontal to the ground as this could cause the panel to buckle or bend in the center.
STILE STORAGE GENERAL Please inspect panels for moisture accumulation. If moisture has formed, the panels should be unbundled, wiped dry, and allowed to dry completely. Once dry, carefully restack the panels and loosely recover allowing for ample air circulation. Bundled sheets should be stored high enough off of the ground to allow for air circulation and prevent contact with accumulating water. If possible, elevate one end of the bundle to allow any moisture to run off the panels.
STILE FIELD CUTTING AND TOUCH-UP FIELD CUTTING Tin snips or a "nibbler" type electric tool are recommended for field cutting Stile panels. Cutting the steel generates slivers or metal chips. These slivers and metal chips must be immediately removed from the Stile panels because they will damage the finish and shorten the life of the product. One method of preventing this problem is to flip the Stile panels over when cutting.
STILE INSTALLATION OF EAVE OR GUTTER FLASHING EAVE OR GUTTER 1. Attach Eave or Gutter flashing starting at the edge of the roof and extending the length of the eave. 2. Fasten the top leg of the Eave or Gutter flashing to the roof decking with a Woodscrew XL fastener placed 1" from the edge of the eave. Fasteners should be placed on 5'-0" centers along the Eave or Gutter flashing to provide temporary attachment of the flashing until the roof panels are installed.
STILE INSTALLATION OF RAKE STARTER RAKE STARTER 1. Install the Rake Starter along the edge of the roof beginning at the eave and stopping at the ridge. Align the vertical leg of the Rake Starter flush with the edge of the rake. Attach with a Woodscrew XL fastener in the extended leg of the trim 3" up from the eave. Place fasteners along the Rake Starter 1'-0" o.c. 2.
STILE INSTALLATION OF STILE C-CLOSURE C-CLOSURE C-CLOSURE 1. In applications where a hip or high side parapet is involved, a Stile C-Closure is used at the termination of the panel. When Formed Ridge flashing is used Stile C-Closure flashing is not required. 2. Install the Stile C-Closure along the length of the hip or parapet 2" below the highest point (for hip condition a Stile C-Closure is required on both sides of the hip). 3.
STILE INSTALLATION OF VALLEY FLASHING VALLEY 1. Begin by installing a sheet of 36" wide Ice and Water Shield in the valley so that it extends up each side of the valley 18". 2. Place Valley flashing over the Ice and Water Shield starting at the eave and working upward towards the ridge. 3. If two or more Valley flashings are required, lap the flashing over the previously installed flashing by a minimum of 12" placing a bead of Tube Sealant between the flashings along the edge where they lap. 4.
STILE INSTALLATION OF PANEL 1. Stile panels must be installed from right to left. 2. When starting at a rake, slide the panel into the opening of the previously installed Rake Starter until it hits the vertical leg of the flashing. 3. Align the Stile panel with the eave allowing the bottom leg of the sheet to extend 1/2" over the edge of the eave. It is important to tilt the right side of the panel 1/16" lower than the left side.
STILE INSTALLATION OF PANEL (CONT) FASTENING OF PANEL 1. After placement of the first panel is established, a Stile Closure with Tube Sealant is placed at the eave flush with the Stile panel. 2. Fastening of the panel can begin by placing a Woodscrew XL fastener in the first valley of the Stile panel in the bottom leg just below the step. Place a second fastener in the first valley of the Stile panel three steps up from where the first fastener was placed.
STILE INSTALLATION OF PANEL (CONT) SIDELAPPING OF PANEL 1. Stile panels are installed from right to left. Once the first Stile panel is in place, install the second panel by lapping the right side of the panel over the last rib of the previously installed panel. 2. Align the sidelap of the panels and check proper seating of the panels at the lap and eave. 3. Apply Stile Closure and fasten panel to roof deck following the same pattern as the first panel.
STILE INSTALLATION OF PANEL (CONT) ENDLAPPING OF PANEL 1. Stile panels are available in lengths from 3'-0" to 20'-0" in one foot increments. For runs longer than 20'-0", panels are designed to endlap. 2. Endlaps can be placed staggered or in-line with the previous panel endlap. Either method of installation is suitable, but in-line endlapping tends to be easier to order and install. 3. Follow the panel installation sequence as shown below.
STILE INSTALLATION OF PANEL (CONT) PANEL AT VALLEY CONDITION 1. All Stile panels meeting the valley must be field cut at an angle so that the panels stop 3" from the center of the valley. 2. When starting Stile panel near a valley, tilt the right side of the panel 1/16" lower than the left side. This is required to keep the panel thickness from accumulating at the eave (see page 24). 3. A foam Universal Closure or Stile Closure is placed between the previously installed Valley flashing and Stile panel.
STILE INSTALLATION OF FORMED RAKE LEFT FORMED RAKE RIGHT FORMED RAKE RAKE CONDITION 1. After the Stile panel has been installed in the opening of the Rake Starter, fasten the upper leg of the Rake Starter to the Stile panel rib with a 1/8" Pop Rivet. 2. Pop Rivets are placed directly over the high point of the panel at each step. POP RIVET RAKE STARTER WOODSCREW XL STILE CLOSURE EAVE FLASHING 3. Starting at the eave install the Formed Rake over the Rake Starter.
STILE INSTALLATION OF FORMED RIDGE FORMED RIDGE SIMPLE RIDGE CONDITION 1. Position the Formed Ridge at the peak of the roof and square with the front edge of the Formed Rake. 2. Align the Formed Ridge so that the flanges extend down on each side of the roof equal distance. 3. Place Stile Closure under the flange on each side of the Formed Ridge. 4. Place 1/8" Pop Rivet in the flange of the Formed Ridge so that the Formed Ridge is fastened to the Stile panel at the top of every other rib of the panel.
INSTALLATION OF FORMED RIDGE (CONT) STILE HIP CONDITION 1. It will be necessary to field cut the ends of the three pieces of Formed Ridge where they intersect. 2. The Formed Ridge on the first hip should be cut at approximately a 45 degree angle at the corner where it will intersect with the Formed Ridge of the second hip. 3. The Formed Ridge on the second hip will then need to be cut at an angle so that it neatly joins the Formed Ridge on the first hip. 4.
STILE INSTALLATION OF FLASHING AROUND CHIMNEY JUNCTION SHEET FIELD CUT AND BEND PITCH BREAK AROUND CORNERS AND POP RIVET TOGETHER PITCH BREAK 1. Roofing felt should extend up the sides of the penetration at least 6" and fit snugly around all sides of the penetration. 2. Stile panels should be field cut so that they fit close to the penetration on the sides and lower end.
STILE INSTALLATION OF RUBBER ROOF JACK RUBBER ROOF JACK 1 On vent pipe penetrations, the roofing felt should fit very tightly around the penetration. 2. Take the appropriate measurements for the vent location and mark them on the Stile panel. Cut the Stile panels to fit the opening properly. 3. Once the Stile panels are applied, flash the vent pipe with a Rubber Roof Jack or similar pipe flashing. 4.
STILE INSTALLATION OF STILE ROOF VENT STILE PANEL STILE ROOF VENT WOODSCREW XL SEALANT (USED AROUND PERIMETER OF VENT BASE) STILE ROOF VENT The Stile Roof Vent allows compliance with many new venting regulations and is suitable for new construction and reroofing. The Stile Roof Vent offers 31 square inches of ventilation area and complies with Uniform Building Code requirements. In all cases the installer should conform to applicable building codes for that area.
STILE CONDITION DETAIL EXPLANATION The following pages depict Metal Sales' suggested Stile details and are for illustration purposes only. These details may not be applicable to all conditions or designs. STILE FORMED RIDGE/ HIP DETAIL A STILE PANEL WOODSCREW XL POP RIVET TUBE SEALANT STILE CLOSURE/ UNIVERSAL CLOSURE (FOR USE ON HIP ONLY) FORMED RIDGE MOISTURE BARRIER FLASHING PROFILES ACCESSORIES UNIVERSAL OR STILE CLOSURE B TUBE SEALANT POP RIVETS (1'-0" O.C. TYPICAL) WOODSCREW XL (1'-0" O.C.
STILE FORMED RIDGE/HIP DETAIL STILE PANEL WOODSCREW XL POP RIVET TUBE SEALANT STILE CLOSURE/ UNIVERSAL CLOSURE (FOR USE ON HIP ONLY) FORMED RIDGE MOISTURE BARRIER STILE C-CLOSURE (OPTIONAL) FLASHING PROFILES ACCESSORIES UNIVERSAL OR STILE CLOSURE TUBE SEALANT POP RIVETS (1'-0" O.C. TYPICAL) WOODSCREW XL (1'-0" O.C.
STILE RIDGE/HIP DETAIL STILE PANEL WOODSCREW XL POP RIVET TUBE SEALANT STILE CLOSURE/ UNIVERSAL CLOSURE (FOR USE ON HIP ONLY) STILE C-CLOSURE RIDGE/HIP COVER VAPOR BARRIER FLASHING PROFILES ACCESSORIES UNIVERSAL OR STILE CLOSURE TUBE SEALANT POP RIVETS (1'-0" O.C. TYPICAL) WOODSCREW XL (1'-0" O.C.
STILE FORMED RAKE DETAIL STILE PANEL MOISTURE BARRIER POP RIVET FORMED RAKE RAKE STARTER WOODSCREW XL LEFT FORMED RAKE RIGHT FORMED RAKE FLASHING PROFILES ACCESSORIES TUBE SEALANT STITCH SCREW XL (1'-0" O.C. TYPICAL) WOODSCREW XL (1'-0" O.C.
RAKE DETAIL STILE STILE PANEL POP RIVET TUBE SEALANT RAKE RAKE STARTER MOISTURE BARRIER CLEAT FASTENER WOODSCREW XL FLASHING PROFILES ACCESSORIES TUBE SEALANT POP RIVETS (1'-0" O.C. TYPICAL) WOODSCREW XL (1'-0" O.C.
STILE EAVE DETAIL STILE PANEL MOISTURE BARRIER WOODSCREW XL STILE STARTER /16" SPACER (1/2" X 1") 1 TUBE SEALANT STILE CLOSURE WOODSCREW XL TUBE SEALANT EAVE FLASHING PROFILES ACCESSORIES STILE CLOSURE TUBE SEALANT POP RIVETS (1'-0" O.C. TYPICAL) WOODSCREW XL (1'-0" O.C.
STILE EXTENDED EAVE DETAIL STILE PANEL MOISTURE BARRIER WOODSCREW XL STILE STARTER /16" SPACER (1/2" X 1") 1 TUBE SEALANT STILE CLOSURE WOODSCREW XL TUBE SEALANT EXTENDED EAVE FLASHING PROFILES ACCESSORIES STILE CLOSURE TUBE SEALANT POP RIVETS (1'-0" O.C. TYPICAL) WOODSCREW XL (1'-0" O.C.
STILE GUTTER DETAIL STILE PANEL MOISTURE BARRIER WOODSCREW XL STILE STARTER /16" SPACER (1/2" X 1") 1 TUBE SEALANT STILE CLOSURE WOODSCREW XL TUBE SEALANT POP RIVET UNIVERSAL GUTTER/ DOWNSPOUT STRAP BOX GUTTER CAUTION In locations where heavy rainfall or severe ice and snow may occur, Metal Sales' standard gutter may not be suitable for use. FLASHING PROFILES ACCESSORIES STILE CLOSURE TUBE SEALANT UNIVERSAL GUTTER/ DOWNSPOUT STRAP POP RIVETS (1'-0" O.C. TYPICAL) WOODSCREW XL (1'-0" O.C.
STILE RAKE PARAPET COUNTER DETAIL TUBE SEALANT FASTENER COUNTER FLASHING PITCH BREAK RAKE STARTER POP RIVET TUBE SEALANT WOODSCREW XL STILE PANEL MOISTURE BARRIER FLASHING PROFILES ACCESSORIES TUBE SEALANT POP RIVETS (1'-0" O.C. TYPICAL) WOODSCREW XL (1'-0" O.C.
STILE RAKE PARAPET SIDING DETAIL MOISTURE BARRIER PITCH BREAK FASTENER POP RIVET TUBE SEALANT RAKE STARTER WOODSCREW XL STILE PANEL FLASHING PROFILES ACCESSORIES TUBE SEALANT POP RIVETS (1'-0" O.C. TYPICAL) WOODSCREW XL (1'-0" O.C.
STILE HIGH SIDE COUNTER DETAIL TUBE SEALANT FASTENERS COUNTER FLASHING PITCH BREAK STILE C-CLOSURE POP RIVET TUBE SEALANT STILE CLOSURE WOODSCREW XL STILE PANEL MOISTURE BARRIER FLASHING PROFILES ACCESSORIES STILE CLOSURE TUBE SEALANT POP RIVETS (1'-0" O.C. TYPICAL) COUNTER FLASHING PITCH BREAK WOODSCREW XL (1'-0" O.C.
STILE HIGH SIDE REGLET DETAIL TUBE SEALANT REGLET FLASHING FASTENER PITCH BREAK STILE C-CLOSURE POP RIVET TUBE SEALANT STILE CLOSURE WOODSCREW XL STILE PANEL MOISTURE BARRIER FLASHING PROFILES ACCESSORIES STILE CLOSURE TUBE SEALANT POP RIVETS (1'-0" O.C. TYPICAL) REGLET FLASHING PITCH BREAK STILE C-CLOSURE 46 © Metal Sales Manufacturing Corporation/ Subject to change without notice WOODSCREW XL (1'-0" O.C.
STILE VALLEY WITH COVER DETAIL STILE PANEL MOISTURE BARRIER WOODSDCREW XL POP RIVET UNIVERSAL CLOSURE TUBE SEALANT VALLEY COVER VALLEY FLASHING PROFILES ACCESSORIES UNIVERSAL CLOSURE TUBE SEALANT POP RIVETS (1'-0" O.C. TYPICAL) VALLEY WOODSCREW XL (1'-0" O.C.
STILE HIGH SIDE PARAPET DETAIL TUBE SEALANT FASTENERS (BY OTHERS) COUNTER FLASHING JUNCTION SHEET WOODSCREW XL TUBE SEALANT STILE PANEL MOISTURE BARRIER (BY OTHERS) NOTE: Field formed cricket must be applied for proper water drainage. FLASHING PROFILES ACCESSORIES TUBE SEALANT WOODSCREW XL (1'-0" O.C.
STILE SLOPE CHANGE DETAIL STILE PANEL TUBE SEALANT FASTENER STILE CLOSURE WOODSCREW XL PITCH BREAK TUBE SEALANT POP RIVET STILE CLOSURE WOODSCREW XL STILE C-CLOSURE MOISTURE BARRIER FLASHING PROFILES ACCESSORIES STILE CLOSURE TUBE SEALANT POP RIVETS (1'-0" O.C. TYPICAL) WOODSCREW XL (1'-0" O.C.
STILE STILE ROOF VENT DETAIL VENTILATOR STILE PANEL WOODSCREW XL TUBE SEALANT FLASHING PROFILES ACCESSORIES TUBE SEALANT WOODSCREW XL (1'-0" O.C.
STILE CARE AND MAINTENANCE Though factory applied prepainted finishes are very durable and will last many years, eventually it may be desirable to thoroughly clean or repaint them. Dirt pickup may cause apparent discoloration of the paint when it has been exposed in some dirt laded atmospheres for long periods of time. In areas of strong sunlight, slight chalking may cause some change in appearance. A good cleaning will often restore the appearance of these buildings and render repainting unnecessary.
STILE 52 NOTES © Metal Sales Manufacturing Corporation/ Subject to change without notice
213189_Cover.mpc 8/20/01 7:31 AM Page 2 Longmont, Colorado 800.289.7663 Jacksonville, Florida 800.394.4419 Jefferson, Ohio 800.321.5833 Independence, Missouri 800.747.0012 Sellersburg, Indiana 800.999.7777 Rogers, Minnesota 800.328.9316 Antioch, Tennessee 800.251.8508 Spokane, Washington 800.572.6565 Kent, Washington 800.431.3470 Rock Island, Illinois 800.747.1206 Orwigsburg, Pennsylvania 800.544.2577 Temple, Texas 800.543.4415 Woodland, California 800.759.6019 Fontana, California 800.782.