
Installation Guide


4
V
V
123456
1
2345
6
1
2345
6
1
2345
6
1
2345
6
123456
A
A
A
V
V
V
V
V
V
V
V
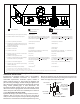
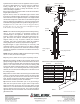
Figure 8. Side Wall Vent Termination Requirements
1
2
1
2
**
*
= VENT TERMINAL
= AIR SUPPLY INLET
= AREA WHERE TERMINAL IS NOT PERMITTED
Clearance above grade, veranda, porch, deck, or balcony
Clearance to window or door that may be opened
Clearance to permanently closed window
Vertical clearance to ventilated soffit located above the
terminal within a horizontal distance of 2 feet (61 cm) from
the center line of the terminal
Clearance to unventilated soffit
Clearance to outside corner
Clearance to inside corner
Clearance to each side of center line extended above
meter/regulator assembly
Clearance to service regulator vent outlet
Clearance to nonmechanical air supply inlet to building or
the combustion air inlet to any other appliance
Clearance to a mechanical air supply inlet
Clearance above paved sidewalk or paved driveway
located on public property
Clearance under veranda, porch deck, or balcony
Canadian Installations
12 inches (30 cm)
6 inches (15cm) for appliances < and including 10,000 Btuh
(3kW), 12 inches (30 cm) for appliances < 100,000 Btuh (30kW),
36 inches (91cm) for appliances >100,000 Btuh (30kW)
12 inches (30 cm) recommended
18 inches (45 cm)
12 inches (30cm)
6 inches (15cm)
Non-combustible and combustible - As determined by
Manufacturer’s Installation Instructions
3 feet (91 cm)
3 feet (91 cm)
6 inches (15cm) for appliances < and including 10,000 Btuh (3
kW), 12 inches (30 cm) for appliances > 10,000 Btuh (30kW), 36
inches (91 cm) for appliances > 100,000 Btuh (30kW)
6 feet (1.83 m)
In accordance with the current CAN/CSA-B149.1-00 Installation Codes
In accordance with the current ANSI Z223.1/NFPA 54 National Fuel Gas Code
A vent shall not terminate directly above a sidewalk or paved driveway that is located between two single family dwellings and serves both dwellings.
Permitted only if veranda, porch, deck, or balcony is fully open on a minimum of two sides beneath the floor.
12 inches (30 cm)
**
7 feet (2.13 m)
*
US Installations
12 inches (30 cm)
6 inches (15 cm) for appliances < 10,000 Btuh (3 kW), 9 inches
(23cm) for appliances >10,000 Btuh (3 kW) and < 50,000 Btuh
(15 kW), 12 inches (30 cm) for appliances > 50,000 Btuh (15 kW)
12 inches (30 cm)
12 inches (30 cm) recommended
18 inches (45 cm)
6 inches (15cm)
3 feet (91 cm)
3 feet (91 cm)
6 inches (30 cm) for appliances < 10,000 Btuh (3 kW), 9 inches (23
cm) for appliances > 10,000 Btuh (3 kW) and < 50,000 Btuh (15
kW), 12 inches (30 cm) for appliances > 50,000 Btuh (15 kW)
3 feet (91 cm) above if within 10 feet (3 m) horizontally
7 feet (2.13 m)
*
12 inches (30 cm)
**
A =
B =
C =
D =
E =
F =
G =
H =
I =
J =
K =
L =
M =
Fixed
Closed
Operable
Operable
Fixed
Closed
Inside Corner
Detail
Non-combustible and combustible - As determined by
Manufacturer’s Installation Instructions
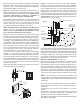
2) Assemble the pipe (and elbow if using) and attach it to the
appliance. Plan for a level to 1/4" per foot rise (from inlet to
outlet) in the horizontal system if not specified by the Appliance
Manufacturer. Horizontal runs should be supported every 4 feet.
3) Push the appliance near the desired location. Determine the
center point of the penetration by locating the centerline of the
outlet of the pipe with respect to the wall.
HORIZONTAL INSTALLATION:
1) Determine the appliance location. Refer to the Appliance
Manufacturer’s installation instructions for clearance to
combustible requirements, termination options, number of
elbows, maximum length, etc. then position the appliance and
plan vent routing accordingly. Consider locating the appliance in a
place where there will be no interference with wall studs, electrical
wiring, conduit, plumbing pipe, or other obstructions. The
termination should be located at least 12’’ above grade, remain
above the snow line in geographical areas that accumulate snow
and be away from traffic areas such as walkways if it is less than
7’ high (See Figure 8 for more detail).
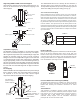
Wall Thimble
Face Plate
Wall Thimble
Shield
Wall Thimble
Shield
Wall Thimble
Face Plate
Seal with RTV
silicone sealant
on exterior side
here (around
perimeter)
FIG. 9 WALL THIMBLE