
Installation Guide

CHOOSING YOUR HEATING APPLIANCE
There are three important rules for selecting a woodburning stove, fire-
place or heater.
FIRST Look for a label or nameplate attached to the appliance which bears
the mark or name of a well-known safety testing organization* or labora-
tory.
SECOND Don't buy an appliance which is bigger than necessary.
THIRD Look or ask for complete installation, operating and mainte-
nance instructions for the appliance. If you can't get these, buy one that
gives you all these very important details.
*Such as Underwriters’ Laboratories, Inc. or Intertek Testing Services.
The connector or smoke pipe is the sheet metal pipe between the appliance
and the chimney. Different types of fuels and appliances have different
connector clearances to combustible walls and ceilings. These clearances
will be shown in the appliance instructions.
OBSERVE CLEARANCE TO COMBUSTIBLE MATERIAL AND SLOPE
FOR CONNECTOR OR SMOKE PIPE
Whatever clearances and connector arrangements are shown in the appli-
ance instructions, must be followed rather than the arbitrary 18 inch dimen-
sion. This is important if tests have shown that more than 18 inches clear-
ance is necessary, or if the location of the stove or heater necessitates
more clearance. See Fig. 5.
Combustible materials include such things as framing lumber, plywood,
drywall (sheet rock, plaster board, lath and plaster, gypsum board) and
also furniture and curtains. Building insulation of any kind, including batts,
foams, boards and especially loose fill cellulose fiber, must also be kept
away from the chimney in the same manner as combustible materials.
APPLIANCE SAFETY
Be sure to follow all details of the instructions for your solid fuel burning
appliance. You should give preference to the purchase of an appliance
which either has a label or includes detailed instructions showing all re-
quired clearances to floor and walls. If necessary, these clearances may
be reduced by use of a tested and "Listed" (by UL, for example) protection
system, or by one of the methods described in NFPA Standard 211.
When protecting walls or ceilings from the heat of a connector, be sure to
leave at least a 1 inch ventilated air space between the protection material
and combustible construction. It is ineffective and possibly dangerous to
apply ordinary brick, or any similar dense material directly to a wood framed
wall for the purpose of reducing safe clearances.
For the chimney connector, the appliance instructions take prece-
dence over the 18 inch clearance shown in these instructions (or in
building codes). The 18 inch minimum clearance dimension applies only if
there is no other information for the connector.
EACH SOLID FUEL APPLIANCE SHOULD HAVE ITS OWN CHIMNEY
* Stoves of air-tight or controlled combustion design may be difficult to
operate if some other appliance is connected to the same chimney.
* Open front, freestanding or built-in fireplaces may need all the draft
produced by a minimum height of chimney. Interconnecting them or their
chimney with another appliance may be prohibited by their instructions and
may cause smoking problems.
* Never connect a gas-burning appliance into a chimney for any woodburning
stove, heater or fireplace. This is extremely dangerous because a chimney
blocked with creosote (or anything else) may cause the connected gas
appliance to produce poisonous carbon monoxide.
* For these and other reasons, don't ever inter-connect your solid fuel
appliance with anything else, not even another solid fuel appliance. There
are simply too many things that can go wrong if you do.
Passing a bare smoke pipe or connector of a wood burning appliance
through a combustible stud wall is not recommended, as the entire inside of
the wall must be cut away to get 18 inch clearance (usually at least a 40
inch circle). Wherever possible, locate the MetalBest Chimney to avoid
penetrating a wall with a single wall connector. Besides following the
appliance instructions for connectors, other rules for solid fuel appliance
connectors are:
1. Never enclose vertical single wall pipe, even at 18 inches clearance.
2. Never run it through ceilings or floors, or windows.
3. Don't use single wall pipe outdoors.
4. Always secure all single wall pipe joints with at least 3 screws.
5. Obtain proper attachment parts for the appliance end and for the entry
to the chimney. See the MetalBest Chimney System catalog for the proper
size Dripless Smoke Pipe Adapter (DSA) or (DSAC), or Chimney Pipe Adap-
tor (CPA).
6. Locate and support the connector to avoid accidental contact or dam-
age.
7. Caps or plugs for tees should be secured against falling out and de-
signed so they can't leak creosote or rain.
8. Heavy weight single wall pipe lasts longer. Use 24 gauge if possible.
9. Porcelain enamel is the best high temperature protective finish but re-
quires careful handling and may be difficult to assemble securely except in
a vertical position and could produce noxious odors if overheated.
10. Galvanized steel pipe is no better than plain black or painted steel
GENERAL INSTALLATION INSTRUCTIONS
A correct easily-maintained chimney installation has five important parts:
1. Proper support, both vertical and lateral, with access for inspection and
maintenance.
2. Adequate clearance to combustible materials for single wall connector
or smoke pipe.
3. AIR SPACE clearance of 2 inches for insulated chimney parts.
4. All vertical intermediate ceiling or floor penetrations completely framed
and firestopped with specified chimney parts.
5. All connector and chimney joints completely secured against unlocking
with three screws or with locking bands. See diagram for screw location.
PROPER SUPPORT
Vertical chimneys may be supported in these ways:
1. Ceiling Support with all chimney stacked above. See sheet S-1.
2. Roof Support, with one or more lengths suspended below and with total
height limits depending on factors such as roof pitch and height. See sheet
S-4.
3. Appliance Support, with the MetalBest Chimney System starting at the
appliance outlet. This is permissible if this method is shown in the appliance
instructions, or with masonry fireplaces.
4. Wall Support with Insulated Tee. See Sheet S-5.
5. Support Box. See Sheet S-9.
6. Proper lateral support is also necessary and may be provided by wall
bands, firestops, roof braces and/or all the supports listed above. Maxi-
mum spacing between components providing lateral support is 8 ft (See
sheets S-2, S-3, and S-5).
Because of thermal expansion problems, only one of these support meth-
ods should be used for a vertical installation. For example: Do Not use both
a ceiling support and a roof support for the same chimney.
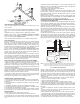
2 FT.
3 FT.
10 FT.
2 FT.
Fig. 4
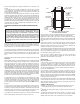
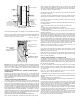
Drip-Free Cap on Cleanout Tee
The purpose of the diagonal arrows is to show that the 18 inch clearance DOES NOT APPLY to the
vertical connector entering a Finish Support. This support is actually tested with a bare vertical
connector and must pass the UL tests with very hot gases entering the bare single wall pipe.
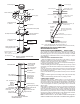
FIG. 5 CONNECTOR CLEARANCES
Use Locking
Bands at Every
Joint
Minimum
Clearance
2”
Ceiling Support
(FSP) (CSP)
Dripless Smoke
Pipe Adapter
(DSA or DSAC)
See Note
Below
Follow Appliance
Instructions For
Clearance. If
Not Given, Use
18”
Follow Appliance
Instructions For
Clearance. If
Not Given, Use
18”
Connector (Or
Smoke Pipe)
NOTE:
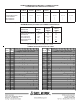
RULES FOR CHIMNEY
HEIGHT ABOVE THE ROOF