
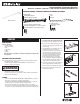
Installation Guide

1
PACKAGING CONTENTS / CONTENU DE L’EMBALLAGE / CONTENIDO DEL PAQUETE
Instruction Manual/Instrucciones/Directives
Questions?/¿Preguntas?/ Questions ? 1-800-334-6871 ConsumerProducts@eaton.com
INSTALLATION INSTRUCTIONS
1. Turn off the power at the main fuse/breaker box.
Carefully open carton, remove fixture from carton.
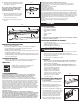
2. Remove from the packaging and remove lens from
the luminaire (Fig. 1) by pulling up from edge of lens
near the endcap.
3. The LED wrap fixture is compatible out of box for
installation with 4” surface J Box with 3.5”
mounting hole spacing. If using 3” J Box with 2.75”
mounting hole spacing use alternate mounting
hole slots in fixture by removing knockouts. Be
sure to properly support fixture before removing
knockouts to help prevent deforming fixture.
Remove appropriate knockouts for mounting.
To remove simply place flathead screwdriver on the
knockout and strike it sharply with a hammer. The
slug may then be removed with pliers (Fig. 2).
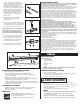
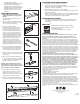
4. Locate wires in outlet box. Connect all fixture wires
to power supply wires: White to white, black to
black, and green to green with wire nuts (D) (Fig. 3).
5. After Connections push all wires and wire nuts
inside junction box (Fig. 4).
ITEMS REQUIRED
(Purchase separately)
• Phillips screwdriver
• Flat head screwdriver
• Pliers
• Safety glasses
• Ladder
• Hammer
Note: This product is not intended for continuous row applications. Suspension kits
sold separately.
IMPORTANT SAFETY INSTRUCTIONS
When using product, basic precautions should always be followed, including the following:
• Read and follow these instructions.
• Heed all warnings, including below warnings AND those included on product.
• Save these instructions and warnings.
• Risk of fire/electric shock.
• Ground fixture to avoid potential electric shock.
• Turn off the power at fuse or circuit breaker box before installation and maintenance.
• Edges may cut. Handle with care.
CAUTION
• Connect model: 4WPLD3140R9, 4WPLD2340R or 2WPLD2040R fixture to a 120 volt,
60 Hz power source. Any other connection voids the warranty.
• Connect model: 4WPLD4035C, 4WPLD4040C, 2WPLD2035C fixture to a 120 or 277
volt, 60 Hz power source. Any other connection voids the warranty
• Fixture should be installed by persons with wiring experience or by a qualified
electrician. The electrical system, and the method of electrically connecting the fixture
to it, must be in accordance with the National Electrical Code and local building codes.
ENGLISH
A. Fixture housing
Alojamiento del accesorio
Boîtier de l’appareil d’éclairage
B. Lens
Lente
Panneau
WPLD Series
WARNING
Fig. 1
Fig. 2
Fig. 3
D. (3) Wire connectors
(3) Conectores de cable
(3) Serre-fils
C. (2) 8-32 x 25 mm #8-32 machine screws
(2) tornillos para máquinas n.° 8-32 de 8-32 x 25 mm
(2) vis de mécanique no 8-32 x 25 mm (1 1/2 po)
Fig. 4