
Instruction Manual

2
NDSP: Inverted Digital readout - used while unit is mounted on truss or ceiling.
(if you are going to be looking at the LCD display while unit is hanging down – it is
recommended that you invert the LCD screen read out so you can look at it normal)
TALL
:
Test all channels of unit. If you want to test all channels. Press Enter.
(LCD changes to read –
CH01 – press Enter. Channel 1 (lamp and fan channel) will
start to come up in brightness and the fans will increase in speed to cool fixture.
Press Black UP button. LCD changes to
CH02. Press Enter. Lamp will start to flash and
strobe.
Press Black UP button. LCD changes to
CH03. Press Enter. Fixture will run through it
full PAN capability.
Press Black UP button. LCD changes to
CH04. Press Enter. Fixture will run through its
full TILT cycle.
Press Black UP button. LCD changes to
CH05. Press Enter. Does fine adjust – PAN.
Press Black UP button. LCD changes to
CH06. Press Enter. Does fine adjust – TILT.
Press
M/C
Black button to exit this test mode.
TLMP: Time of usage on lamp. Press Enter. Fixture will start to come up and fans will increase
in speed for maximum cooling
RSET: Unit resets itself to factory settings. TEST
Press Enter
DEMO: Unit runs it programs in a demo mode. 3 options: O
OFF – Fixture to be controlled by lighting controller
SLAV – subordinate – daisy chained – inline with controller
AUTO – runs automatically
Press Enter
TEST: Specific channel you wish to test.
Press Enter.
Y DIR: Set either clockwise or counterclockwise response. Individual channel test runs
a full range of the Tilt Function (“Y” reverse) – Mirror image if need be.
Press Enter.
X DIR: Set either clockwise or counterclockwise. Individual channel test runs a full
range of the Pan Function (“X” reverse). Mirror image if need be.
Press Enter.
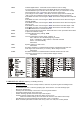
NDST
DISP
TALL
LAMP
NDST
DISP
TALL
LAMP
LAMP INSTALLATION:
Replacing or installing the lamp.
- Disconnect Power
from fixture. If lamp is broken, make sure no pieces of glass are rattling around
inside.
- On the back of the unit. Locate two (2) Spring clips. Push forward – the back will hinge open.
- Remove 8” retaining ring.
- Carefully insert Par 64 lamp of choice into / onto 4 long Teflon holders.
- Push lamp forward enough to the front brace.
- Position retaining clip back around the lamp to hold in place.
- Carefully plug the Ceramic lamp socket onto lamp. As far as it can.
Note:
If not seated correctly, this could cause the socket to come loose from the lamp.
- Hold Back the two spring loaded clips and shut back of unit. Lock in place.
- Move unit head up and down to hear if there is any noise. If no noise, it is correctly seated.