
Technical Manual


smarter locking
© Metra 2019,
All Rights reserved
The content of this document is subject
To change without notice
Page 12
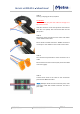
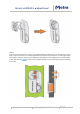
STEP 3:
Start by crimping the first (red) wire.
ATTENTION
Make sure that you push the cable far enough so it
has a firm contact.
Slide the connector to the next position and continue
with the next (white) wire and finish with the last
(blue) wire.
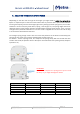
STEP 4:
Repeat the same procedure on the other side and/or
in the middle of the cable.
Photo shows a middle connector. Middle connectors
can be put in the middle or at the ends of the cable.
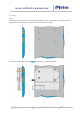
STEP 5:
You should end up with two or more connectors on a
cable.
Photo shows one end connector (left) and one middle
connector (right).
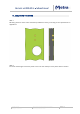
STEP 6:
Connect both ends of the cable to the connection
plate and/or MEW Controller.
NOTE: Example shows Link 8 connection plate, main
connection cable with middle connector and one 6
pole cable.