
Technical Manual

smarter locking
© Metra 2019,
All Rights reserved
The content of this document is subject
To change without notice
Page 9
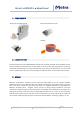
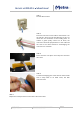
STEP 1:
Find the PIN1 marker.
STEP 2:
Place the connector on the cable so that marker is on
the red wire. There are two possible ways to do it, so
mind also the orientation of the leading dent. To
achieve a good quality contact on all wires, the
connector should be perpendicular to the cable and
the end of the cable should be overhanging the
connector for a few mm.
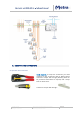
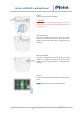
STEP 3:
Place connector into pliers and crimp the connector
till it clicks.
STEP 4:
Cut the overhanging part of the cable on the lock side
with a sharp knife or an OLFA cutter, flat with
connector side.
STEP 5:
Repeat the same procedure on the other side of the cable.