INSTALLATION INSTRUCTIONS FOR PART 99-2005 APPLICATIONS Cadillac 1996-2005 99-2005 KIT FEATURES • DIN mount radio provision with pocket • ISO mount radio provision with pocket KIT COMPONENTS • A) Radio housing • B) Radio housing brackets • C) ISO brackets • D) ISO trim plate • E) Spacer • F) (4) Phillips screws A B C D 98-04S S-E F WIRING & ANTENNA CONNECTIONS (sold separately) Wiring Harness: • GMRC-03 - Cadillac harness with chime 1996-2002 • GMOS-06 - Cadillac OnStar harness 2000-2005 Antenna A
99-2005 Table of Contents Dash Disassembly – Cadillac Eldorado 1996-2002 ...................................................................................... 3-4 – Cadillac Seville 1996-1997 .......................................................................................... 3-4 – Cadillac Seville 1998-2005 ..............................................................................................5 – Cadillac DeVille 2000-2005 .....................................................................
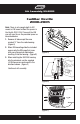
Dash Disassembly 99-2005 Cadillac Eldorado 1996-2002 Seville 1996-1997 1. Remove C-clip on forward facing side of shift knob and pull and remove knob. (Figure A) 2. Remove (2) 9/32” screws on each side of the ashtray assembly and (1) in the middle underneath ashtray insert. (Figure B) 3. Insert a small flat blade screwdriver in between the radio and the switch panel at top of radio and pry up and out to remove switch panel.
Dash Disassembly 99-2005 Cadillac Eldorado 1996-2002 Seville 1996-1997 4. Remove (4) 9/32” screws, (2) from the top and (2) from the bottom, to remove radio. (Figure D, E) 5. Remove the (6) retaining nuts securing the radio and climate control to the factory bracket assembly and slide the climate control outward.
Dash Disassembly 99-2005 Cadillac Seville 1998-2005/DeVille Concours (console shift) 1996-1999 1. Remove (2) 9/32 screws on each side of the ashtray assembly and (1) in the middle underneath ashtray insert. (Figure A) 2. Insert a small flat blade screwdriver in between the radio and the switch panel at top of radio and pry up and out to remove switch panel. (Figure B) (Figure B) 3. Remove (3) 9/32” screws, (1) from the top and (2) from the bottom to remove radio. (Figure C, D) 4.
Dash Disassembly 99-2005 Cadillac Deville 2000-2005 1. Unsnap and remove panel surrounding climate controls and radio. (Figure A) 2. Depress clips on both sides of radio and pull out to remove.
Kit Assembly 99-2005 Cadillac Eldorado 1996-2002 Cadillac Seville 1996-1997 1. Remove all tabs except the ones marked “S-E” from the radio housing. (Figure A) S-E D D 2. Slide the “S-E” radio housing bracket onto the 99-2005 until side clips engage. (Figure B) 98- 04 S 98- 04 S 98- 04 S S-E D 3. Slide the climate control assembly into the bracket/housing assembly and attach with the factory hardware.
Kit Assembly 99-2005 Cadillac Seville 1998-2005/DeVille Concours (console shift) 1996-1999 Note: There is not enough depth to ISO mount or DIN mount without the spacer in the Deville 2000-2004. To mount the DIN you will need to use the provided spacer as described below. 1. Remove all tabs except the ones marked “98-04 S” from the radio housing. (Figure A) 2. Slide the “98-04 S” radio housing bracket onto the 99-2005 until side clips engage. (Figure B) (Figure B) 3.
Kit Assembly 99-2005 Cadillac Deville 2000-2005 Note: There is not enough depth to ISO mount or DIN mount without the spacer in the Deville 2000-2004. To mount the DIN you will need to use the provided spacer as described below. S-E D D 1. Remove all tabs except the ones marked “D” from the radio housing. (Figure A) 98- 04 S 98- 04 S 98- 04 S S-E D D 2. When DIN mounting slide the included spacer onto the DIN cage that came with your aftermarket radio before inserting it into the housing.
Kit Assembly 99-2005 DIN head unit provision 1. Slide the DIN cage into the Radio Housing and secure by bending the metal locking tabs down. (Figure A) 2 Slide the after-market head unit into the cage and secure. (Figure B) 3. Locate the factory wiring harness in the dash. Metra recommends using the proper mating adapter from Metra or AXXESS. Re-connect the negative battery terminal and test the unit for proper operation. 4. Reassemble dash in reverse order of disassembly.
Kit Assembly 99-2005 ISO DIN head unit provision 1. Mount the ISO brackets to the aftermarket radio with the screws supplied with the unit. (Figure A) 2. Slide the after-market radio unit into the cage and secure. (Figure B) 3. Snap the Trim plate into the Radio Housing. (Figure B) 4. Locate the factory wiring harness in the dash. Metra recommends using the proper mating adapter from Metra or AXXESS. Re-connect the negative battery terminal and test the unit for proper operation. (Figure A) 5.
REV. 01/31/12 INSTALLATION INSTRUCTIONS FOR PART 99-2005 METRA. THE WORLD’S BEST KITS.™ metraonline.
INSTRUCCIONES DE INSTALACIÓN PARA LA PIEZA 99-2005 APLICACIONES Cadillac 1996-2005 99-2005 CArACtEríStICAS dEL kIt • Provisión de radio de montaje DIN con bolsillo • Provisión de radio de montaje ISO con bolsillo COmPONENtES dEL kIt • A) Carcasa del radio • B) Soportes de la carcasa del radio • C) Soportes ISO • D) Placa de moldura ISO • E) Espaciador • F) (4) tornillos Phillips A B C D 98-04S E CABLEAdO Y CONEXIONES dE ANtENA F (se venden por separado) Arnés de cableado: • GMRC-03 - Cadillac ha
99-2005 Indice Desmontaje del tablero – Cadillac Eldorado 1996-2002 ...................................................................................... 3-4 – Cadillac Seville 1996-1997 .......................................................................................... 3-4 – Cadillac Seville 1998-2005 ..............................................................................................5 – Cadillac DeVille 2000-2005 ..........................................................................
Desmontaje del tablero 99-2005 Cadillac Eldorado 1996-2002 Seville 1996-1997 1. Retire el gancho C en el lado que da hacia el frente de la perilla de la palanca de velocidades y jale y retire la perilla. (Figura A) 2. Retire los (2) tornillos de 9/32” a cada lado del ensamble del cenicero y (1) en el centro, debajo del inserto del cenicero. (Figura B) 3.
Desmontaje del tablero 99-2005 Cadillac Eldorado 1996-2002 Seville 1996-1997 4. Retire los (4) tornillos de 9/32”, (2) de arriba y (2) de abajo, para retirar el radio. (Figura D, E) 5. Retire las (6) tuercas restantes que sujetan el radio y el control del clima al ensamble del soporte de fábrica y deslice el control de clima hacia afuera.
Desmontaje del tablero 99-2005 Cadillac Seville 1998-2005/DeVille Concours (console shift) 1996-1999 1. Retire los (2) tornillos de 9/32” a cada lado del ensamble del cenicero y (1) en el centro, debajo del inserto del cenicero. (Figura A) 2. Inserte un pequeño destornillador de paleta entre el radio y el panel de interruptores en la parte superior del radio y haga palanca hacia arriba y hacia afuera para retirar el panel de interruptores. (Figura B) (Figura B) 3.
Desmontaje del tablero 99-2005 Cadillac Deville 2000-2005 1. Suelte a presión y retire el panel que rodea los controles del clima y el radio. (Figura A) 2. Presione los ganchos a ambos lados del radio y jale para retirar.
Ensamble del kit 99-2005 Cadillac Eldorado 1996-2002 Cadillac Seville 1996-1997 1. Retire todas las pestañas, excepto las marcadas “S-E” de la carcasa del radio. (Figura A) S-E D D 2. Deslice el soporte de la carcasa del radio “S-E” en el 99-2005 hasta que los ganchos laterales se enganchen. (Figura B) 98- 04 S 98- 04 S 98- 04 S S-E D D 3. Deslice el ensamble de control de clima en el ensamble de soporte/carcasa y una con la tornillería de fábrica.
Ensamble del kit 99-2005 Cadillac Seville 1998-2005/DeVille Concours (console shift) 1996-1999 Nota: No hay suficiente profundidad para un montaje ISO o DIN sin el espaciador en el Deville 2000-2004. Para montar el DIN, deberá utilizar el espaciador suministrado como se describe a continuación. 1. Retire todas las pestañas, excepto las marcadas “98-04 S” de la carcasa del radio. (Figura A) 2. Deslice el soporte de la carcasa del radio “98-04 S” en el 99-2005 hasta que los ganchos laterales se enganchen.
Ensamble del kit 99-2005 Cadillac Deville 2000-2005 Nota: No hay suficiente profundidad para un montaje ISO o DIN sin el espaciador en el Deville 2000-2004. Para montar el DIN, deberá utilizar el espaciador suministrado como se describe a continuación. S-E D D 1. Retire todas las pestañas, excepto las marcadas “D” de la carcasa del radio. (Figura A) 98- 04 S 98- 04 S 98- 04 S S-E D D 2.
Ensamble del kit 99-2005 Provisión de unidad central DIN 1. Deslice la reja DIN en la carcasa del radio y sujétela doblando hacia abajo las pestañas de metal. (Figura A) 2 Deslice la unidad central de mercado secundario en la reja y sujétela. (Figura B) 3. Ubique el arnés del cableado de fábrica en el tablero. Metra recomienda usar el adaptador de acoplamiento adecuado de Metra o AXXESS. Vuelva a conectar el terminal negativo de la batería y pruebe la unidad para verificar que funcione correctamente.
Ensamble del kit 99-2005 Provisión de unidad central ISO DIN 1. Monte los soportes ISO en el radio con los tornillos suministrados con la unidad. (Figura A) 2. Deslice el radio de mercado secundario en la reja y sujételo. (Figura B) 3. Coloque a presión la placa de la moldura en la carcasa del radio. (Figura B) 4. Ubique el arnés del cableado de fábrica en el tablero. Metra recomienda usar el adaptador de acoplamiento adecuado de Metra o AXXESS.
REV. 01/31/12 INSTRUCCIONES DE INSTALACIÓN PARA LA PIEZA 99-2005 METRA. THE WORLD’S BEST KITS.™ metraonline.