
Installation

AX-SUB5RVC-6V AX-SUB5RVC-6V
INSTALLATION INSTRUCTIONS INSTALLATION INSTRUCTIONS
AX-SUB5RVC-6V AX-SUB5RVC-6V
INSTALLATION INSTRUCTIONS INSTALLATION INSTRUCTIONS
REV. 1/4/18 REV. 1/4/18© COPYRIGHT 2018 METRA ELECTRONICS CORPORATION © COPYRIGHT 2018 METRA ELECTRONICS CORPORATION
Integrate • AxxessInterfaces.com Integrate • AxxessInterfaces.com
REV. 1/4/18 REV. 1/4/18© COPYRIGHT 2018 METRA ELECTRONICS CORPORATION © COPYRIGHT 2018 METRA ELECTRONICS CORPORATION
Integrate • AxxessInterfaces.com Integrate • AxxessInterfaces.com
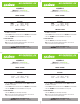
• Connect the Black wire from the AX-SUB5RVC-6V, and the Black wire from the
AX-CAM6V to chassis ground.
•
Connect the Red wire labeled “Camera Power 6V” to the Blue/Red wire of the AX-CAM6V
• Connect the Blue/White wire from the AX-CAM6V to accessory power
To the aftermarket radio:
• Connect the Yellow RCA jack to the backup camera input.
Note: The reverse wire from the aftermarket radio must be connected to the
vehicle’s reverse wire in order to function properly.
INTERFACE COMPONENTS
INTERFACE COMPONENTS
INTERFACE COMPONENTS
INTERFACE COMPONENTS
• AX-SUB5RVC-6V • AX-CAM6V 12-volt to 6-volt converter
• AX-SUB5RVC-6V • AX-CAM6V 12-volt to 6-volt converter
• AX-SUB5RVC-6V • AX-CAM6V 12-volt to 6-volt converter
• AX-SUB5RVC-6V • AX-CAM6V 12-volt to 6-volt converter
*Visit AxxessInterfaces.com for up-to-date vehicle specific applications.
*Visit AxxessInterfaces.com for up-to-date vehicle specific applications.
*Visit AxxessInterfaces.com for up-to-date vehicle specific applications.
*Visit AxxessInterfaces.com for up-to-date vehicle specific applications.
AX-SUB5RVC-6V
Subaru (with 7” screen) 2015-up*
AX-SUB5RVC-6V
Subaru (with 7” screen) 2015-up*
AX-SUB5RVC-6V
Subaru (with 7” screen) 2015-up*
AX-SUB5RVC-6V
Subaru (with 7” screen) 2015-up*
APPLICATIONS
APPLICATIONS
APPLICATIONS
APPLICATIONS
SUBARU
Crosstrek 2016
Forester 2015-2016
Impreza 2015-2016
Outback 2015-2016
XV Crosstrek 2015
SUBARU
Crosstrek 2016
Forester 2015-2016
Impreza 2015-2016
Outback 2015-2016
XV Crosstrek 2015
SUBARU
Crosstrek 2016
Forester 2015-2016
Impreza 2015-2016
Outback 2015-2016
XV Crosstrek 2015
SUBARU
Crosstrek 2016
Forester 2015-2016
Impreza 2015-2016
Outback 2015-2016
XV Crosstrek 2015
CONNECTIONS TO BE MADE
CONNECTIONS TO BE MADE
CONNECTIONS TO BE MADE
CONNECTIONS TO BE MADE