PoE NVR Kit Quick Start Guide Please read the Quick Start Guide fully before using the product and keep it for your records. Related tools and documents of products, please download from http://www.metrahometheater.com.
Statement Thank you for purchasing our products, if you have any questions about setup or product use, please contact us. This manual is used for PoE NVR and PoE cameras in the kit. Safety Precautions 1. Please modify default password immediately after the equipment is installed, to avoid unauthorized access. 2. Please do not place and install the equipment in direct sunlight or near heating equipment. 3. Please do not install the equipment in wet, dusty or locations with smoke. 4.
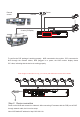
Products Appearance Description NVR Ports: HDMI port, VGA video output port, Audio output port, Ethernet port, USB port, PoE LAN ports, Power Input port. IP camera Ports: Ethernet Port, Power input port. VGA Video output interface A-OUT With PoE function network interface VGA Audio output USB LAN7 LAN5 LAN3 LAN1 LAN8 LAN6 LAN4 LAN2 USB 2.
Remote access Router Internet monitoring options A variety of display POWER NET LAN2 LAN4 LAN6 LAN8 LAN1 LAN3 LAN5 LAN7 USB VGA A-OUT To confirm the PoE package is working properly:NVR connected to the monitor, IPC's connected to NVR through the network cables, NVR plugged in to power, the NVR monitor display shows IPC video, indicating that the device is working properly. Note: Images for instruction use only, your unit may look different but use the same methods.
System login Start up the NVR, right click the desktop and enter the user login interface. Input the username and password, click "Login". System default username : “ admin” Password : “12345”. Preview Enter preview interface after device start up. Preview interface includes date and time of system, and channel names. Login to system, double left click to switch between full screen and multi-screen. Menu basic operating instructions 1.
Shortcut menu introduction Right click to popup shortcut menu, the menu consists with the following three parts: Preview mode: Select the preview mode in the menu bar you prefer. Shortcut menu mode: There is Poll, Record,Add Camera, NVR image, you can click and then enter corresponding menu. Main menu:It contains 【Playback】,【Export】,【HDD】,【Record】,【Camera】, 【Configuration】 ,【Maintenance】,【Shutdown】eight sections. Recording Settings 1. HDD formatting. Make sure the hard disk is detected and works well.
3. Motion Detection Setting, enable “Motion” to activate motion recording, motion sections have no more than 6 time periods each day. If normal record and motion record are overlapped, it will only save the motion records while motion detection comes up. Playback Enter “Playback” interface by clicking “Playback” from shortcut or main menu, select channels and search the recorded files and playback what you want.
Live View 1. Left click【1-Win】/【4-Win】/【8-Win】/【9-Win】in the menu, and enter real time view interface, and you can view one or more cameras at the same time. 2. PoE NVR kit cameras are pre-connected to the NVR, connect all IPC's to NVR, connect the NVR to the monitor, and power it on, then you can view real time preview. If you change the cameras default IP address, you will need to re-add the IPC's to the NVR.
Webpage NVR Login 1. Login to NVR on LAN (PC & NVR connected to same router LAN) 1. Make sure the NVR and the connected PC (computer) are in the same segment. If not, please set IP address of your PC to the same segment as the NVR’s, for example ‘192.168.1.33’, but it must be different IP as the NVR’s. ( Note: NVR default IP address is 192.168.1.88). 2. Open IE (Internet Explorer) browser, Select Tools > Internet Options > Safety > customized. 3.
2. IPC LAN Login (the PC and the IPC are on the same router) 1. Connect LAN port with network cable for your PC and IPC. Make sure the devices and the connected PC are on the same segment. If your PC has different segment, please set IP address of your PC to the same segment as the IPC ,for example “192.168.1.104”,but it must be different IP as the NVR’s and IPC’s. (Default IP address of IPC is 192.168.1.168) 2. Open IE browser, Select Tools > Internet Options > Safety > customized. 3.
Mobile App Access Download and install SpyclopsPRO on a smart phone or tablet using either option below: 1. On the Android App Store or iPhone App Store enter “SpyclopsPro” search, download and install. 2. Scan the following QR codes to download and install the App. Android iOS Run the SpyclopsPRO App (new users need to register an account to log in first). The steps to add devices are as follows: To add with LAN Search method follow steps 1 - 9.2 and for QR scan replace 5.1 - 7.1 with 5.2 - 6.2.
8.1 7.1 9.2 1. Tap in the upper left menu bar ; 5.2 8.1 Tap the device you would like to add 6.2 9.1 Enter the username and password and tap Done. 2. Tap "Device" 3. Tap 9.1 in the upper right menu bar; 4. Tap "Add device" 5.1 Tap LAN Search menu 9.2 Enter your choice of Device name, select the group you would like to add to and tap "Finish" in the upper right. The device will now be found in "My Devices" 5.2 Tap "Manual Add" 6.
How to playback recorded videos with app 1 1. 2. 3. 4. 2 3 Tap "Tap to select Camera" Tap "My devices" Tap the check box for the camera to view recorded videos and tap "Done" Swipe left or right on the time line to change the recording time view. Note: Green bars are recording from schedule and Red is from motion detection.
©2020 Metra Electronics Corporation 460 Walker Street, Holly Hill, FL 32117-2699 Sp Specifications are subject to change without notice. All trademarks are the property of their respective owners. 386-255-0234 • www.spyclopsusa.