Wireless NVR Kit Quick Start Guide Please read the Quick Start Guide fully before using the product and keep it for your records. Related tools and documents of products, please download from http://www.metrahometheater.com.
Declaration Thank you for purchasing our products, if you have any questions about setup or product use, please contact us. This manual is for Spyclops PRO wireless kits (wireless NVR & wireless cameras). Safety Precautions 1. Please modify default password immediately after the equipment is installed, to avoid unauthorized access. 2. Please do not place and install the equipment in direct sunlight or near heating equipment. 3. Please do not install the equipment in wet, dusty or locations with smoke. 4.
Products Appearance Description LAN、Audio Output、VGA、HDMI、Power input port、Antenna. Antenna LAN Audio Output VGA HD Power input port Notes: Images for instruction use only, your unit may look different but use the same methods. Wireless NVR Kits Quick Installation Guide This wireless NVR Kit has easy installation, plug and play, wireless communication uses automatic passwords generation mechanism to ensure that the monitored video can not be intercepted under the default passwords. 1. Install HDD.
2. Make sure wireless NVR Kit is working properly. Connect NVR to monitor, all devices powered on, no settings to adjust as this is set to auto-pair. When all of the IPC (IP Camera) videos appear on the display, the device is working properly and can be installed in the next step. Notes: Please make sure the NVR video output and monitor input have been connected. Please only use the included power supply in the package to prevent damaging the NVR or IPC's.
Correct demonstration Ideal Installation Mode ........ .... ... .. ... ........ Figure 1 Suggested Not Suggested Figure 2-1 Figure 2-2 Notes: Images for instruction use only, your unit may look different but use the same methods.
System login Start up the NVR, right click the desktop and enter the user login interface. Input the user name and password. System default user name : “admin” password : “12345”. Live View After the device is started, you can enter the preview screen. The system date, time, and channel name can be seen on the preview screen. After logging in to the system, double-click the left mouse button to preview the single screen; double-click the left mouse button again to return to the multiscreen preview.
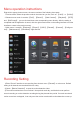
Menu operation instructions Right click to popup shortcut menu, the menu consists of the following three parts: 1.Preview mode: Select the preview mode in the menu bar you like, such as 【1-Win】 or 【4-Win】. 2.Shortcut menu mode: It contains 【Poll】, 【Record】,【Add Camera】, 【Playback】, 【PTZ】 and 【NVR Image】, you can click and then enter corresponding menu directly.
Playback 1.Enter “Playback” interface by clicking “Playback” from shortcut or main menu. 2.Select channels,record mode, date and search the recorded files, click the play button in the lower left corner of the interface to play the video file, or drag the time progress bar to play the video file at the specified time.
PC Side LAN Access 1. PC and NVR are connected in the same LAN (connected to the same router). 2. Open the search tool on the PC, select the target device from the search results and double-click with the left mouse button to enter the login interface (search tool can be downloaded and installed at: http://www.metrahometheater.com/). 3)Enter the username and password and click Login (the default username is admin and the password is 12345).
Mobile App Access Download and install SpyclopsPRO on a smart phone or tablet using either option below: 1. On the Android App Store or iPhone App Store enter “SpyclopsPro” search, download and install. 2. Scan the following QR codes to download and install the App. Android iOS Run the SpyclopsPRO App (new users need to register an account to log in first). The steps to add devices are as follows: To add with LAN Search method follow steps 1 - 9.2 and for QR scan replace 5.1 - 7.1 with 5.2 - 6.2.
8.1 7.1 9.2 5.2 8.1 Tap the device you would like to add in the upper left menu 1. Tap 9.1 6.2 9.1 Enter the username and password and tap Done. 2. Tap "Device" bar ; 9.2 Enter your choice of Device name, select the group you would like to add to and tap "Finish" in the upper right. The device will now be found in "My Devices" 3. Tapin the upper right menu bar; 4. Tap "Add device" 5.1 Tap LAN Search menu 5.2 Tap "Manual Add" 6.
How to playback recorded videos with app 1 1. 2. 3. 4. 2 3 Tap "Tap to select Camera" Tap "My devices" Tap the check box for the camera to view recorded videos and tap "Done" Swipe left or right on the time line to change the recording time view. Note: Green bars are recording from schedule and Red is from motion detection.
Wireless pairing The Wi-Fi NVR Kits have been paired with the code at the factory, and can be mapped when powered. If there is a special situation, you need to re-pair the code. You can right click on the NVR and click 【Add Camera】 in the shortcut menu to enter the Add Camera interface. Click 【Wireless Code Add】, within 120 seconds of the NVR pair code countdown, long press the button on the camera pigtail line (about 6 seconds) until the camera infrared light flashes.
©2020 Metra Electronics Corporation 460 Walker Street, Holly Hill, FL 32117-2699 Sp Specifications are subject to change without notice. All trademarks are the property of their respective owners. 386-255-0234 • www.spyclopsusa.