XVR Quick Start Guide Please read the Quick Start Guide fully before using the product and keep it for your records. Related tools and documents of products, please download from http://www.metrahometheater.com.
Statement Thank you for purchasing our products, if you have any questions about setup or product use, please contact support. This manual is used for XVR's. Safety Precautions 1. Please modify default password immediately after the equipment is installed, to avoid unauthorized access. 2. Please do not place and install the equipment in direct sunlight or near heating equipment. 3. Please do not install the equipment in wet, dusty or locations with smoke. 4.
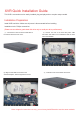
XVR Quick Installation Guide This XVR is convenient can be easily installed, plug and play and no complex setup needed. Installation Preparation Install XVR hard drive. Make sure all power is disconnected before installing. Installation tools: Phillips screwdriver (Please use surveillance grade hard disk drive only to avoid poor drive performance) (1)Unscrew the screws on the back and sides of the chassis and remove the cover.
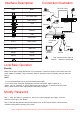
Interface Description Icon Connection Illustration Ethernet Cable Name DC Power Input AC Power Input Power Cabl e IPC Power switch VGA HDMI Ethernet Switch Power Camera RG59 Cable XVR Ethernet Cable USB A-IN Audio Input A-OUT Audio Output Alarm-IN Alarm In Alarm-OUT Alarm Out RS485 RS485 RS232 RS232 BNC VGA/HDMI cable Power Monitor Mouse Only connect power when all Caution cables are connected Local Basic Operation Boot Up Make sure the input voltage matches the XVR consumption.
Step 3: Set the security question, select the security question 1, 2, 3 by the pull-down operation, and set the answer to the corresponding security question. Step 4: Insert the USB flash drive into the device, and click "Export Key > Comfirm > Save". The password is changed. Quick Configuration After the device is powered configuration, format hard disk, through the Wizard.
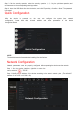
Channel Configuration Step 1: Choose "Menu > Configuration > Channel Config". Step 2: Select the signal access type of each channel as required. Step 3: Click "Apply > Confirm", the device restarts and the modified Channel configuration takes effect. 1. Single channel select signal access mode to follow certain rules, the interface will be automatically reflected in the optional options. 2. The actual access signal should be checked with the signal mode.
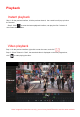
Playback Instant playback Step 1: On the preview interface, click the preview channel, the control bar will pop up below the channel. Step 2: Click " " to enter the instant playback interface, can play the first 5 minutes of the current channel video. Video playback Step 1: On the preview interface, right-click to enter the menu, and click " ". Step 2: Select "Channel > Date", the searched video is displayed on the time progress bar, click " " to start playing the video.
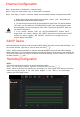
Normal Event Step 1: On the preview interface, right-click to enter the menu, and click " > Normal Event". Step 2: Choose "Event Type > Channel > Enable" and set the corresponding alarm parameters. The device's normal event alarms include Motion Detection, Video Tampering, Video Loss, Alarm Input, Alarm Output, Exception, and Buzzer. Smart Event Step 1: On the preview interface, right-click to enter the menu, and click " > Smart Event".
Browser XVR Login 1. Login to XVR on LAN (PC & XVR connected to same router LAN) 1. Make sure the XVR and the connected PC (computer) are in the same segment. If not, please set IP address of your PC to the same segment as the XVR’s, for example ‘192.168.1.33’, but it must be different IP as the XVR’s. ( Note: XVR default IP address is 192.168.1.88). 2. Open IE (Internet Explorer) browser , Select Tools > Internet Options > Safety > customized. 3.
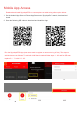
Mobile App Access Download and install SpyclopsPRO on a smart phone or tablet using either option below: 1. On the Android App Store or iPhone App Store enter “SpyclopsPro” search, download and install. 2. Scan the following QR codes to download and install the App. Android iOS Run the SpyclopsPRO App (new users need to register an account to log in first). The steps to add devices are as follows: To add with LAN Search method follow steps 1 - 9.2 and for QR scan replace 5.1 - 7.1 with 5.2 - 6.2.
8.1 7.1 9.2 5.2 8.1 Tap the device you would like to add in the upper left menu 1. Tap 6.2 9.1 Enter the username and password and tap Done. 2. Tap "Device" 3. in Tap the 9.1 9.2 Enter your choice of Device name, select the group you would like to add to and tap "Finish" in the upper right. The device will now be found in "My Devices" upper right menu bar; 4. Tap "Add device" 5.2 Tap "Manual Add" 6.1 Tap LAN Search button 7.1 Tap on the 6.
How to playback recorded videos with app 1 1. 2. 3. 4. 2 3 Tap "Tap to select Camera" Tap "My devices" Tap the check box for the camera to view recorded videos and tap "Done" Swipe left or right on the time line to change the recording time view. Note: Green bars are recording from schedule and Red is from motion detection. ©2020 Metra Electronics Corporation 460 Walker Street, Holly Hill, FL 32117-2699 Sp Specifications are subject to change without notice.