
Manual

1. Find a suitable location to surface mount install the camera. Make
sure the camera’s view is unobstructed and be careful not to drill into
any wires that might damage the vehicle. When all connections have
been made and before mounting the camera, verify the camera is
working and has good view of the area. Then mount the camera
down with the supplied two screws.
2. Connect the RED wire to the +12 volt reverse wire
3. Connect the BLACK wire to ground (a metal, non-painted surface).
4. Run video cable though vehicle, up to video display. (Avoid placing
video cable where it can get pinched or damaged).
5. Attach the YELLOW video rca to camera’s output and to the
reverse camera input of the radio or video display.
1. Find a suitable location to surface mount install the camera. Make
sure the camera’s view is unobstructed and be careful not to drill into
any wires that might damage the vehicle. When all connections have
been made and before mounting the camera, verify the camera is
working and has good view of the area. Then mount the camera
down with the supplied two screws.
2. Connect the RED wire to the +12 volt reverse wire
3. Connect the BLACK wire to ground (a metal, non-painted surface).
4. Run video cable though vehicle, up to video display. (Avoid placing
video cable where it can get pinched or damaged).
5. Attach the YELLOW video rca to camera’s output and to the reverse
camera input of the radio or video display.
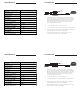
II. Connection
II. Connection
I. Specifications
I. Specifications
RED
BLACK
Video (in)
RED
BLACK
Video (in)
CMOS 7070
PAL / NTSC
648 H x 488 V
480 TV Lines
More than 48 dB
110 mA
℃ ℃
℃ ℃
110
o
0.6 Lux
CMOS 7070
PAL / NTSC
648 H x 488 V
480 TV Lines
More than 48 dB
110 mA
℃ ℃
℃ ℃
110
o
0.6 Lux