MCD-479 OWNER'S MANUAL + – PLL SYNTHESIZER STEREO RADIO WITH COMPACT DISC PLAYER DIGITAL
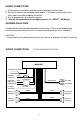
INSTALLATION Notes: • Choose the mounting location where the unit will not interfere with the normal driving function of the driver. • Before completly installing the unit, connect the wiring temporarily and make sure it is functioning properly. • Use only the parts included with the unit to ensure proper installation. The use of unauthorized parts can cause malfunctions. • Consult with your Metrik dealer if installation requires the drilling of holes or other modifications of the vehicle.
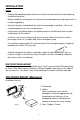
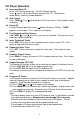
1 1. 2. 3. 4. 5. 6. Dashboard Nut (5mm) Spring washer Screw (5 x 25mm) Screw Strap Be sure to use the strap to secure the back of the unit in place. The strap can be bent by hand to the desired angle. 7. Plain washer 6 7 4 2 5 3 (Fig. 2) Removing the unit 1. Frame 2. Insert fingers into the groove in the front of frame and pull out to remove the frame. (When re-attaching the frame, point the side with a groove downwards and attach it.) 3.
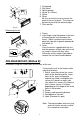
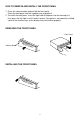
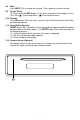
HOW TO REMOVE AND INSTALL THE FRONT PANEL 1. Press the release button and pull-off the front panel. Place the front panel into the supplied case to protect it. 2. To install the front panel, insert the right side of thepanel into the housing first, then press the left side in until it locks in place. If the panel is not correctly installed some of the function keys or the display may not function properly.
WIRING CONNECTIONS 1. All connections should be soldered and insulated with electrical tape. 2. Be sure to connect the red power input lead to + 12V power terminal after all the other leads have been properly connected. 3. Run all ground wires to a common ground. 4. After all the connections are completed, press the “RESET” (26) button. ANTENNA RELAY WIRE A yellow wire has been provided for power antenna relays.
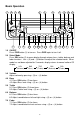
Basic Operation 2 25 3 6 9 8 16 11 12 10 13 + – 4 7 5 18 19 20 17 21 22 23 24 15 1 14 1.0 ON/OFF Press PWR button (1) to turn on. Press PWR again to turn it off. 2.0 Select Mode Press SEL button (2) to move display through volume, bass, treble, balance and fader functions. Use + (3) and – (4) buttons to adjust the selected mode. When mode has not been adjusted for 3 seconds, display returns to normal radio or CD display.
8.0 Mute Press MUTE (13) to silence the receiver. Press again to resume listening. 9.0 Set the Clock 10.1 Press and hold DSP button (11) for three seconds until the display flashes. 10.2 Press (7) to change hours, (6) to change minutes. 10.0 Release Press REL button (25) until "tack" sound is heard, then the left-hand side of the panel will be ejected. 11.0 Reset Button Function RESET button (26) is placed on the housing and must be activated with either a ball-point pen or thin metal object.
Radio Operation 1.0 Select a Band Press BND button (5) to change between three FM bands and AM/LW bands. Each band stores up to six preset stations. FMI FMII FMIII AM 2.0 Select a Station Touch a TUNE button (7) or (6) for less than two seconds to move radio frequency number down or up on step. Hold a TUNE button (7) or (6) for more than two seconds to seek the next clear station. 3.0 Preset Stations Six number buttons (17) store and recall stations for each band. 3.1 Store a station: 3.1.
CD Player Operation 1.0 Insert and Eject CD Insert a CD into the loader slot. The CD will begin to play. Press (eject) (10) to stop CD play and eject the CD. The Receiver automatically switches to radio operation. 2.0 Skip Tracks Press TUNE on display. (7) or (6) to advance CD to next track. Track numbers show 3.0 Pause CD During CD player operation, press button (24) pause CD play. "PAUS" appears in the display. Press again to resume play. 4.
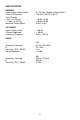
SPECIFICATION GENERAL Power Supply Requirements Chassis Dimensions Tone Controls - Bass (at 100 Hz) - Treble (at 10 KHz) Maximum Output Power CD PLAYER Signal to Noise Ratio Channel Separation Frequency Response : DC 12 Volts, Negative Ground ONLY : 178 (W) X 155 (D) X 50 (H) : +10 dB/–10 dB : +10 dB/–10 dB : 25W X 4 (ch) : < 60 dB : < 60 dB : 20 Hz - 20 KHz RADIO FM 87.5 to 107.9 MHz 10.
TROUBLE SHOOTING Before going through the check list, check all wiring connections. If any of the problems persist after check list has been completed, consult your Metrik dealer. Symptom No power. Cause Solution The car ignition is not on. If the power supply is properly connected to the car accessory terminal, switch the ignition key to "ACC". The fuse is blown. Replace the fuse. Presence of CD disc inside the player. Remove the disc in the player, then put a new one.
LIMITED ONE YEAR WARRANTY This warranty shall be in effect for a period of one year from the date of the first consumer purchase. This warranty is valid during the warranty period providing that proof of date of purchase from an authorized dealer is presented whenever warranty service is required. To receive service for this product return it to the Metrik dealer from whom it was purchased and such dealer will arrange for service. If shipment of the product is required, it should be packed securely.