
User's Guide
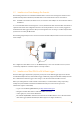
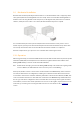

Table Of Contents
- Remote Terminal Unit M717
- Table Of Contents
- Introduction
- Installation
- Register the RTU to the M2M Gateway
- The SDI Connector
- The MPI Connector
- The Micro USB Service Connector
- About the Data Acquisition Subsystem
- SDI-12 Sensors
- Create a New Template From an Existing One
- Create a New Template From Scratch
- Interface to a Davis Vantage Pro Console
- Interface to a Thies TDL14 or DL16 Data Logger
- Mechanical Installation
- Operation
- Configuration
- Commands
- General Commands
- help
- ver
- echo
- ps
- date
- log
- attr
- pin
- hwid
- connect
- xfer
- fwupdate
- reboot
- exit
- Data Acquisition Commands
- dacq
- dacq info
- dacq sample
- dacq retrieve
- dacq abort
- dacq date
- dacq interval
- dacq direct
- dacq t
- hist
- hist info
- hist stat
- hist map
- hist purge
- Data Acquisition Legacy Commands
- sdi t
- thi t
- thi direct
- Communication Commands
- net
- net get
- net up
- net down
- net session
- modem
- modem direct
- modem pwrdown
- modem pwrup
- modem reset
- modem mode
- File System Commands
- ls
- mkdir
- cd
- cp
- pwd
- rm
- cat
- Command Line Interface Error Messages
- Attributes
- Technical Specifications

2.9. Mechanical Installation
The M717 unit should be preferably mounted outdoors on a 40 mm diameter mast or support by means
of an (optional) metallic mounting fixture and a hose clamp. In this case fasten first mounting fixture to
the M717 enclosure using two M6 screws and spacers (see the figure below). If the unit is not installed
outdoors, rather placed on a table or in a cabinet, the metallic fixture may not be required.
It is recommended to place the top of the unit (where the internal antennas reside), not too close to
metallic objects, especially to the mast itself. Ideally the unit should be mounted at the top of the mast.
Use tie wraps to fasten the cables to the mast after the mechanical installation is completed.
If the unit is kept indoors, try to place it close to a window if the cellular signal is weak.
2.10. Operation
After being powered up, an uninitialised RTU will first check the SIM card and extract the provider specific
information (APN, Name, Password) from it. This information, together with the initial address of the
Metrilog M2M Gateway is stored in a table in the RTU’s firmware.
Note: The RTU must be already registered on the Metrilog M2M Gateway as described at the beginning of this
section. In addition, the SIM card must be active. If not sure, please contact Metrilog.
At this point, the RTU is able to connect via the cellular network to the M2M Gateway. If the connection
succeeds, the RTU retrieves its configuration, including its account data and the attached sensors. The
account data is based on the credentials offered by information contained in the SIM card, the IMEI, and/
or the serial number of the device. If the SIM card is not known to the M2M Gateway, the RTU will not be
able to log in and retrieve configuration and account data. The error messages in the log file document
such situations, as well as other similar potential issues. You can see the log files, if you have direct access
to the unit, by connecting it to a PC using the USB connector. For more details see the “Commands”
section.
13