
Troubleshooting guide

Copyright © 4/20/2006 Travis Industries, Inc.
Configuring the Control Board
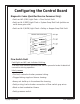
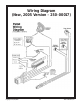
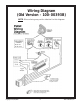
Using this Control Board with Older Wiring Harnesses
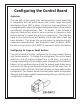
When the control board is installed on an older wire harness the 4 pin molex jumper plug on the back
of the control board next to the stock wire harness must be installed. This jumper replaces the
diagnostic wires (see “”) that are present on the new wiring harness. The control board will work
normally, but the diagnostic capabilities will not function.
Technical Notes for Operation
The new pellet control board is essentially the same as our old board. The biggest difference between
them is that buttons were used in place of knobs on the heat and fan controls.
Make sure to give the home owner the “Pellet Heater Operating Instructions” if you are replacing
an older board (the final 4 pages of this instruction sheet). It contains the new operating
instructions for this control board.
A few changes were made to accommodate the new control board. The start up cycle indicator on
the old board illuminates all heat output indicator lights to show the unit is in a start-up cycle and
adjusting the heat setting knob would not change them. On the new board to enable adjusting the
run settings during start-up we made the start-up indicator the blinking #1 heat output light. If the
#1 heat output light is blinking the board is in a start-up mode and the blower and auger outputs can
not be adjusted. The run settings the unit will go to after start-up are displayed on the heat output
indictor. These settings can be adjusted any time during start up by pushing the up or down heat
buttons on the panel. When the fan setting is adjusted up or down the heat output indicators will
turn off and the fan setting will display.
Another feature we added to the control board is a manual auger feed. This button can be used to
prime and empty the auger or speed the initial delivery of pellets to the burn pot. All start-up timing
remains the same and the stove will still self prime the auger tube – this option allows the operator
an additional option. It is not needed for normal operation.
All voltage outputs and feed rates remain the same as the old board. There is a difference in respect
to the auger on/off times. The auger timing was changed to shorten the interval between pellet drops
to the burn pot. For example, on low the auger used to turn for 3 seconds and remain off for 13 seconds,
for this same condition this control board turns the auger for 2.5 seconds and remains off for 10.7
seconds. This produces the same amount of time the auger is turning and not turning but gives a
steadier flame height and less incidental outages on low.
2