
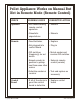
Troubleshooting guide


b
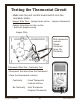
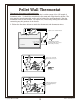
Swing the
panel
open.
c
Thread the thermostat wire, quick-
connect end first, through the hole in the
rear panel.
a
Phillips
Screwdriver
Open the hopper lid and remove the
screw holding the right panel in place.
d
Attach the quick-
connects to the
thermostat posts
on the circuit
board (orientation
does not mater).
Pull on the thermostat
wire to allow just enough
slack to allow the right
side panel to open.
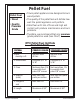
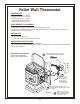
COMPATIBILITY
• All Travis Gas Stoves & Inserts
• Newport Pellet Stoves & Inserts
• Pioneer Pellet Stoves & Inserts
• Astoria Pellet Stoves & Inserts
• Yankee Pellet Stoves & Inserts
ITEMS NEEDED FOR ASSEMBLY
• Standard Screwdriver
• Additional tools may be required for laying the thermostat wire
• You may need additional tools to access the on/off switch on certain gas heaters - refer to the
instructions in the owner's manual.
PACKING LIST
• Thermostat
• Thermostat wire (20' long)
• 2 Screws (for attaching the thermostat to wall)
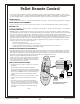
INSTALLATION INSTRUCTIONS
! This kit must be installed by a qualified technician.
! Do not connect 110 VAC to the gas control valve or on/off switch on gas heaters or the thermostat
posts on pellet heaters.
Pellet Heater Installation
Attach the thermostat
wire to the circuit board.
Copyright © 4/20/2006 Travis Industries, Inc.
Pellet Wall Thermostat
4