
Owner manual


3 Installation
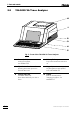
746 VA Trace Analyzer / 747 VA Stand
3-2
3.2 Installation of 746 VA Trace Analyzer
Follow the instructions below for connecting to the power supply. If
the instrument is operated with the mains voltage set wrongly and/or
wrong mains fuse there is a danger of fire!
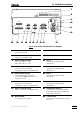
3.2.1 Setting the instrument supply voltage
Before switching on the 746 VA Trace Analyzer for the first time, check that the
mains voltage set on the instrument (visible in mains voltage selector 99) matches
the local power supply voltage. If this is not the case, you must change the voltage
set on the instrument by moving the mains voltage selector 99 with a screwdriver:
230V
115V
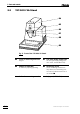
3.2.2 Fuses
The 746 VA Trace Analyzer contains 2 fuses 1010 and 1212 built in as standard, both of
type 2 ATH (2 A, slow-blow, high breaking capacity, Metrohm ordering No.
U.600.0107).
Ensure that the instrument is never put into operation with fuses of
another type, otherwise there is danger of fire!
To change blown fuses, proceed as follows
1
Change Fuse 1010 (neutral, 2 ATH, slow-blow)
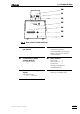
• Disconnect mains cable from mains connection plug 1313.
• Using a screwdriver, turn the fuse holder 1010 to the left until it can be
pulled out.
• Take out fuse holder, remove blown fuse and insert replacement fuse
(2 ATH, slow-blow) in the holder.
• Reinsert fuse holder in instrument, push in with a screwdriver and fix by
turning to the right.
2
Change Fuse 1212 (phase, 2 ATH, slow-blow)
• Disconnect mains cable from mains connection plug 1313.
• Using a screwdriver, push the fuse holder 1212 upwards until it can be
pulled out.
• Take out fuse holder, remove blown fuse and insert replacement fuse
(2 ATH, slow-blow) in the holder.
• Push fuse holder back into instrument until it clicks into place.
Positions of mains voltage
selector 99:
115: 100 ... 120 V ± 10%
230: 220 ... 240 V ± 10%