
Owner's manual

2.5 Reference electrode
797 VA Computrace / Hardware-Manual 8.797.8001EN
37
2.5.2 Startup procedure
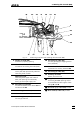
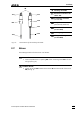
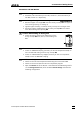
The reference electrode 26 is supplied in modular form as the reference system 100
and the electrolyte vessel
101 and has first to be filled and assembled as follows:
1 Add internal electrolyte
Filling of the reference system is necessary only when the optional 6.0728.010
Reference system supplied dry is used, if the internal electrolyte solution has to
be renewed / filled up or if gas bubbles interrupt the electrical connection.
• Hold reference system
100 so that diaphragm 107 faces upwards.
• Unscrew diaphragm support
106.
• Fill electrolyte compartment
105 completely with the desired internal
electrolyte. Expel any air bubbles by tapping shaft gently.
• Screw diaphragm support
106 back on, the electrolyte solution thus dis-
placed is expelled through the vent opening
103.
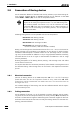
2 Add bridge electrolyte
• Fill internal compartment 109 of the electrolyte vessel 101 with a suitable
bridge electrolyte whose composition depends on the analyses to be per-
formed (aqueous or non-aqueous solution, composition of the supporting
electrolyte, etc.).
• For the determination of organic additives in electroplating bath solutions
with CVS and CPVS use electrolyte c(KNO3) = 1 mol/L (Metrohm order no.
6.2310.010).
If you use the same solution for the bridge electrolyte and the internal
electrolyte (single-junction operation), the inner diaphragm
107 can
be omitted to reduce the electrical resistance: Unscrew diaphragm
support
106 with diaphragm 107 from the reference system 100.
3 Screw reference electrode together
• Insert the filled reference system 100 in the vessel 101 filled with bridge
electrolyte and screw tight. The electrolyte solution thus displaced is ex-
pelled through the vent opening
108. Metrohm recommends waiting now
until the diaphragm is soaked with bridge electrolyte (ca. 20 min).
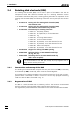
4 Install reference electrode in 797 VA Computrace Stand and
connect
• Insert reference electrode
26 in opening 61 of the measuring head 24
(see
Fig. 6).
• Attach electrode cable
31 (RE) to reference electrode:
push cable lug under the screw and then tighten screw firmly.
• Turn reference electrode so that the electrode cable points to the rear and
not to the side (in the latter position it may become kinked and damaged
when cover
2 is closed).