Version 2.0 OptimusPDA SP5700 Series User Manual OptimusPDA SP5700 Series User Manual Version 2.0 March 2007 Copyright © 2007 Metrologic, Inc.
Version 2.0 OptimusPDA SP5700 Series User Manual Contents Notice.............................................................................................................. 6 OptimusPDA–General view 9 ...................................................................................................................................................................................................................................................................................................................
Version 2.0 OptimusPDA SP5700 Series User Manual 5.6.8 Sound Settings ........................................................................................................ 52 5.6.9 Setting a Wireless Network ................................................................................... ⋅53 5.6.10 How to Lock Menu................................................................................................. 55 5.6.11 Connecting to GPRS Network ......................................................
Version 2.0 OptimusPDA SP5700 Series User Manual Picture 23 Barcode selection list............................................................................. 26 Picture 24 Opening barcode image scanning program ......................................... 27 Picture 25 Disabling image function ....................................................................... 28 Picture 26 ActiveSync 4.2 setup wizard ................................................................. 29 Picture 27 Connection process....
Version 2.0 OptimusPDA SP5700 Series User Manual Picture 58 History record ........................................................................................ 44 Picture 59 Phonebook ............................................................................................ 44 Picture 60 Mailbox .................................................................................................. 45 Picture 61 Touch-screen keypad ...........................................................................
Version 2.0 OptimusPDA SP5700 Series User Manual Notice 1. Limited Warranty Metrologic warrants and represents that all Optimus SP5700 Series PDAs are free of all defects in material, workmanship and design, and have been produced and labeled in compliance with all applicable U.S. Federal, state and local laws, regulations and ordinances pertaining to their production and labeling. This warranty is limited to repair, replacement of product or refund of product price at the sole discretion of Metrologic.
Version 2.0 OptimusPDA SP5700 Series User Manual programs are granted to use by its End User License Agreement (EULA). The user shall not modify or merge any form of a licensed program with other programs, or use it in a network without prior consent of Metrologic. No right to copy a licensed program in whole or in part is granted except as permitted under copyright law. Metrologic may terminate the contract in the event where a breach of contract has been made by the user. 4.
Version 2.0 OptimusPDA SP5700 Series User Manual 6. Unpacking Carefully remove protective materials from the PDA and the cradle, and store the shipping cartons in case of the need to return the product for repair. Upon receipt of your PDA it is important to verify that you have received all the equipment listed below.
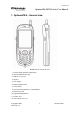
Version 2.0 OptimusPDA SP5700 Series User Manual 1. OptimusPDA – General view Picture 1 Front and left side view 1. Indicator LEDs (Charging & Operation) 2. Antenna (GSM models only) 3. USB Host connector 4. Speaker 5. Scan Trigger 6. 4 Way Navigation Pad 7. Power Button 8. Send (S) & End (E) Buttons for GSM-GPRS 9. Numeric Key Pad 10. Keypad Backlight Button 11. Function Key 12. Universal I/O connector Copyright © 2007 Metrologic, Inc.
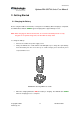
Version 2.0 OptimusPDA SP5700 Series User Manual 2. Getting Started 2.1 Charging the Battery Before using the PDA for the first time, recharge the Li-ion Battery. When charging is completed, the LED indicator will turn GREEN. Typical charging time is approximately 3 hours. Note: When charging the PDA for the first time, do not remove the battery before it is fully charged. For an optimal charge time, turn the PDA into sleep mode. To charge the battery: • Connect the cradle to the power supply source.
Version 2.0 OptimusPDA SP5700 Series User Manual Picture 3 Charging process Note: The OptimusPDA is equipped with a memory backup battery. The backup battery allows data stored in the memory to be kept when the main battery is removed or discharged. If the PDA remains without the main battery for more than 1 hour, the backup battery will start to get low. It is highly recommended to replace the main battery within 10 minutes or keep charging the battery when the PDA is inserted in the cradle.
Version 2.0 OptimusPDA SP5700 Series User Manual 2.2 Turning the PDA on/off Before turning on the PDA, ensure the battery is inserted. 1) Inserting the battery • Slide the battery lock cover left. Picture 4 Battery cover • Insert the battery into the compartment and replace the cover. Ensure the latch is in the lock position. Copyright © 2007 Metrologic, Inc.
Version 2.0 OptimusPDA SP5700 Series User Manual 2) Turning on your OptimusPDA Press the Power button to turn the PDA on. • - If you press and then hold the Power button for about 3 seconds, the PDA switches into sleep mode and turns off. Picture 5 Power button • When the booting process has finished, the Metrologic logo will be displayed on the desktop as illustrated below. Picture 6 Desktop background • If the Power button does not activate your PDA, execute a hard reset.
Version 2.0 OptimusPDA SP5700 Series User Manual 3) Turning off your OptimusPDA Press and hold the Power button for 3 seconds or tap Suspend on the start menu. • - It is possible to set your terminal to auto-suspend status or to auto-turn off after a specified period of time in order to save battery power. - To change the power setting: Tap Start → Settings → Control Panel. Double tap the Power button and select the Schemes Tab.
Version 2.0 OptimusPDA SP5700 Series User Manual 3. Settings 3.1 Sleep Mode 1) To reduce battery consumption the PDA can be manually put in to Sleep Mode. To do this, push the Power button for 3 seconds or tap Start → Suspend. Data stored in RAM remains unchanged when in sleep mode. 2) To wake up the PDA from sleep mode, press the Power button. When the system wakes up, the screen will display the same view as displayed before entering sleep mode 3.
Version 2.0 OptimusPDA SP5700 Series User Manual 4. PDA Management 4.1 Using the Stylus The stylus is useful for command selection and entering data. The stylus functions are similar to a mouse connected to a PC. 1) Tap: Touch the screen once with the stylus to open an item and select options. 2) Drag: Hold the stylus on the icon and drag it across the screen to a selected area. Drag in a list to select multiple items. Note: 1.
Version 2.0 OptimusPDA SP5700 Series User Manual 4.3 Resetting If the screen freezes or the terminal becomes inoperative, you may need to reset your PDA. 4.3.1 Performing a Soft Reset Note: Transfer all stored data into a computer otherwise files that are open during a soft reset may not be retrieved. To perform a soft reset, press the Reset Button located at the rear of the PDA on the right side above the Battery Cover.
Version 2.0 OptimusPDA SP5700 Series User Manual 4.3.2 Performing a Hard Reset When a Hard Reset is performed, all formats, preferences, date/time, and other settings are restored to their factory default values. To perform a hard reset, press the Reset and Power buttons simultaneously. Picture 11 Power button Note: Hard reset not only restarts your PDA, but also erases all stored records and entries in the RAM memory. Therefore, perform a hard reset only in cases when a soft reset mode does not work.
Version 2.0 OptimusPDA SP5700 Series User Manual 5. Applications 5.1 Creating documents 1 You can create a new document on your PDA with Microsoft WordPad , or work on an existing one by sending it from the PC to your OptimusPDA. Data, files, and document uploads/downloads between PDA and computer are controlled by the Microsoft ActiveSync software.
Version 2.0 OptimusPDA SP5700 Series User Manual 1) Using the keyboard • Select the WordPad icon from the Start menu or tap the shortcut icon on the desktop screen to run Microsoft WordPad , the document-editing program. The pictures below illustrate how to use the screen shortcut for activating WordPad. By double tapping on the Microsoft WordPad icon (Picture 12), the Microsoft WordPad program will appear (Picture 13). Picture 12 WordPad shortcut Copyright © 2007 Metrologic, Inc.
Version 2.0 OptimusPDA SP5700 Series User Manual • Tap once on appear. at the bottom of the screen (see Picture 14). A keyboard should now If this is not the case, press until a drop-down menu appears. Then select Keyboard. Picture 15 shows the keyboard panel. Picture 14 Keyboard Icon • Picture 15 Keyboard Panel With the keyboard display visible on the lower part of the screen, tap the buttons with characters to enter text into your document.
Version 2.0 OptimusPDA SP5700 Series User Manual 2) Using Transcriber program • Keep the stylus on the icon at the bottom of the screen. • A drop down menu will appear; select the Transcriber shown in Picture 16. Picture 16 Transcriber Program selection Copyright © 2007 Metrologic, Inc.
Version 2.0 OptimusPDA SP5700 Series User Manual • Simply write on the screen with the stylus. Handwriting is converted into recognized characters shortly afterwards. Space Enter Cursors Back Space Help Picture 17 Transcriber Program The following icons will be shown at the bottom of the screen: - Options Set options of writing direction, inking, and shorthand. - Letter Shape Selection This allows user to adapt user’s personal writing style to maximize recognition.
Version 2.0 OptimusPDA SP5700 Series User Manual 5.2 Barcode Scanning 5.2.1 Laser Scan Engine 1) Open the barcode scanning program from the shortcut on the screen. Picture 18 Barcode scan Test 2) Place the scanner in alignment with the barcode and press one of the scan trigger buttons. Ensure the RED laser beam line covers the barcode. ! DO NOT KEEP THE SCAN BUTTON PRESSED FOR TOO LONG; IT MAY RESULT IN A SCAN ENGINE FAILURE OR MALFUNCTION. Picture 19 Barcode scanning Copyright © 2007 Metrologic, Inc.
Version 2.0 OptimusPDA SP5700 Series User Manual 3) A short beep sound indicates successful scanning and decoding of the bar code. The result will be displayed in the scan window. Picture 20 Scanning result 4) Barcode Setting Options Bar code settings can be changed. This should ideally be done only by an administrator. • Select Start → Settings → Control Panel • Double tap Barcode icon • Click Admin button and then password window pops up • The password is 23646.
Version 2.0 OptimusPDA SP5700 Series User Manual Picture 21 Control panel Picture 22 input password Picture 23 Barcode selection list 5) Readable codes Linear Symbologies: Codabar, Code 11, Code 128, Code 39, Code 93, EAN-8, EAN-13, Interleaved 2 of 5, ISBT 128, MSI, Reduced Space Symbology, Straight 2 of 5 IATA, UPC-A, UPC-E, UPC-E1 Copyright © 2007 Metrologic, Inc.
Version 2.0 OptimusPDA SP5700 Series User Manual 5.2.2 Image Scan Engine 1) Run the barcode image scanning program by tapping a shortcut on the background screen. Picture 24 Opening barcode image scan program 2) Place the scanner in alignment with the barcode and press one of the scan trigger buttons. Ensure the Green laser beam line covers the barcode being scanned. ! DO NOT KEEP THE SCAN BUTTON PRESSED FOR TOO LONG AS THIS MAY RESULT IN A SCAN FAILURE OR DEVICE MALFUNCTION.
Version 2.
Version 2.0 OptimusPDA SP5700 Series User Manual 5.3 Connecting to a Desktop ActiveSync® is the software that allows users to move files between the OptimusPDA and a desktop PC as well as synchronise data. When the PDA’s cradle and desktop computer are connected via a USB cable, inserting the PDA into the cradle automatically activates the Microsoft ActiveSync window, which appears on the desktop and indicates the synchronization status. 5.3.
Version 2.0 OptimusPDA SP5700 Series User Manual 5.3.2 Setting up a partnership With the cradle connected to a desktop computer via a USB or RS232, insert your OptimusPDA into its cradle. The desktop computer will display a window indicating that the PDA is being connected. Picture 27 Connection process The desktop computer and your PDA will attempt to synchronize. When the “New Partnership” window appears, click Yes and then select Next.
Version 2.0 OptimusPDA SP5700 Series User Manual • The Select Synchronization Settings Window appears. Select the items you want to synchronize and then press the Next button. Picture 29 Synchronization options • To complete the process select the Finish button. The basic settings and configuration for a PC and the PDA connection will now be established. Picture 30 Setup completion Copyright © 2007 Metrologic, Inc.
Version 2.0 OptimusPDA SP5700 Series User Manual • Once a partnership is set up, synchronization between the PDA and the desktop computer can take place at any time by running ActiveSync or by re-inserting the USB cable in to the desktop computer with the PDA in the cradle. Picture 31 Synchronization process • Once completed, the status window will show that synchronization is complete. Picture 32 Synchronization status Copyright © 2007 Metrologic, Inc.
Version 2.0 OptimusPDA SP5700 Series User Manual 5.4 Wireless Setting You can turn on/off wireless functions in Wireless Setting menu. • Select Start → Settings → Control Panel • Double tap the Wireless Setting icon. Picture 33 Wireless Setting Icon Once Wireless LAN On is selected, the Wireless LAN Setting button will be enabled. Picture 34 Enabling WLAN and changing settings Copyright © 2007 Metrologic, Inc.
Version 2.0 OptimusPDA SP5700 Series User Manual Click “Save” after changes have been made in each tab. The other wireless options are shown below. Picture 35 Wireless Functions On/Off • Power Save Mode for WLAN You can select options for saving battery life in Power Save Mode menu. Auto: Power Save Mode activates when PDA is being used. Extended: Power Save Mode is always active.
Version 2.0 OptimusPDA SP5700 Series User Manual 5.5 Wireless LAN With a wireless LAN enabled OptimusPDA, it is possible to access the internet wirelessly through the internal WLAN module. The PDA must be set up correctly including any Hotspot configurations. Follow the below steps to Configure your OptimusPDA for wireless LAN connection. • Select Start → Settings → Control Panel • Double tap the Network and Dial-up Connections icon.
Version 2.0 OptimusPDA SP5700 Series User Manual Specifying an IP address is covered separately under “Static IP” • Static IP • Under the IP Address tab, select the Specify an IP address radio button. Enter the IP Address, Subnet Mask and Default Gateway data. • Select the Name Servers tab, and enter the required data. You will need to consult the network manager for specific server address information. Picture 39 IP address and server address assignment Copyright © 2007 Metrologic, Inc.
Version 2.0 OptimusPDA SP5700 Series User Manual * To check your network connection status, select the icon on the Taskbar, and then click on the Wireless Information tab. The Signal Strength is indicated as Very Good or Good etc… Picture 40 Network connection icon • Picture 41 Connection status To check the IP address data has been entered correctly, select the IP Information tab. Note: IP address data is not lost when a soft reset is performed.
Version 2.0 OptimusPDA SP5700 Series User Manual 5.6.1 Initializing the Modem Picture 42 Running Modem.exe from the desktop Picture 43 Open Modem.exe first display When the PDA starts up, the Modem.exe is activated automatically and the GSM Module is initialized. During this process the following icons may appear in the Taskbar: : Modem suspended : Modem activation in progress : SIM card information is being loaded Copyright © 2007 Metrologic, Inc.
Version 2.0 OptimusPDA SP5700 Series User Manual Picture 44 Signal strength Picture 45 Connection quality Antenna and signal icon indicates the signal strength as follows: : Found signals only : Found signals and identified an operator : Service area not available Picture 46 Operating mode You can switch the GSM Module on or off by pressing the “END” button for an extended period. After turning the GSM function off, the Modem will display the message “Modem Off”. Copyright © 2007 Metrologic, Inc.
Version 2.0 OptimusPDA SP5700 Series User Manual 5.6.2 Checking Subscriber Identity Module (SIM) As soon as the Phone User Interface starts, the program checks the stored SIM data. The SIM card may require PIN information to be entered in order to continue. To enter a PIN, select “Input PIN” and enter the required PIN as shown in pictures 49 and 50. Picture 47 Request for SIM card insertion Picture 48 Emergency calls availability Picture 49 Request for PIN Copyright © 2007 Metrologic, Inc.
Version 2.0 OptimusPDA SP5700 Series User Manual 5.6.
Version 2.0 OptimusPDA SP5700 Series User Manual 1) Phone Setting Menu Click on the Phone Setting Menu Icon in the top right hand corner. The following menu will appear. The various menu options are discussed below. Picture 52 Phone setup options Copyright © 2007 Metrologic, Inc.
Version 2.0 OptimusPDA SP5700 Series User Manual 2) Setup options The Phone Setting Menu allows for configuration of sounds, network and SMS settings and Locking settings. Version info can also be viewed. Picture 53 Sound setup Picture 54 Network setup Picture 55 PIN edit Copyright © 2007 Metrologic, Inc.
Version 2.0 OptimusPDA SP5700 Series User Manual After making any changes, always click on the “save icon”. 3) User Interface options To access the phonebook, check out call history or view mailbox settings, select the relevant choice from the drop-down menu. Picture 57 User Interface functions Picture 58 History record Copyright © 2007 Metrologic, Inc.
Version 2.0 OptimusPDA SP5700 Series User Manual Picture 60 Mailbox A) History: View call log history B) Phone Book: Displays list of callers along with their names and respective phone numbers C) Mail Box: Displays the SMS box and what has been sent/received. 5.6.4 Voice call 4.1 Voice Dialing/Answering If you want to make a call you should use the key pad or LCD touch-screen driven panel. Picture 61 Touch-screen keypad Copyright © 2007 Metrologic, Inc.
Version 2.0 OptimusPDA SP5700 Series User Manual 1) Voice call: Use the keypad on the PDA and press “S” to make a call and “E” to end a call. Alternatively, use the LCD touch screen keypad. 2) Volume: Use the 4-way direction key pad to increase (Up) or reduce (Down) volume. Picture 62 Keyboard 5.6.5 Short Message Service Reading Stored SMS texts To read a stored SMS, simply access the Mailbox and select the relevant SMS message. Once the message is open to be read, it can also be forwarded.
Version 2.0 OptimusPDA SP5700 Series User Manual Sending a Message To send a message, first go to the Mailbox. Then tap the envelope icon. The Message Detail window will then open allowing standard SMS details to be entered.
Version 2.0 OptimusPDA SP5700 Series User Manual 5.6.6 Phonebook How to Add a New Phone Number 1. Open up the phone book window by selecting it from the UI Menu at the top. 2. Tap on the icon to add a new address 3. Enter phone number and other information into the “Address Detail” window 4. Specify a “Quick Dial” number, or select primary phone number among cellular, home and office phones Picture 66 Adding a new contact Copyright © 2007 Metrologic, Inc.
Version 2.0 OptimusPDA SP5700 Series User Manual The entire list of contacts can be viewed by clicking on the two way icon arrow. Picture 67 Phonebook content Copyright © 2007 Metrologic, Inc.
Version 2.0 OptimusPDA SP5700 Series User Manual Updating Phone Numbers To modify any of the phone contacts simply click on the specific contact within the phone book. The address detail screen will be shown. Once changes have been made, click on the save icon. Clicking on the bin will delete the contact.
Version 2.0 OptimusPDA SP5700 Series User Manual 5.6.7 History This button deletes history record Missed call Sent call Received call Save to the PhoneBook Call indicated person Delete indicated items Picture 69 Tracking history records Copyright © 2007 Metrologic, Inc.
Version 2.0 OptimusPDA SP5700 Series User Manual 5.6.8 Sound Settings The sound setting window allows you to change sounds such as the Ring tone, Message Notification Sound and Network Register Sounds as well as other volume parameters. Picture 70 Sound configurations Copyright © 2007 Metrologic, Inc.
Version 2.0 OptimusPDA SP5700 Series User Manual 5.6.9 Setting the Wireless Network Automatic Operator Selection is popped up as default Access Point Name for GPS When filling in this field, you will set a name for Phone UI front screen Picture 71 Network advanced settings Copyright © 2007 Metrologic, Inc.
Version 2.0 OptimusPDA SP5700 Series User Manual Selecting manual Operator mode starts the system search for operators With ‘Display by MCC/MNC Number’ selected the MCC/MNC value will be displayed. Icons indicate operator status Unknown Available Connected Forbidden Picture 72 Connecting to network in manual mode Copyright © 2007 Metrologic, Inc.
Version 2.0 OptimusPDA SP5700 Series User Manual 5.6.10 How to Lock the Menu 1. Input your PIN number 2. Press tab ‘Input PIN information’ 3. Check the “Use PIN Locking” box 4. Check the “PIN Auto Input” box If ‘Change PIN Number’ is selected, enter the new PIN Number. Picture 73 Locking menu values Copyright © 2007 Metrologic, Inc.
Version 2.0 OptimusPDA SP5700 Series User Manual 5.6.11 Connecting to GPRS Network To establish a new GPRS network, the Access Point Name (APN) should first be set. 1. How to set up GPRS Connection. 1. APN setting. Setting APN on DDialer. Copyright © 2007 Metrologic, Inc.
Version 2.0 OptimusPDA SP5700 Series User Manual 2. Setting GPRS Dialup Network 2. Setting GPRS Dialup Network Connection. 1. Settings and Network and Dial-Up Connection Copyright © 2007 Metrologic, Inc. 2. Click “Make New Connection”. 57 3. Make a name for connection .
Version 2.0 OptimusPDA SP5700 Series User Manual 2. Setting GPRS Dialup Network 3. Setting GPRS Dialup Network Connection. 4. Select modem as COM8 and Click the Configure.. button Copyright © 2007 Metrologic, Inc. 5. Setting the Band Rate 58 6.
Version 2.0 OptimusPDA SP5700 Series User Manual 2. Setting GPRS Dialup Network 4. Setting GPRS Dialup Network Connection. 7. Click the Next button 8. Setting Phone Number “ *99***1# “ 9. Finish the setting It doesn’t matter Country or Area Code Then click the Finish button Copyright © 2007 Metrologic, Inc.
Version 2.0 OptimusPDA SP5700 Series User Manual 2. Setting GPRS Dialup Network 5 Checking the GPRS properties 10. Double Click the GPRS Icon Copyright © 2007 Metrologic, Inc. 11.
Version 2.0 OptimusPDA SP5700 Series User Manual 6. Troubleshooting The following table lists common issues that may occur along with possible solutions. Please contact Metrologic if an issue occurs which is not covered here . Problem OS is not loading PDA turns itself off Battery does not charge Characters on display are invisible Cause Low-Battery Problem with button’s rubber Solution Charge or replace the battery.
Version 2.0 OptimusPDA SP5700 Series User Manual Problem Your PDA does not accept scan data input ActiveSync does not operate Sound is not audible Program does not recognize handwriting Cause Solution Scan window is dirty Clean scanner window with a soft, wet cloth. Object moves while Fix the object while scanning.
Version 2.0 OptimusPDA SP5700 Series User Manual 7. Specifications 7.1 Physical Characteristics Dimensions* Weight * Drop Specification Operating Temperature Storage Temperature Environmental Sealing Humidity Electrostatic Discharge (ESD) Key Pad 78 W × 177 L × 34 H (Top); 26 H (Bottom) mm / 3.1 x 7.0 x 1.3 x 1.0 in. 256g / 9.03oz. (WLAN, WPAN, Camera, Scanner Included/ Except Battery) 1.
Version 2.0 OptimusPDA SP5700 Series User Manual 8. Limited Warranty Statement General Metrologic authorized service provider or (iii) your own installation of end-user replaceable parts if available for your product in the servicing country. This Limited Warranty applies to the Metrologic brand name products sold with this Limited Warranty Statement.
Version 2.0 OptimusPDA SP5700 Series User Manual Statement applicable to Metrologic options. Metrologic’s only obligations with respect to software distributed by Metrologic under the Metrologic brand name are set forth in the applicable end-user license or program license agreement. Non-Metrologic hardware and software products are provided “AS-IS.” However, non-Metrologic manufacturers, suppliers, or publishers may provide their own warranties directly to you.
Version 2.0 OptimusPDA SP5700 Series User Manual 9. Regional Offices Copyright © 2007 Metrologic, Inc.
Version 2.0 OptimusPDA SP5700 Series User Manual Information in this document is subject to change without notice Metrologic, Inc. reserves the rights to make improvements in the product described in this manual at any time and without notice. This manual and the software described in this manual are copyrighted. All rights reserved.