
Operating instructions
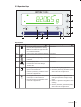

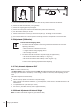

A
B
B
A
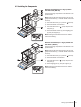
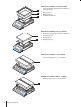
a) Switch off the balance and remove the power cable and any interface cable from the balance.
b) Remove the draft shield element (10 mg models).
c) Remove the weighing pan and pan support.
d) Remove the bottom plate and unlock the draft shield (models with draft shield).
e) Turn the balance carefully on its side.
f) Remove and retain the 2 screws (A) and the cover plate (B). The hanger is now accessible.
g) Then turn the balance to its normal position and simply reinstall all components in the reverse order.
4.8Adjustment (Calibration)
To obtain accurate weighing results,
●
the balance must be adjusted to match the gravitational acceleration at its location.
Adjusting is necessary:
•
before the balance is used for the first time.
•
at regular intervals during weighing service.
•
after a change of location.
●
the balance must be connected to the power supply for approximately,
•
30 minutes for balances with redability of 1 mg to 5 g
•
60 minutes for balances with redability of 0.01 mg to 0.1 mg
in order to reach operating temperature before adjusting.
4.8.1Fully Automatic Adjustment FACT
Note: On models with FACT only.
The factory setting is fully automatic adjustment FACT (Fully Automatic Calibration Technology) with the inter
nal weight (see also section "The Menu"). In this setting, you have no need worry about adjusting your bal
ance.
The balance adjusts itself automatically:
●
after the warm-up phase on connection to the power supply.
●
when a change in the ambient conditions, e.g. the temperature, could lead to a noticeable deviation in the
measurement.
●
on a predefined time. (see menu topic "FACT")
●
time interval. (with OIML accuracy class II approved models)
4.8.2Manual Adjustment with Internal Weight
Note: On models with internal weight only (see technical data).
20 Setting up the Balance