
Operating instructions


Basic principles for using the terminal and the firmware (software)
12
Screen saver
If the balance is not used for 15 minutes, the backlighting of the display is automatically switched off and the pixels are inverted at
intervals of approximately 15 seconds. As soon as you start to work with the balance again (load a weight, press a key, etc.), the display
returns to its normal state.
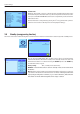
2.3 Performing a simple weighing
Just a few keys located in the lower part of the terminal are needed to perform a simple weighing. Your balance has separate keys for
zeroing («G») and taring («H»).
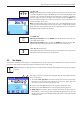
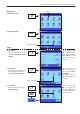
5 The current weighing result appears in this zone. If the weighing unit is touched (5a),
a window appears, in which the desired weighing unit can be selected.
If the weighing result (5b) is touched, then a new screen will appear displaying the
result in a larger format. This can be useful if the weighing result has to be read from
a distance. This window can be closed again by pressing the “OK” button.
6 Additional information (information fields) for the active application, which makes your
work easier, are displayed in this area (section 5.2.4). By touching this zone, you can
indicate which information fields (and function keys, see below) should be displayed
without having to go through the menu, and you can also start the Leveling Assistant
(see Operating Instructions – Part 1, section 3.2).
7 The “SmartTrac,” a graphic weighing-in aid, which shows the used and remaining
available weighing capacity at a glance, is displayed in this zone. Different display
types for the “SmartTrac” can be selected or switched off completely by touching this
area.
8 This area is reserved for the function keys, which provide direct access to the most
frequently required functions and settings for the active application. If more than
5 function keys are activated, you can switch between them using the arrow keys (not
shown in the figure).
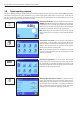
Zeroing: A new zero point is set using the «G» key and all weight values (including
the tare weight) are measured in relation to this zero point. After zeroing, the following
values apply: tare weight = 0, net weight (= gross weight) = 0. Always use the «G»
zeroing keys before you start with a weighing, especially before recording a tare weight
(using the «H» key).
Taring: If you are working with a weighing container, first set the balance to zero. Place the
container on the balance and press the «H» key to tare the balance. The weight of the
container is set as the new tare weight and the current tare (if available) is overwritten.
The “Net” display indicates that all weight values displayed are net values. Note: If you
try to tare a negative weight value, an error message appears as this is not permitted. Set
the balance to zero and try again.
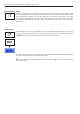
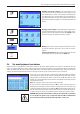
Weighing: Place the weighing sample on the pan. As soon as the stability detector icon
(the small ring to the left of the weight display) fades, the display is stable and the weigh-
ing result can be read. In the illustration opposite, the stability detector icon is still visible
and the weighing result is therefore not yet stable.
G
H
6
8
7
5a
5b