
Operating instructions


The “Density” application
121
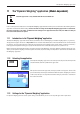
The balance now determines the density of the liquid and displays the result. Either the
compensated result, the uncompensated result, or both is/are displayed depending on
the settings you made for the result display (see section 10.3.5).
If a printer is connected, you can press the «F» key to print out a report of the density
determination result according to your specifications (section 10.3.8). The result is saved
until the next density determination using the same method has been completed, so it
can be printed out again if required.
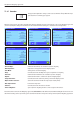
10.4.5 Determining the density of porous solid bodies
To determine the density of porous solid bodies, the solid is first weighed in air. In contrast to non-porous solids, a supplementary oil
bath is required for closing the pores of the solid before it is weighed in the auxiliary liquid.
In the application-specific settings, select “Solid porous” as your method (section 10.3.2),
and specify the desired auxiliary liquid (section 10.3.3).
Activate the appropriate function keys and information fields (sections 10.3.6 and
10.3.7).
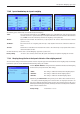
Note: The example shown here illustrates settings for determining the density of solid
bodies using distilled water as the auxiliary liquid. If you use an auxiliary liquid other
than water or ethanol, then instead of the “Temp. AL” function key you should activate
the “Density AL” function key you should activate the.
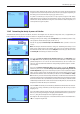
If you are using water or ethanol as the auxiliary liquid, enter its temperature using
the “Temp. AL” function key. Density tables for these two substances covering the tem-
perature range from 10 °C to 30 °C are stored in the balance; see also sections 10.7
and 10.8). The illustration here shows the corresponding input field (input in °C with 1
decimal figure).
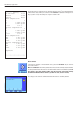
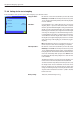
If you use an auxiliary liquid other than water or ethanol, activate the “Density AL”
function key, and use it to enter the density of the auxiliary liquid being used at the
current temperature (in g/cm³, max. 5 decimal places). This is necessary because density
tables are only saved for water and ethanol. The value you have entered appears in the
information field with the same name, which you should also activate. Note: The “Temp.
AL” function key, activated in the example shown here, and the information field with the
same name are not necessary for determining density when using an auxiliary liquid other
than water or ethanol. You can, nevertheless, use these function keys to enter the current
ambient temperature. This will in turn also be included on the printouts, and indicates the
temperature at which the density was determined.
Press the “Start” function key to start the density determination. The balance will automati-
cally carry out a taring, after which you will be prompted to put the solid in place (first
weighing in air).
If you are working with the optional density kit, follow the instructions that are included
with it. If you are using the hanger, for weighing underneath the balance (see note, sec-
tion 10.1), hang the solid body from the suspension equipment.
The weight of the solid body appears in the lower left-hand corner of the window. Press
“OK”, to accept the weight value.