
Operating instructions


The “Weighing” application
58
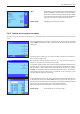
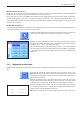
As soon as the nominal value and tolerances have been entered, a graphic weighing-in
aid (“SmartTrac”) appears in the display with tolerance markers that simplify weighing
in to the nominal value: You can roughly weigh in your samples until the lower tolerance
value is reached and then accurately dose, if necessary, up to the nominal value.
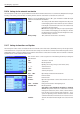
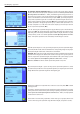
Press the «G» key to set the display to zero. Place the tare (weighing container) on
the weighing pan and press the «H» key to tare the balance. The balance determines
the tare value and displays it in the “Tare” information field. The “Net” icon (net weight)
appears next to the weight display.
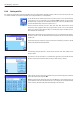
The “MinWeigh” information field displays the minimum initial weight, which is required
for the current tare (20.00g in the example opposite). In addition, the tare reference value
(which determines the minimum initial weight value) is displayed in the “Ref. Tare” informa-
tion field. Note: If several reference tare values (and their corresponding minimum initial
weight values) have been programmed by the service technician, the displayed value
automatically changes to the range for the current tare weight. The required minimum
initial weight value also changes simultaneously.
In the illustration opposite, the small weight icon (status icon) and the gray color of the
weight value indicate that the minimum initial weight value has not yet been reached
and that the current weight value may be outside the tolerance range specified in the
QA system.
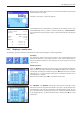
Place the weighing sample on the pan. As soon as the required minimum initial weight
value is reached, the weighing result is displayed in dark, easy-to-read figures and the
small weight icon disappears.
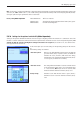
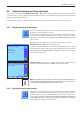
The weighing result can be printed using the «F» key. The illustration opposite shows an
excerpt from a sample printout, which lists the specifications for the “MinWeigh” function
(method, reference tare and required minimum initial weight value) as well as the current
weight values. The asterisk to the left of the net weight indicates that, according to the
example above, the minimum initial weight value was not reached and that the value
may not meet the QA specifications.
Note
If the status icon opposite (small weight symbol with clock) appears in the upper right
of the display (below the date and time), it’s time to test the “MinWeigh” function again.
Contact the customer service department of your sales outlet to have a service technician
run the test as soon as possible.
5.3.6 Working with the “MinWeigh” function
The “MinWeigh” function ensures that the weighing results are within a specified tolerance range in accordance with the requirements
of your quality assurance system. This function must be enabled and programmed by a service technician. The “MinWeigh” function
must be activated in this menu in order to use the function (section 5.2.14). As soon as this function is activated, a small weight icon
containing a “<” appears above the weighing result in the display. We recommend that you also activate the “MinWeigh”, “Ref. Tare”
and “Tare” information fields (section 5.2.4).
MW-Method USP precise
Ref. Tare 120.00 g
MinWeigh 20.00 g
*N 17.03 g
T 46.85 g
G 63.88 g