
Operating instructions


IES Corporation, 2324 SE 11
th
Ave, Portland, OR 97214
PHONE: 1-800-541-0852/1-503-230-0646 FAX: 1-503-235-2535 e-mail: office@iescorp.com
64
DI Series -- Linearity Correction Procedure / Denver Instruments
Software Revision 2.21 and Higher ONLY. To check the software version, press and hold buttons #1 and
#3 at the same time. The display will list the model, serial number, and software version of your unit. If
your software version if below 2.1, please contact Denver Instrument Company. If your software version is
2,21 or higher, please continue.
Tools: Two weights (any two weights as long as the combined weight does not exceed the capacity of the
balance), needle nose pliers, tweezers, and Xacto knife.
1. Remove weighing pan and disconnect both the power supply and the communication cable from the
front panel.
2. Cut silver seal from the E-Prom cover on the underneath side of the front panel. USE XACTO KNIFE TO
CUT SEAL. Cover opens from the same end where the seal is located.
3. Once the cover is off, locate the 4 pin RJ11 connector. This is the output for the communication cable
from the front panel to the weighing cell. The board you will have five (5) pins to the right of the connector,
three (3) pins to the left of the connector, or no pins at all.
For five (5) pins:
Note that the five pins are numbered 1-5 with pin 5 in the middle. Locate the jumper between pin 2 and pin
5. Using needle nose pliers remove the jumper from pins 2 and 5. Reconnect between pins 4 and 5.
Proceed to #4.
For Three (3) pins and a blue jumper:
Remove jumper from the middle pin and the front pin. Reconnect the jumper to the middle pin and the pin
at the rear end. Proceed to #4.
For three (3) pins without jumper:
Short the middle pin and the rear pin. Proceed to #4. Continue to short pins until step #7.
For three holes without pins:
Use tweezers to short square hole and middle hole. Reconnect communication cable and power supply
with tweezers in place. Proceed to #4. Continue to short pins until step #7.
4. Plug communication cable back into both the front panel and the weighing cell. Make sure the
communication cable is plugged into the front panel and the weigh cell BEFORE connecting power. If
power is applied to the balance prior to the communication cable, you will have an IO ERROR. Please
unplug and reconnect.
5. Press MENU key once. MENU 1 of 3 will appear.
6. Press key #4 and #6 at the same time. “SM SET UP” will appear at the top of the screen. If the CHECK
WEIGHING MENU appears, you did not press both keys at the same time. Exit CHECK WEIGHING by
pressing the ENTER key.
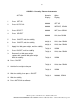
7. When key #4 and #6 are pressed at the same time, the following will appear:
“SM SET UP”
0. SM ZERO
1. SM SCALE