30 LCD-TV PIP Operating Instructions 30 TL 55
Thank you Dear Customer, 1. thank you for selecting this Metz 2. product. 3. 4. In this TV set, we have provided 5. a menu guidance system which, 5.1 we believe, will permit you to 6. operate the set easily. 6.1 However, before using the set for 6.2 the first time, you should at least 7. read Sections 1 to 7 of these 8. Operating Instructions. 9. 10. Your METZ-WERKE Contents Setting up . . . . . . . . . . . . . . . . . . . . . . . . 3 Safety notes . . . . . . . . . . . . . . . . . . . . . .
1. Setting up The TV is delivered complete with base and wall bracket. Fitting the base Slide the base into the slots provided for it and secure it carefully with four screws (M4 x 16mm). 4 screws M4 x 16mm Base Wall mounting Non-compliance with these instructions can result in serious injuries to persons and/or major damage to the TV set. The TFT monitor may be mounted only on vertical walls, using the wall bracket.
1. Setting up Wall mounting Holes plug screw plastic bolts wall bracket Remove the base (if it is fitted). • Remove the four caps from the rear side. • Insert the enclosed plastic bolts in the holes and carefully secure each one with a screw M6x20 mm. • Hold the wall bracket against the wall at the desired position and mark the positions of the four mounting holes. • Screw the wall bracket to the wall with wall plugs and screws.
2. Safety notes • Place the TV set on a solid surface which is capable of bearing the weight! • If you bring a cold TV set into a warm room, wait until any condensation has evaporated before switching it on. • The TV set is intended for use in dry rooms. If, in exceptional cases, you want to use it outdoors, take care that it is not exposed to moisture (rain, splashwater, dew). • TV sets need sufficient cooling to prevent them from overheating.
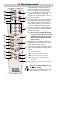
3. The remote control 23 22 21 The Metz Remote Control RL 18 can be used to control the TV set and the basic functions of video recorders VCR1 and VCR 2, a DVD player and HiFi units (such as radio, cassette player, CD player, amplifier, etc.) made by Metz or various other manufacturers. The remote control sends the commands to the TV set with the aid of infrared radiation. Always point the remote control at the TV set when using it.
3.
3. The remote control 1. Programming the remote control for the individual devices 1.2 Entering the codes for CD player, tuner and tape In order to control your various devices with the remote control, you must first programme it with a three-digit number for each operating level. • TV (TV set) The TV operating level is programmed in the factory for the Metz 30 LCD-TV PIP. You cannot enter any other code. • VCR 1 (video recorder 1) VCR 2 (video recorder 2) DVD player HiFi (e.g.
3. The remote control 1.3 Entering the code for a HiFi amplifier 2. Reading out a programmed code ☞ ☞ After executing steps a) to d), you have about 15 seconds to make further entries. If you do not do so, the remote control returns automatically to the TV operating level. a) Use the Select key to select the operating level HiFi. The coloured HiFi LED lights. b) Press the key, release it and then press the key until the LED blinks twice. c) Press the l–ll key. The LED blinks once.
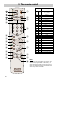
3. The remote control Key 23 22 21 21 22 23 On VCR 1/ 2 On / Standby Record Time in display 0...9 Numeric keys: progr. selection Programme +/– Fast forward / Rewind OK OK Vol.+/– Lautstärke +/– TV Mute TV mute Menu MENU P- Switching voltage on/off Text Info Disp.
3. The remote control Key On On / Standby C D ( I-II ) TUNER ( Ȅ ) TAPE ( ) ON: Display time/track ON:Radio-text on/off ON&AV, ON:On/Standby ON&AV, ON: On/Standby Return Angle I-II & ON: CD I-II & ON: CD 0...9 Numeric keys: title selection Num.keys: title select. Num.keys: progr.select. Cursor up/down Cursor left/right OK OK / Enter Vol.
4. Day-to-day operation Switching on Switch on the TV set with the mains switch. It is now in the standby state and the red standby indicator lights. Select any desired programme position with the numeric keys on the remote control. Alternatively, you can switch on the TV set by pressing the key. In this case, the programme you were watching when the TV set was switched off is again selected.
5. Selecting your country Open the menu Once you have installed the TV set, you must specify the country in which it is located (e.g. UK) to assign certain basic settings (such as the TV channel frequencies). Selecting your country: • Press the "MENU" key to open the TV menu. • Use the cursor key to select the menu "Settings". • Use the cursor key to select the menu item "TV tuner" and press the "OK" key to open it. • Use the cursor key to select the sub-menu "APS".
Open the menu 5.1 Selecting a language Language selection for the TV menu MENU OK You can select any of the available languages for the TV menu. All text in the menu and the help screens (Information) are displayed in the selected language. Selecting the language: • Press the "MENU" key to open the TV menu. • Use the cursor key to select the menu "Options". • Use the cursor key to select the menu item "Language". • Use the cursor key to select one of the languages from the list.
6. Tuning to TV stations Open the menu You can tune your TV set to TV stations in three different ways: a) Automatic Programme Search (APS) The automatic programme search searches the entire range of channels for TV stations. All stations which are found are placed in a station table which is displayed at the end of the search. If you do not like the order in which the stations appear in this table, you can move stations to other positions and/or delete unwanted stations.
Open the menu 6. Tuning to TV stations b) Manual search You can use the manual search function to search for individual stations whose channel number or frequency you do not know. MENU OK programming manual search right / left to search Executing a manual search • Press the "MENU" key to open the TV menu. • Use the cursor key to select the menu "Settings". • Use the cursor key to select the menu item "TV tuner". • Press the "OK" key and open the sub-menu "Programming".
6. Tuning to TV stations Open the menu c) Direct channel input If you know the channel number of a station you want to save, you can enter this number directly. Executing direct channel input • Press the "MENU" key to open the TV menu. • Use the cursor key to select the menu "Settings". • Use the cursor key to select the menu item "TV tuner". • Press the "OK" key and open the sub-menu "Programming". • Use the cursor key to select the menu item "Channel type".
Open the menu 6. Tuning to TV stations Fine tuning MENU OK programming fine tune right / left to adjust fine TV 18 The TV set is normally tuned to the centre frequency of each of the TV channels. This is usually satisfactory. If you are not satisfied, you can carry out fine tuning of the frequency. Executing fine tuning • Switch to the programme position you wish to adjust. • Press the "MENU" key to open the TV menu. • Use the cursor key to select the menu item "Settings".
6.1 Station logo Open the menu Each station which transmits VPS signals automatically receives a station logo with up to four characters. If this automatic assignment does not work, or if you want a different logo, you can enter the logo manually. Setting the station logo • Switch to the programme position for which you want to set the logo. • Press the "INFO" key. • Press the yellow key and switch to edit mode.
Open the menu 6.2 Sorting the stations In the station table, you can shift or delete individual stations. INFO OK program table Shifting and deleting stations • Press the "INFO" key to open the station table. • Use the cursor key to select the station you want to shift or delete. • To delete this station, press the red key and, in the menu, press the "OK" key to confirm that you want to delete it. • To move the selected station, press the green key.
7. Programme selection Programme selection and programmeposition management Your TV set can manage a maximum of 100 programme positions (0-99) in the station table. You can select these programme positions with the numeric keys, the "P+/P-" keys or from the station table. When you press a numeric key, you have three seconds to enter any further digits. Programme selection from the station table P+ In normal TV mode, you can open the station table by pressing the "INFO" key.
Open the menu 8. Picture settings The picture settings (brightness, contrast, sharpness, etc.) can be set globally for all programme positions. MENU OK Adjusting the picture settings: • Press the "MENU" key to open the TV menu. • Use the cursor key to select the menu "Picture". • Use the cursor key to select the desired menu item "Brightness", "Contrast", "Sharpness" or "Colour". • Use the cursor key to adjust the selected picture setting. • Press the "TV" key to close the TV menu.
9. Sound settings Open the menu The sound settings (volume, headphone volume, balance, etc.) can be adjusted in the menu "Audio". Adjusting the sound settings: • Press the "MENU" key to open the TV menu. • Use the cursor key to select the menu "Audio". • Use the cursor key to select the desired sound setting "Volume", Headphone volume", "Balance", "Virtual Dolby", "Equalizer", "AVL", "Wide sound" or "Dynamic Bass". • Use the cursor key to adjust the selected setting.
Open the menu 10. Special functions Picture in Picture (PIP) The PIP picture can be used to display the programme of a second TV station or a signal from an AV device. OK Displaying/hiding PIP: • Press the red key to display the PIP picture. • You can use the cursor key to select the content of the picture + the selected part of the picture is surrounded by a green frame. • You can use the numeric keys or the "P+/P-" keys to switch to another programme position in the PIP picture.
10. Special functions Picture size Open the menu You can use the function "Picture size " to adjust programmes transmitted in various formats to match the wide-screen format of the TV screen. Adjusting the picture-size: • Press the key. The current aspect ratio is displayed at the bottom of the screen. • Use the cursor key to select the desired setting. The available options are: OK or use the menu "Window" Possible picture-size settings: Normal: Programmes are displayed in the standard format 4:3.
10. Special functions Split screen In "split screen" mode, the screen is divided vertically into two halves. You can activate and deactivate this mode with the key. When this mode is activated, you hear the sound belonging to the picture on the left. You can use the cursor keys to select the pictures. The selected picture then has a green frame for a short time. You can now change the source of this picture with the numeric keys, with the "P+/P-" keys or the "AV" key.
10. Special functions Sleep timer Open the menu By programming the sleep timer, you can determine when the TV set is to switch itself off automatically. The sleep timer can be set to Off, 30, 60, 90 or 120 minutes. MENU Setting the sleep timer: • Press the "MENU" key to open the TV menu. • Use the cursor key to select the menu "Options". • Use the cursor key to select the options menu item "Sleep timer". • Use the cursor key to set the desired time after which the TV set is to switch itself off.
11. Teletext Teletext is an additional, free information servii ce which is provided by many TV stations. You can scroll through the pages of this "electronic newspaper" in various ways. TEXT Displaying Teletext: • Press the "TEXT" key. Page 100 (Contents page) of the Teletext is displayed on the screen. Navigating through Teletext with pages displayed: • You can step through the subjects by pressing the blue key. • You can step through the sections of a subject by pressing the yellow key.
S-VHS in Video in Audio in Headphones Front sockets Antenna Audio out Scart 1 Scart 2 Rear sockets Audio in DVI in VGA in Mainscable On/Offsocket 12.
Open the menu AV oder MENU OK settings source select to activate source 30 12. AV devices AV (Audio/Video) devices are external devices (such as video recorders, DVD players, decoders, video cameras, etc.) which generate picture and/or sound signals and can be connected to a TV set. Video recorders, DVD players and similar devices can be connected to the Scart 1 or Scart 2 socket. Decoders must always be connected to the Scart 1 socket.
12. AV devices Possible selections • Tuner The signal from the TV station to which the TV set is tuned is displayed. • Scart 1/2 The picture from the AV device connected to the Scart1 socket is displayed in the compositecolour picture signal. • Scart 1/2 RGB The picture from the AV device connected to the Scart1 socket is displayed in the RGB picture signal. • PC und DVI The picture from the connected PC is displayed. The picture size and position can be adjusted in the menu "Window".
Open the menu MENU OK options 12. Copying AV recordings Your TV set has a copy mode in which an AV device connected to the Scart 2 socket can record the picture and sound coming from an AV device connected to the "FAV" (Front AV socket) or to the Scart 1 socket. Selecting the Scart 2 socket as the output: • Press the "MENU" key to open the TV menu. • Use the cursor key to select the menu "Options". • Use the cursor key to select the menu item "Scart 2 output".
12. AV devices Open the menu Picture quality when playing back pictures from tape MENU The VCR function ensures an optimal picture quality when playing back recordings from tape devices such as camcorders or video recorders. ☞ The VCR function in the menu "Options" can be selected only if, for example, the connected video recorder is delivering a signal. Activating the VCR function • Start the playback function on the AV device. • Press the "MENU" key to open the TV menu.
13. Operation without the remote control This facility is provided only as an emergency measure for use in cases where the batteries of the remote control are flat or where the remote control is not easily available. ☞ The local controls are located on the top of the TV set. Switching on: Press the mains switch on the TV set to switch it to standby mode (see Page 29). Programme selection: Press the "P/CH +" or "P/CH–" button. Volume: Press the "Volume +" or "Volume –" button.
13.1 Key lock (child lock) With the function "Key lock", you can disable the local controls on the front of the TV set. This makes it possible to indirectly prevent use of the TV by other persons (such as children) by activating this function and hiding the remote control. Setting the key lock: • Press the "MENU" key to open the TV menu. • Use the cursor key to select the menu "Options". • Use the cursor key to select the menu item "Key lock ". • Use the cursor key to switch the key lock on or off.
15. Cleaning the set ☞ Before cleaning the set, always switch it off with the mains switch! ☞ Incorrect treatment and cleaning of the screen surface can cause irreparable damage to it. You should therefore always observe the following instructions for treatment and cleaning of the set. Treatment: Always treat the screen surface very carefully. Take care not to damage it mechanically by shocks, impact, scratching or scraping. Keep sharp, pointed and hard objects away from the surface of the screen.
16. Technical data Mains voltage: 220 - 240 V ˜ 50 Hz Antenna input: 75 Ohms asymmetrical DIN 45325 Tuning range: Standard channels 2 - 12, 21 - 69 ap. 148 W (sinus output power): to DIN 45324 into 4 Ohms at 1 kHz Music output power TC 59 X): (to CENELEC / Power consumption: S1 - S20, S21 - S41 S42 ... S46 (Belgium: channels OIR) Power consumption Special channels 2 x 12 W (2 x 8 W) Energy consumption per hour (Wh): See power consumption in W multiplied by 1 hour Standby: ca.
Disposal of batteries Dry or rechargeable batteries should never be discarded as normal garbage! Please use the local facilities for the disposal of exhausted batteries. Make sure the batteries are fully discharged before disposal. The batteries are generally fully discharged when the unit in which they are used - switches itself off or indicates "Battery flat" or - no longer operates correctly when the batteries have been in use for a long time.
Problem Possible cause The TV set does not • There is an obstacle between react to commands the remote control and the TV from the remote conset. trol. • Sunlight is shining directly on the infrared sensor in the TV set. • The batteries in the remote control are flat. • The TV set is not switched on with the mains switch. • Fault in the internal processor. Remedy • Remove the obstacle. • Ensure that the sun does not shine on the set. • Install new batteries. • Switch on the TV set with the mains switch.
Code list BLACK PANTHER BLAUPUNKT 616 491 508 607 614 BONDSTEC 466 BONDSTECBRANDT 505 BRANDT ELECTRONIQUE 503 574 BRAUN 570 BRIONVEGA 450 BROKSONIC 481 BRUNS 466 BUSH 588 Codes Video Metz VG61 532 VF21, VF44, VF46 VF61, VE21, VE43 VE44, VE45, VD21 VD43, VD44, VD45 VC21, VC43, VC44 VC62, 21VB11 42VB12, 21VA12 21VA13, 42VA11 64VA14, 9836,9837 9847, 9874, 9875 9876, 9877 Metz VF22, VF47 CALIN 568 VF48, 9843, 9844 9849 Metz VH22, VH47 573 VH48 ACTION ADMIRAL ADVANTZ ADVENTURA ADYSON AGHA AIWA AKAI AK
Code list EPC ESC ETZUKO EUROPHON EXPERT 505 466 487 586 604 586 510 FERGUSON 501 555 487 468 477 468 481 505 574 523 595 524 596 477 481 473 487 478 487 528 575 601 603 FIDELITY FINLUX FIRST LINE FISHER FUNAI GAB GBC GE GEC GELOSO GITEM GOLDHAND GOLDSTAR GOODMANS GRAETZ GRANADA GRANDIN GRUNDIG GRUNDIG GUTTRONIC HANSEATIC HANTAREX HARLEY DAVIDSON HARVARD HCM HEADQUARTER HINARI HINARIHITACHI HITACHI HYPSON IMPERIAL INGERSOL INNO HIT INNO HIT INTERBUY INTERDISCOUNT INTERFUNK INTERVIDEO INTE
Code list NEI NESCO NIKKAI NIKKO NOBLIKO NOKIA NOVATRONIC OCEANIC OKANO OLYMPIC OLYMPUS ORION OTTO VERSAND PAEL PALLADIUM PANASONIC PATHE MARCONI PAXSONIX PENNEY PENTAX PERSHIN PHILCO PHILIPS PHILIPS PHILIPS PHILIPS PHILIPS PHILIPS (F) PHONOLA PILOT PIONEER PRIMA PROFEX PROFILE PROSCAN PROTEC PULSAR PULSER PYE QTY1 QUARTER QUARTZ QUASAR QUELLE 42 575 575 487 466 481 606 450 488 505 518 554 601 500 515 602 575 483 487 466 507 481 537 560 527 508 544 609 616 606 481 507 533 623 503 547 477 477 606 48
Code list SIEMENS SILMA SILVA SINGER SINUDYNE SOLAVOX SONOKO SONOLOR SONTEC SONY SR1000 STS SUNWOOD SYLVANIA SYMPHONIC TAISHO TALENT TANDBERG TANDY TASHIKO TATUNG TEAC TEC TECHLINE TECHNICS TECHNILAND TECHNISAT TEKNANT TEKNIKA TELEAVIA TELEAVIA TELEFUNKEN TELEORDER TELERENT TELESERVICE TELETECH TENOSAL TENSAI THOMAS THOMSON THORN THORN-FERGUSON TOKAI TOSHIBA TOTEVISION TOWADA TOWIKA 495 511 607 612 575 481 487 509 599 466 575 601 481 506 541 547 477 487 527 481 509 609 623 468 528 505 505 466 487 527 5
Code list DIORA DUAL 949 822 832 859 994 FISCHER 830 831 920 953 GOLDSTAR GOODMANNS GOODMANS GRUNDIG 885 872 888 908 911 912 913 HARMAN KARDON 905 853 931 934 935 INTERSOUND 960 937 JVC 844 903 848 904 849 992 902 233 237 KENWOOD 847 878 963 858 879 859 925 250 KRELL 820 877 948 908 LINN LUXMAN 908 924 964 946 METZ HE11 882 833 908 955 908 908 908 972 908 955 LABWAVE LG LINN LOEWE 200 263 215 219 201 MARANTZ MbyN MEDIENCOM MEDION MEGATON MUSTEK MYRYAD 218 271 241
Code list REVOX REVOX/STUDER ROTEL 829 910 818 SABA 926 908 939 908 852 821 869 888 928 960 978 982 986 SAE SAMSUNG SANSUI SANYO SCHNEIDER DENON 860 840 870 892 929 972 979 983 987 919 841 873 911 955 973 980 984 988 799 936 833 872 876 886 891 892 892 842 896 990 888 908 800 943 867 873 880 887 969 813 944 868 874 883 889 970 T+A 882 T+A ELECTROAKUSTIK 882 TECHNICS 809 950 TENSAI 954 THOMSON 823 974 SUPERTECH SYLVANIA UHER 814 869 966 995 UNIVERSUM UNKNOWN YAMAHA 828 941 843 897 991 945
Code list 947 953 964 865 967 992 950 954 976 925 968 T+A T+A ELEKTROAKUSTIK TECHNICS THOMSON 871 961 838 852 961 UNIVERSUM 868 947 SONY YAMAHA 857 924 951 955 952 956 965 969 966 991 898 875 950 858 932 981 886 859 ASH ASWO 376 734 452 469 744 427 BANG & OLUFSEN BUSH 369 748 DAEWOO DENON 739 372 471 423 991 DIORA DUAL 458 371 445 461 370 381 994 FISCHER 434 449 GOLDSTAR GOODMANNS GOODMANS GRUNDIG 746 737 748 427 429 HARMAN KARDON HITACHI 418 453 730 991 ITT 412 JVC 41
Code list BANG & OLUFSEN BRAUN BUSH DAEWOO DENON 996 960 748 SAMSUNG SANYO SCHNEIDER DIORA DUAL FISCHER 750 820 839 GRUNDIG 794 749 779 795 766 804 782 HARMAN KARDON 760 751 823 HITACHI ITT 827 JBL JVC 821 792 975 816 819 KENWOOD 755 771 818 LINN LUXMAN 794 810 795 845 954 METZ HE11 MARANTZ MEDION MERIDIAN MINOWA MISSION 774 794 785 795 978 799 795 798 NOKIA NAD NAKAMICHI NIAM NONAME 826 834 822 795 782 OKANO 763 772 765 982 PALLADIUM 783 991 PIONEER PRO-LOGIC 7
Metz bietet Qualität Made in Germany: Unterhaltungselektronik, mecablitz-Blitzgeräte, Kunststofftechnik sowie Industrieelektronik. Metz-Werke GmbH & Co. KG Postfach 1267, D-90506 Zirndorf 04/28/05 Fon: +49 911 - 97060 www.metz.de/info@metz.de Metz - allways first class. ķ 604 47 0055.