TV. VIDEO. AUDIO.
Hints for use of the Operating Instructions Do not be put off by the size of the Operating Instructions. Initially, it is sufficient to read the instructions in Sections 1.1, 2 and 4. In order to familiarise yourself with the TV set and its many functions, we recommend that you read the Operating Instructions step by step, carrying out the described actions on your TV set as you do so. This method, often called "learning by doing", is the easiest way of learning how to execute the various functions.
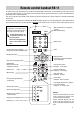
Remote control handset RB 11 The remote control sends commands to the TV set with the aid of infrared light. For this reason, you should always point the remote control at the TV set for reliable operation. Use of the remote control may interfere with the operation of other devices or systems controlled which use infrared light (such as infrared headphones).
1. Setting up and connecting Setting up When selecting a suitable place for the TV, be sure that no bright light or sunlight falls on the screen. Light may cause reflections and impair the brilliance of the image. The best viewing distance is five times the picture tube diagonal, e.g. about 3.5 m for TV sets with a 70 cm screen. 5 x cm cm y y Connecting the aerial TV sets require adequate ventilation.
1.1 Turning the TV on and off Turning on with the ON/OFF key Turning on with the remote control Before turning on a cold TV in a warm room, first allow any condensation mist that may have formed on the screen to evaporate. Press the ON/OFF key. The programmes can be directly selected with the 0-9 keys when the television is in standby mode. Select single-digit programme numbers by pressing the corresponding numeric key.
2.1 TV menu and operator help Menu control of the TV, and the versatility of the system, ensure that supposed complicated settings and entries are made easily and clearly comprehensible for everyone. Operator Help can be called with the ? key when in TV mode. Operator Help indicates the functions of the individual keys. All settings are entered by way of different submenus.
2.2 Programme selection Press this key on the remote control.... The screen displays Explanation 1. Select the programme position (e.g. Prog number 10) -/-- 1 Press the -/-- key when the TV is in standby mode. The TV then switches to the programme viewed before the receiver was turned off to standby. Now enter the programme number with the numeric keys. The TV is changed over to the selected programme position as soon as the last digit has been entered.
3. Presetting TV stations Direct channel entry/ station search The TV is supplied with factory preprogrammed TV stations. However, if you can receive TV stations in your area that are not listed in the station table, then these transmitters can be entered and programmed at any time. You can choose one of the following three programming possibilities: a) Direct channel entry b) Station search c) Autostore function Press this key on the remote control.... The screen displays MENU 1.
3. Presetting TV stations Autostore function, sorted to countries The autostore function automatically scans through the entire reception range to locate stations. The located stations are presented in the station table and can then be stored by way of the OK key. If you do not like the order in which the stations appear in the station table, you can sort the stations to match your own requirements as described on the next page. Press this key on the remote control....
3.1 Sorting stations IIn the „Sort“ submenu you can move, exchange, copy, or delete the stationss stored in the programme positions. The „Sort“ submenu is displayed automatically after the autostore function has found all available stations. This menu can also be called at any time from the station table display for subsequent modification of the station programming. Press this key on the remote control.... The screen displays MENU 1.
3.2 Fine tuning The individual channels are automatically tuned to channel centre for station tuning. As a rule, this automatic tuning will be sufficient. Apply manual fine tuning if automatic tuning does not produce satisfactory results. Select the programme number at which fine tuning is to be completed. Press this key on the remote control.... The screen displays MENU 1.
3.3 Allocating a station logo A logical logo consisting of up to 5 characters can be allocated to each station. The station RTL 2, for example, can be allocated the logo RTL 2. Manual logo allocation is not necessary with most stations. The corresponding station logo appears a few seconds after the picture when a station is selected by direct channel entry. However, an automatic logo only appears for stations which transmit a VPS signal. Press this key on the remote control....
4. Changing individual picture settings The screen displays Explanation Luminance OK + 40 change: - 1. Adjusting the luminance Press the tion. key to display the last adjusted func- Continue pressing the key until the picture setting value to be changed is displayed. Contrast OK + 40 change + - Adjust the required value with the - Press this key on the remote control.... keys.
4.2 Adjusting the video and audio standard values Press this key on the remote control.... The screen displays return MENU Explanation picture TV ? Help Press any coloured key to step through the submenus. Pressing the blue key selects the „Video standard values“ submenu, pressing the yellow key selects the „Audio standard values“ submenu Help Luminance, contrast, chrominance and tint* can be adjusted in the „Video standard values“ submenu.
5. Equipment configuration Assigning the function keys The remote control handset has two factory programmed function keys A and B. Press the ? key in normal television mode to reveal the factory programming. The displayed Operator Help text describes the current programming in the last-but-one paragraph. This programming can be changed according to your requirements in conformity with the displayed selection. This choice is described in the „Glossary“ chapter.
5. Equipment configuration Press this key on the remote control.... 4. Select the function for TV mode (in this example „Subtitles“) The screen displays MENU return TV ? ▲ ▼ Functions 1 2 3 4 5 6 7 8 9 --/- 0 A B TV TV Muting -12dB Reveal text no function Subtitles Subtitles Large letters Large subt. - OK P- TV MENU ? A B REC AV Ȅ Select the function in the right-hand field with the P or P- key. The text on the left-hand side changes as soon as the cursor (a white bar) is moved.
5. Equipment configuration Press this key on the remote control.... The screen displays return TV Explanation picture ? Help Prog. change settings Yes 9 yellow Spat. sound on PC : Off white Stereo wide on PC : Off 2 3 4 5 6 7 8 --/- 0 In the first line of the menu, use the keys to select whether the mute function is to be retained („Yes“) or to be cancelled („No“) when you change programmes.
5. Equipment configuration Press this key on the remote control.... 1. Call the „Equipment configuration“ menu MENU MENU return TV Explanation picture ? Help Equipm. configuration 1 2 3 4 5 6 7 8 9 --/- 0 red blue Prog. change settings yellow RGB priority: Yes white Sound settings: Yes P+ - OK + 2x The screen displays RGB priority Volume adaptation PTV MENU ? A B REC Ȅ AV store ? OK 698-05B-GB MENU return TV picture ? Help 2.
6. Volume adjustment and forced mono It is possible for TV stations to be received at different volume levels although the volume level settings on the individual programme positions are identical. To overcome this problem, you can set a volume correction factor for each programme position. Example: Programme 1 is soft: volume value 40. Programme 3 is loud: volume value 40. Programme 1 is to be adjusted to the same volume as Programme 3. Switch over to programme position 1.
6.1 Correcting picture deviations It is possible for stations to be received with differing levels of chrominance, picture sharpness and contrast, even though the settings on the individual programme positions are identical. For this reason, your TV set enables you to correct the value for each programme position and/or to select a picture correction function (CTI, noise reduction). Press this key on the remote control.... 1.
6.1 Correcting picture deviations 5. Call the second picture menu and adjust the chrominance The screen displays MENU return TV Explanation picture Help ? Station table Programme ▲▼ red - + 0 1 2 3 4 5 6 7 8 9 VTR1 ARD ZDF SAT 1 blue yellow white green red Std Pict. Sound Auto. Auto. Auto. Auto. — — — — — — — — Chrom. adjustm. Col. offset adj. Contrast adj.
7. AV recording Camcorder ➜ video recorder In the „AV recording“ menu, you can define which of the connected peripheral AV devices are to be used for copying a recording. AV device is a generic term for all external video units, such as video recorders, camcorders,video disk players, photo CD players, etc which can be connected to a TV. Example: You wish to copy a film recorded with an S-VHS/Hi8 camcorder to an S-VHS/Hi8 video recorder which is also connected to the TV set.
7. AV recording Video recorder ➜ video recorder Example: You wish to copy a film from video recorder 1 to video recorder 2. Press this key on the remote control.... The screen displays MENU return TV Explanation picture Help ? 1. Call the AV menu AV-recording AV Input Output blue Video Rec.2 Video Rec.2 yellow Video Rec.1 Video Rec.1 white Camcorder Camcorder red Pr. 1: ARD no recording 698-07A-GB A Device connection yellow MENU return TV picture ? Help AV-recording - 2.
Switch-on/off and reminder time 8. Time settings In the „Time settings“ menu, you can enter settings which will instruct the TV to switch itself on or off, and to display a reminder at a given time. Switching from summer time to winter time and vice versa is carried out automatically by the teletext clock. The switch-on time function will automatically turn on the TV at the preset time if the television is in standby mode. The switch-off time function will automatically switch it off as desired.
8. Time settings Press this key on the remote control.... The screen displays MENU return TV 4. Enter the reminder time (Example: 21.45 hr) Explanation picture ? Help Time settings If you press the white key, the text in the third line is displayed on a white background. blue Switch-on time: 20:00 nter the desired reminder time with the numeric keys. The function is activated after input of the last digit.
8.1 Childlock Switching on Your TV set can be protected against unauthorized use. It is possible to prevent any use of the television at all or to permit viewing of up to five specific programmes. Consequently, the childlock can be set to prevent a child from seeing violent films, yet still provide access to children’s programmess on selected channels. Access to such permitted programmes can be provided in general or within a specified period of time.
8.1 Childlock Press this key on the remote control.... The screen displays MENU return TV Explanation picture ? Help 4. Enter your personal code 9 yellow Permitted programmes: white Enter code : 2 3 4 5 6 7 8 --/- 0 3 Ask your local dealer for help if you have forgotten your personal code number. 01 02 05 -- -P+ - 2 Childlock. . . . . + 1 Off blue 1 Enter your personal 4-digit code at this point. The digits are entered with the numeric keys.
8.2 Recording with the timer The menu „Timer recording“ is intended primarily for recording Pay-TV programmes (e.g. Premiere) in cases where the decoder is connected to a EURO socket of the TV set. 8 timers can be programmed up to 2 months in advance. Example: A VHS video recorder which has only one EURO socket is connected to the EURO 1 socket of the TV, while a Pay-TV decoder is connected to the EURO 3 socket. You now wish to record a film running on the Pay TV channel.
9. Connecting headphones Headphones can be connected to the TV by way of the connecting socket underneath the fascia cover at the front. The socket will only accept headphones with a 3,5 mm jack plug ( Elba 6,35 mm ). We recommend the use of headphones with an impedance of at least 32 Ohms. Headphones of a lower impedance (down to approx. 8 Ohms) will impair the sound quality. The headphones volume can be stored as a standard value. The headphones and the TV speakers can be used together.
10. Megatext Press this key on the remote control.... The screen displays MENU 1. Call Megatext TV-picture Explanation View page OK ? Help TOP MEGATEXT TV 2. Select a subject Börse Wetter ARD-Programm Football Bundesligen Hinweise Fußball VT-Redaktion Sport VT-Zentrale Aktuelles Index Übersicht Inhalt Subj. Chapter on subject MENU TV-picture For some stations, for example, only numbers, rather than the header lines, appear in the Megatext file.
10. Megatext Press this key on the remote control.... 5. Page-by-page leafing The screen displays Card index MENU Mark: AV Ȅ next Explanation new ? Help 301 ARD/ZDF Mi. 5.10.93 10:52:00 ARD white 05.55 06.00 09.00 09.03 09.45 10.00 10.03 10.45 11.00 11.03 12.35 12.55 13.00 13.05 Basic functions Dienstag, 5. Oktober 1993 This function enables you to run through the individual pages. Just as in a book, you can leaf forwards or backwards from the displayed page.
10. Megatext Press this key on the remote control.... 1. Recognizing multiple pages The screen displays MENU Card index Mark: AV Ȅ next Explanation new ? Help 422 ARD/ZDF Di. 12.10.93 13:08:00 /1 /2 /3 /4 /5 /6 /7 /8 /9 /10 /11 /12 /13 /14 /15 >> börse frankfurt Fortlaufende Notierungen Kassa 12.10.93 1/4 Vortag AEG AMB AGIV Allianz Altana Asko BSAF Bayer Bay. Hypo BHF-Bank BMW Bay.
10. Megatext Press this key on the remote control.... The screen displays MENU 1. Select the subject TV-picture Explanation View page OK Help ? TOP MEGATEXT Select a file card for any desired subject. Continue pressing the blue key to run through the filecard box. Börse Wetter ARD-Programm Football Bundesligen Fußball Sport Aktuelles blue Direct page selection The displayed choice of chapters is adapted to the selected subject. übermorgen jetzt im TV morgen heute Inhalt Übersicht Subj.
10. Megatext Press this key on the remote control.... The screen displays Direct page selection Explanation 5. Return to TV picture TV 10. Megatext MENU Return to last index page Card index Mark: AV next Ȅ new ? 300 ARD/ZDF Mi. 29.09.93 13:49:00 ARD HEUTE vormittag 301 nachmittag 302 abend 303/304 0 MORGEN vormittag 321 nachmittag 322 abend 323/324 ÜBERMORGEN vormittag 341 nachmittag 342 abend 343/344 JETZT IM PROGRAMM . . . 333 WOCHENÜBERSICHT . . . 360 EINS PLUS . . .
10. Megatext Press this key on the remote control.... 1. Select double font size, e.g. press the B* key A B * 2. Scroll the page upwards, e.g. press the B* key A B * 3. Scroll the page further, e.g. press the B* key A B * 4. Return to normal font size The screen displays Explanation 300 ARD/ZDF Mi. 29.09.93 13:49:00 When the B* key is pressed for the first time, the upper part of the selected page is displayed with the font size doubled.
10. Megatext Infotext - Setting marks There will be certain Megatext pages, e.g. stock market, news, weather forecast, etc., that you will want to read repeatedly. We have programmed a way of making it easier to read such pages. 10 marks per position can be set on each of the first ten programme positions. These marks can be set on any desired text page of your choice, and they can be erased at any time.
10. Megatext Press this key on the remote control.... The screen displays MENU 4. Set the second mark Card index Mark: AV Ȅ next Explanation new ? Help MARKE 2 422 ARD/ZDF Di. 12.10.93 13:08:00 /1 /2 /3 /4 /5 /6 /7 /8 /9 /10 /11 /12 /13 /14 /15 >> red börse frankfurt Fortlaufende Notierungen 12.10.
10. Megatext Press this key on the remote control.... 1. From TV picture to the first mark The screen displays Card index MENU Mark: AV Ȅ next Explanation new ? Help MARKE 1 400 ARD/ZDF Di. 12.10.93 10:52:00 W E T T E R Ü B E R S I C H T ķ INFO Infotext - Mark-by-mark advance After the ķ INFO key has been pressed, a panel with „Mark 1“ will be displayed. On programme positions without a mark, a white field will be displayed with the text „No mark“. Deutschland Wettervorhersage . . . . . . . .
10. Megatext Press this key on the remote control.... 1. Call the desired page e.g. page 422/2 ķ INFO or green The screen displays MENU Card index Mark: AV Ȅ next Explanation new ? Help MARKE 2 422 ARD/ZDF Di. 12.10.93 13:08:00 /1 /2 /3 /4 /5 /6 /7 /8 /9 /10 /11 /12 /13 /14 /15 >> börse frankfurt Fortlaufende Notierungen 12.10.
10. Megatext Subtitles This TV enables you to display programme subtitles automatically. For this purpose one of the two A or B function keys must be programmed on the remote control handset. Please refer to Section „Equipment configuration - Assigning the function keys“ for programming. The subtitles will only be displayed automatically after a function key has been programmed accordingly. Example: You wish to watch the news with its subtitles. Program a function key with the „Subtitle“ function.
11. Special picture effects (not for Gemini) Variable Zoom All programmes that are not transmitted in the traditional 4:3 screen format, such as cinema films in Cinemascope or Super-Cinemascope or 16:9 format, have black bars at the top and bottom of the screen. With the zoom function, you can increase the size of the picture and make the black bars disappear.
11. Special picture effects Press this key on the remote control.... The screen displays Frame freeze Explanation When you press this key, the current frame is „frozen“ on the screen. The TV programme (or the video film) continues to run in the background. 1. Activating frame freeze Pressing the key again switches back to the current programme (or video film). 2. Deactivating frame freeze 11.
11. Special picture effects (only Gemini) 4:3 / 16:9 All programmes that are not transmitted in the traditional 4:3 format, such as cinema films in Cinemascope or Super-Cinemascope or 16:9 format, have black bars at the top and bottom of the screen. With the 4:3 / 16:9 function, you can increase the size of the picture and make the black bars disappear. Press this key on the remote control.... The screen displays Explanation 1. Call the 16:9 function R R 2x T T L L IJ 16:9 11.
11. Supplement to Equipment Configuration Grey value of side bars (only Gemini) Grey value of side bars: When "normal" 4:3 format programmes are being received, grey bars appear at the left and right sides of the screen. The tonal value of these side bars can be adjusted in steps from 0 to 6, where 0 is black and 6 is light grey. 1. Ajustar el valor gris del margen The screen displays MENU return TV Explanation picture Help ? blue This setting applies to all programme positions. Prog.
13. Connecting peripheral equipment Camcorders Videorecorders Video recorders can be connected to the TV set via the antenna socket or a EURO socket. We recommend connection via a EURO (Scart) socket, since only such sockets have separate inputs and outputs for the picture and sound signals. Camcorders can be connected to the TV set with special cables (available from your dealer).
13. Equipment configuration Connecting external devices In the menu „Device connection“, you can define which AV devices are connected to the various sockets on the TV set. The box „Devices“ contains a list of common AV devices. Only certain devices can be connected to the FRONT sockets. Wherever possible, the AV devices should be connected to specific EURO sockets, namely: EURO 1: VHS or S-VHS video recorder + Pay-TV decoder, video recorder with data transfer to/from TV set, PC, games console ( e.g.
13. Connecting peripheral equipment Video recorder Video Rec. 1 or Video Rec.2 Metz cable 087928010 only for copying S-VHS/Hi-8 films from EURO 2 to AV 3 In (phono input) Video Rec. 1 S-VHS/i8 Video recorder Fully assigned SCART or EURO cable, for S-VHS/Hi8 playback only AV VHS Video recorder Euro 1/2/3 Connections on the rear of the TV set A video recorder can be connected to the TV set via the aerial socket or via one of the EURO sockets.
13. Connecting peripheral equipment Video recorders Video signal In the following example, video recorder 2 is to be connected to the EURO 1 socket. ☞ Video recorder 1 is programmed in the factory on programme position 0. For this reason, connect the video recorder via a EURO cable to the EURO 2 socket, insert a recorded cassette, press the ı key and select programme position 0 on the TV set. Example: Connect Video recorder 2 to the EURO 1 socket, as shown on page 43. Press this key on the remote control.
13. Connecting peripheral equipment Video recorders Connecting a video recorder via the aerial socket • Connect the aerial output (RF-out) of the video recorder to the aerial socket of your TV by means of the aerial cable. • Load a recorded video cassette in the video recorder. • Start playback or switch on the test pattern of the video recorder. The test pattern of most video recorders is located within the standard channels Ch 30 to Ch 40 (see operating instructions of the video recorder).
13. Connecting peripheral equipment Pay-TV decoder 50 Euro 1/2/3 VHS Video recorder Euro 1/3 Decoder (e.g. Premiere) Metz cable 087928010 only for copying S-VHS/Hi-8 films from EURO 2 to AV 3 In (phono input). S-VHS/HI8 Video recorder Decoder (e.g. Premiere) EURO Euro 2 Connections on the rear of the TV set EURO Euro 1/2/3 This Pay-TV decoder decodes the scrambled signals of a Pay-TV station (e.g. Premiere) so that they can be displayed on the screen of the TV set.
13. Connecting peripheral equipment Pay-TV decoder For the following explanation it is assumed that the Pay-TV decoder A (Premiere) is connected to the EURO 3 socket. The following settings must be made on the TV set: Press this key on the remote control.... 1. Select the Pay-TV programme position and call the station table The screen displays MENU return TV Explanation picture Help ? Station table Prog.
14. Technical data Mains voltage: 230 V ac, 50/60 Hz 14.1 Upgrade kits • Multi-standard upgrade kit 031 NB 1038 For reception of „Standard M“ and „Standard L“ stations. Power consumption: Power consumption (to CENELEC/TC 59 X): Music power output to DIN 45324 at 4 Ohms and 1 kHz (sine output) Hawaii ca. 106 W 2 x 12 W (2 x 8 W) Linea ca. 125 W 2 x 12 W (2 x 8 W) Elba ca. 105 W 2 x 12 W (2 x 8 W) Gemini ca. 130 W 2 x 12 W (2 x 8 W) 1 x 24 W Morea ca.
15. Glossary 2-channel sound transmission: Separate reproduction of 2 sound channels, e.g. 2 different languages. Audio Latin for „I hear“ - The sound frequency range audible to the human ear is between 60 to 20,000 Hz approx. Camcorder A video camera with integrated video recorder. Cinch (phono) Single-pole plug connector for separate audio and/or video copying. Decoder An electronic circuit that decodes TV signals; required to receive coded TV transmissions, such as Premiere.
16. Remote control handset for video recorders The remote controls RB11 are capable of controlling the basic functions of the current series of Metz video recorders. Remember to point the remote control at the video recorder ! In order to permit control of a video recorder, function key B for the TV level must be programmed to „VTR operation“ in the menu „Equipment configuration/Assigning the function keys“ on the TV set. Whenever a key is pressed, an indicator on the remote control unit blinks.
17. Index Access to riddle solution . . . . . . . . . . . . . . . . . . .40 Aerial connection . . . . . . . . . . . . . . . . . . . . . . . . . .4 Allocating a station logo . . . . . . . . . . . . . . . . . . . .12 Audio . . . . . . . . . . . . . . . . . . . . . . . . . . . . . . . . . . 53 Audio standard values . . . . . . . . . . . . . . . . . . . . .14 Autostore function . . . . . . . . . . . . . . . . . . . . . . . . .9 AV equipment, connecting . . . . . . . . . . . . . . . . . 45 AV recording . . . . .
Quality – A matter of principle. With the trend-setting Metz technology you will allways make the correct choice. See your Metz dealer. He will be happy to demonstrate the current Metz range. Televisions sets Video recorders mecablitz electronic flashguns Metz-Werke GmbH & Co KG Postfach 1267, D-90506 Zirndorf Internet: http://www.metz.de E-Mail: info@metz.de Tel.