TV. VIDEO. AUDIO.
Hints for use of the Operating Instructions Do not be put off by the size of the Operating Instructions. Initially, it is sufficient to read the instructions in Sections 1.1, 2 and 4. In order to familiarise yourself with the TV set and its many functions, we recommend that you read the Operating Instructions step by step, carrying out the described actions on your TV set as you do so. This method, often called "learning by doing", is the easiest way of learning how to execute the various functions.
Remote control handset RD11, RE11(Protos only) The remote control sends commands to the TV set with the aid of infrared light. For this reason, you should always point the remote control at the TV set for reliable operation. Use of the remote control may interfere with the operation of other devices or systems controlled which use infrared light (such as infrared headphones). The television must be switched on or in standby mode (ON/OFF key depressed) when it is to be operated by remote control.
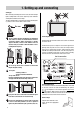
1. Setting up and connecting Setting up When selecting a suitable place for the TV, be sure that no bright light or sunlight falls on the screen. Light may cause reflections and impair the brilliance of the image. The best viewing distance is five times the picture tube diagonal, e.g. about 3.5 m for TV sets with a 70 cm screen. 5 x cm cm y y Connecting the aerial TV sets require adequate ventilation.
1.1 Turning the TV on and off Turning on with the ON/OFF key Turning on with the remote control The programmes can be directly selected with the 0-9 keys when the television is in standby mode. The last programme watched before the television was switched off can be set with the key. The television is automatically set to standby mode ten minutes after station closedown. However, this is not the case if the station starts to transmit a test card within these ten minutes.
Programme position management 2. Programme selection This TV set can manage up to 225 TV programme positions. If you are connected to a cable network or use a terrestrial aerial, you will not need all of these positions at the moment. If, however, you have a SAT upgrade kit installed, the number of programmes can increase drastically. We do not know how many programmes will be available in the future. For this reason, we have provided plenty of programme positions in reserve.
2. Programme selection Press this key on the remote control.... 9-PRG Programme scanning The screen displays Explanation This feature gives you an overview of what is currently running in 9 programmes. 1. Call 9-PRG. programme scanning ARD ZDF BR 3 RTL SAT 1 DSF PRO 7 MDR MTV MULTI-PRG. When you press the MULTI-PRG.. key, the screen is divided into nine small windows which display still pictures of the currently selected TV programme and of the programmes in the next eight programme positions.
2. Programme selection Press this key on the remote control.... The screen displays Explanation Last programme With this key, you can switch back and forth between the last two programme positions you selected. Example: You are watching a programme on ITN; during the commercials, you switch to BBC with the aid of the numeric keys . . PRG. You can now switch back and forth between ITN and BBC by pressing the PRG. key. 2.
3. Presetting TV stations Colour and transmission standards In the sub-menu Standard, you can select the colour and/or the transmission standard. The TV set normally recognises the colour standards (PAL, SECAM, NTSC) automatically, but the transmission standard must always be set manually. The multi-standard upgrade kit is required for the additional transmission standards L, I, D/K and NTSC 4.43.
3. Presetting TV stations Direct channel entry/ station search When the TV set leaves the factory, there are no stations programmed. Depending on where you live, the stations have different channel numbers. There are three possible ways of programming the stations: a) Direct channel input b) Station search c) the Autostore function Press this key on the remote control.... The screen displays MENU 1.
Autostore function, sorted to countries 3. Presetting TV stations The autostore function automatically scans through the entire reception range to locate stations. The located stations are presented in the station table and can then be stored by way of the OK key. If you do not like the order in which the stations appear in the station table, you can sort the stations to match your own requirements as described on the next page. Press this key on the remote control.... The screen displays MENU 1.
3.1 Sorting stations In the „Sort“ submenu you can move, exchange, copy, or delete the stationss stored in the programme positions. The „Sort“ submenu is displayed automatically after the autostore function has found all available stations. This menu can also be called at any time from the station table display for subsequent modification of the station programming. Press this key on the remote control.... The screen displays MENU return 1.
3.2 Fine tuning The individual channels are automatically tuned to channel centre for station tuning. As a rule, this automatic tuning will be sufficient. Apply manual fine tuning if automatic tuning does not produce satisfactory results. Select the programme number at which fine tuning is to be completed. Press this key on the remote control.... The screen displays MENU 1.
3.3 Allocating a station logo A logo of up to 8 characters is provided for each station via the VPS signal. The station RTL 2, for example, receives the logo RTL 2. Manual logo allocation is not necessary with most stations. The corresponding station logo appears a few seconds after the picture when a station is selected by direct channel entry. However, an automatic logo only appears for stations which transmit a VPS signal. Press this key on the remote control....
4. Changing individual picture settings The screen displays Explanation Press the blue key to display the last adjusted function. Continue pressing the blue key until the picture setting value to be changed is displayed. Luminance - OK - OK + - OK + 40 change + 1. Adjusting the luminance, contrast, etc. for all programme positions Contrast 40 change blue In parallel to the display on the screen, the permanent display also shows the currently selected setting, namely: Luminance Lu or Lumin.
4.2 Adjusting the video and audio standard values Press this key on the remote control.... The screen displays return MENU Explanation picture TV Help ? 1. Call the TV menu TV-menu Video standard values 1 2 3 4 5 6 7 8 9 Audio standard values --/- 0 + Station settings MENU Press any coloured key to step through the submenus.
5. Equipment configuration Assigning the function keys The remote control handset has three factory programmed function keys A, B and C. Press the ? key in normal television mode to reveal the factory programming. The displayed Operator Help text describes the current programming in the last-but-one paragraph. This programming can be changed according to your requirements in conformity with the displayed selection. This choice is described in the „Glossary“ chapter.
5. Equipment configuration Press this key on the remote control.... 4. Select the function for TV mode (in this example „Subtitles“) The screen displays MENU return Explanation picture TV ? Help Functions Function keys ▲ ▼ Television 1 2 3 4 5 6 7 8 9 --/- 0 P- B TV Infotext Infotext TV Subtitles Large subt. TV NEXTVIEW no function no function Logo Pict. format Comb filter Magnifier Slow motion 9xmulti-pict Speech-music Sound effects Stereo/ch.
5. Equipment configuration Press this key on the remote control.... 1. Call the „Equipment configuration“ menu red MENU return TV Explanation picture ? Help The Equipment configuration menu is used to define how the TV set operates. Help In this menu you can define the sound functions for a programme change. Equipm. configuration Prog. change settings 1 2 3 4 5 6 7 8 9 0 RGB priority: --/- + MENU The screen displays Settings for programme change Slow-mot. interv.
RGB priority Setting the permanent display 5. Equipment configuration The screen displays MENU return TV Explanation picture Help ? 5. Set the PC „time out“ Prog. change settings Yes 9 Spat. sound on PC : Off + Stereo wide on PC : Off PC time out: On 2 3 4 5 6 7 8 --/- 0 green Off = after input of the first digit, further digits must be entered or the OK key must be pressed to change the programme position.
5. Equipment configuration Sound settings You must change the settings in the menu „Sound settings“ if your TV set is connected to a HiFi system or if you wish to compensate for the varying sound volumes of different stations. Audio sockets via which the TV set can be connected to a HiFI system are provided on the rear of the set. The factory settings for this menu are shown below. Example: The TV set is to be connected to a HiFi system and this system is to control the sound.
6. Volume adjustment and forced mono It is possible for TV stations to be received at different volume levels although the volume level settings on the individual programme positions are identical. To overcome this problem, you can set a volume correction factor for each programme position. Example: Programme 1 is soft: volume value 40. Programme 3 is loud: volume value 40. Programme 1 is to be adjusted to the same volume as Programme 3. Switch over to programme position 1.
6.1 Correcting picture deviations It is possible for stations to be received with differing levels of chrominance, picture sharpness and contrast, even though the settings on the individual programme positions are identical. For this reason, your TV set enables you to correct the value for each programme position and/or to select a picture correction function (CTI, noise reduction). Press this key on the remote control.... 1.
6.1 Correcting picture deviations 5. Call the second picture menu and adjust the chrominance The screen displays MENU return TV Explanation picture ? Help TV station table Programme Pict. Sound Std ▲▼ red - + 0 1 2 3 4 5 6 7 8 9 LOGIC — ARD — ZDF — SAT 1Chrom. adjustm. — AV — — — — Col. offset adj. Contrast adj. Picture format VCR Auto. Auto. Auto. 00 Auto. Auto. 0 Auto. 00 Auto. Auto. 4:3 Auto. Off Auto. << weitere Einstellungen Logo, Channel, Signal store ? 696+06G-GB MENU 6.
7. AV recording Camcorder ➜ video recorder In the „AV recording“ menu, you can define which of the connected peripheral AV devices are to be used for copying a recording. AV device is a generic term for all external video units, such as video recorders, camcorders,video disk players, photo CD players, etc which can be connected to a TV. Example: You wish to copy a film recorded with an S-VHS/Hi8 camcorder to an S-VHS/Hi8 video recorder which is also connected to the TV set.
7. AV recording Video recorder ➜ video recorder Example: You wish to copy a film from video recorder 2 to the logic video recorder. Press this key on the remote control.... The screen displays MENU return 1. Call the AV menu TV picture Explanation ? Help AV-recording AV AV Input Output LogicVTR LogicVTR Video Rec.2 Video Rec.2 Decoder A Decoder A Camcorder Pr. 6: RTL 2 no recording 696+07A-GB A Device connection 2. Select the desired AV device (in this example: video rec.
Switch-on/off and reminder time 8. Time settings In the „Time settings“ menu, you can enter settings which will instruct the TV to switch itself on or off, and to display a reminder at a given time. Switching from summer time to winter time and vice versa is carried out automatically by the teletext clock or when the set is switched from standby mode to programme position 1. The switch-on time function will automatically turn on the TV at the preset time if the television is in standby mode.
8. Time settings Press this key on the remote control.... The screen displays MENU 4. Enter the reminder time (Example: 21.45 hr) white return TV Explanation picture ? Help Time settings 1 2 3 4 5 6 7 8 9 --/- 0 + - P- 20:00 Switch-off time: 23:30 Reminder time 21:45 Time of day: 08 : 22 TV 2 1 4 5 MENU AV ? If you press the white key, the text in the third line is displayed on a white background. Enter the desired reminder time with the numeric keys.
8.1 Childlock Switching on Your TV set can be protected against unauthorized use. It is possible to prevent any use of the television at all or to permit viewing of up to five specific programmes. Consequently, the childlock can be set to prevent a child from seeing violent films, yet still provide access to children’s programmess on selected channels. Access to such permitted programmes can be provided in general or within a specified period of time.
8.1 Childlock Press this key on the remote control.... The screen displays MENU return TV Explanation picture Help ? 4. Enter your personal code Off Ask your local dealer for help if you have forgotten your personal code number. 2 3 4 5 6 7 8 9 --/- 0 Permitted programmes: 01 02 05 -- -Enter code . . . . : - - - - 3 P+ - 2 Childlock. . . . . 1 + 1 Enter your personal 4-digit code at this point. The digits are entered with the numeric keys.
8.2 Recording with the timer The menu "Timer recording" is intended primarily for recording Pay-TV programmes (e.g. Premiere). When using a Metz video recorder of the VC, VE or VD (VF since April 2000) series you can also record SAT programmes* with this menu. For this purpose, the video recorder must be connected to the EURO 1 socket. *only if a SAT upgrade kit is fitted 8 timers can be programmed up to 2 months in advance.
9. Connecting headphones Headphones can be connected to the TV by way of the connecting socket underneath the fascia cover at the front. The socket will only accept headphones with a 3.5 mm (Carat/Stratos 6.3 mm) jack plug. We recommend the use of headphones with an impedance of at least 32 Ohms. Headphones of a lower impedance (down to approx.8 Ohms) will impair the sound quality. The headphones volume can be stored as a standard value. The headphones and the TV speakers can be used together.
10. Hi Text Basic functions Hi Text permits broadcasting stations to improve the display of information and graphics. In the past, there were only eight colours available; with Hi Text, there are 4096 possibilities. Furthermore, the introduction of so-called pixel graphics makes it possible to present the information pictorially. The broadcasting stations are currently in the process of adopting these innovations.
10. Hi Text Press this key on the remote control.... The screen displays ? 5. Page-by-page paging Hilfe MENU Kartei Marke: Basic functions Explanation neu AV nächste 301 ARD/ZDF So. 5.01.97 13:45:00 ARD This function enables you to run through the individual pages. Just as in a book, you can leaf forwards or backwards from the displayed page. Sonntag, 5.
10. Hi Text Press this key on the remote control.... The screen displays - - - 01 02 03 04 05 1. Recognizing multiple pages Multiple pages 589 ARD/ZDF Marke: Explanation neu nächste AV So 5.01.97 15:34:00 1/8 computer Hallo und herzlich willkommen . . . Auf den folgenden Seiten informieren wir Sie über unseren Service rund um das erste regelmäßige Online-Magazin im deutschen Fernsehen. . . . . 2/9 . . . . 3/9 . . . . . . . . . . . . . . . . . . . .
10. Hi Text Press this key on the remote control.... - - 01 02 03 04 05 - 1. Enter the page number e.g. page 589 The screen displays 589 ARD/ZDF Marke: Explanation neu nächste AV So 5.01.97 15:34:00 1/8 computer Hallo und herzlich willkommen . . . Auf den folgenden Seiten informieren wir Sie über unseren Service rund um das erste regelmäßige Online-Magazin im deutschen Fernsehen. 5 8 Technische Mindestausstattung, Online-Kosten . . . . . . . . . . . . . . .
10. Hi Text Press this key on the remote control.... The screen displays ? Hilfe MENU Kartei Marke: neu Explanation AV nächste 301 ARD/ZDF So. 5.01.97 13:45:00 1. Select double font size, e.g. press the B* key ARD Sonntag, 5. Januar 1997 A B ARD-Morgenmagazin Tagesschau Dallas Tele-Gym Tagesschau auslandsjournal ZDF-Info Gesundheit Tagesschau Cappuccino Melange Fernsehfilm, 1993 . . . . . . . Umschau Presseschau Tagesschau ARD-Mittagsmagazin . . . . bis 13.45 Uhr 06.00 09.00 09.03 09.45 10.
10. Hi Text Setting marks There will be certain Hi Text pages, e.g. stock market, news, weather forecast, etc., that you willl want to read repeatedly. We have programmed a way of making it easier to read such pages: Hi Text pages can be flagged with the aid of marks (similar to tabs in a file). We provide a total of 100 marks. Up to 10 marks may be assigned to each programme position, as long as the total number of marks assigned does not exceed 100.
10. Hi Text Press this key on the remote control.... The screen displays Explanation - - 01 02 03 04 05 Marke: entf. AV nächste MARKE 2 589 ARD/ZDF So 5.01.97 15:34:00 1/8 - 4. Set the second mark Setting marks computer When the required page is displayed (in our example page 589), press the red key again to set the second mark. Hallo und herzlich willkommen . . . „MARK 2“ is now displayed at the top left-hand corner of the screen.
10. Hi Text Infotext (Mark by mark paging) The basic idea of Infotext is that you can quickly retrieve and read pages which have previously been marked as described on the two previous pages of this manual. Once marks have been set, you can page through the related pages at any time by pressing a programmed function key Once the marks have been set, you can step through all of the marked pages from the current TV programme by pressing a programmed key (key A is programmed in the factory for this purpose).
10. Hi Text Press this key on the remote control.... 1. Call the desired page e.g. page 400 Erasing marks The screen displays ? Hilfe MENU Kartei Marke: entf. Explanation AV nächste MARKE 1 400 ARD/ZDF So. 5.01.97 14:19:00 Press the A* or B key to call the page where the mark is to be erased. W E T T E R Ü B E R S I C H T A * B Deutschland Wettervorhersage Früh- bzw.
10. Hi Text Subtitles This TV enables you to display programme subtitles automatically. For this purpose one of the three A, B or C function keys must be programmed on the remote control handset. Please refer to Section „Equipment configuration - Assigning the function keys“ for programming. The subtitles will only be displayed automatically after a function key has been programmed accordingly. Example: You wish to watch the news with its subtitles. Program a function key with the „Subtitle“ function.
11. Special picture effects Variable Zoom All programmes that are not transmitted in the traditional 4:3 screen format, such as cinema films in Cinemascope or Super-Cinemascope or 16:9 format, have black bars at the top and bottom of the screen. With the zoom function, you can increase the size of the picture and make the black bars disappear.
11. Special picture effects Press this key on the remote control.... The screen displays Explanation Before the 9x multipicture function can be used, it must be programmed as a function in the menu „Function keys“. The section „Equipment configuration, Assigning the function keys“ describes how this is done. Call this function and return to the normal picture A* or This function is similar to a slow-motion display.
11. Special picture effects Press this key on the remote control.... The screen displays Still picture Explanation The current frame is „frozen“ on the screen when you press the II key. The TV programme (or the video film) continues to run in the background. 1. Activate the still picture function II 2. Deactivate the still picture function Pressing the II key again switches back to the current programme (or video film). II 11. Special picture effects Press this key on the remote control....
12. PIP function only for the PIP TV sets Overview The PIP (picture-in-picture) function permits a second, smaller picture to be superimposed on the main picture on the screen. Both of these may be moving pictures. The small picture may come from another terrestrial or satellite programme position or from a video cassette recorder or a running camcorder connected to the TV set. The picture below shows the various possibilities.
12. PIP function Press this key on the remote control.... The screen displays ARD Only the programme position for the main picture can be changed with the numerical keys. 2. Changing the programme position 1 2 3 4 5 6 7 8 9 Explanation When you press the red key, the small picture appears and displays the same programme as the large picture.
12. PIP function Monitoring with a video camera The following example shows how you can monitor another room with a camcorder (video camera) while watching a TV programme. Connect the camcorder to the TV set as described on Page 51 of the Operating Instructions for your TV. Press this key on the remote control.... The screen displays If this programme position has already been overwritten, you must programme another position as follows: 1. Call the station table by pressing the white key. 2.
13. Operation without remote control This mode is only intended for an emergency when the battery in the remote control handset is flat, or if the remote control is not available. The TV controls are underneath a cover at the front of the set. Press the cover where marked and open it. Program and value-adjusting keys Preselect key + -- P + F P You can control the following functions on the TV without the remote control handset.
14. Remote control handset for video recorders This remote control handset can be used to control the basic functions of the Metz video recorders. Point the remote control handset towards the video recorder when using it. In order to permit control of a video recorder, function key B for the TV level must be programmed to „VTR operation“ in the menu „Equipment configuration/Assigning the function keys“ on the TV set. Whenever a key is pressed, an indicator on the remote control unit blinks.
15. Connecting peripheral equipment Camcorder Videorecorder Video recorders can be connected to the TV set via the antenna socket or one of the EURO sockets. We recommend that you use one of the EURO (Scart) sockets for this purpose, since only the EURO sockets have separate inputs and outputs for picture and sound signals. Camcorders can be connected to the TV set with special cables (available from your dealer).
15. Connecting peripheral equipment Example 1: You want to connect an S-VHS video recorder with Data Logic to your TV set. You also want to be able, from time to time, to copy recordings from an S-VHS camcorder to the S-VHS video recorder. Connections: • Connect the S-VHS video recorder with Data Logic via a fully wired Scart cable to the Euro 1 socket of the TV set. This cable is used for the transfer of data (e.g. station table, timer settings) from the TV set to the video recorder.
Connecting external devices 15. Connecting peripheral equipment In the menu „Device connection“, you can define which AV devices are connected to the various sockets on the TV set. The box „Devices“ contains a list of common AV devices. Only certain devices can be connected to the FRONT sockets.
15. Connecting peripheral equipment Video recorders Connecting a video recorder via the aerial socket • Connect the aerial output (RF-out) of the video recorder to the aerial socket of your TV by means of the aerial cable. • Load a recorded video cassette in the video recorder. • Start playback or switch on the test pattern of the video recorder. The test pattern of most video recorders is located within the standard channels Ch 30 to Ch 40 (see operating instructions of the video recorder).
15. Connecting peripheral equipment Video recorders Video signal In the following example, logic video recorder is to be connected to the EURO 1 socket. ☞ Logic video recorder is programmed in the factory on programme position 0. For this reason, connect the video recorder via a EURO cable to the EURO 1 socket, insert a recorded cassette, press the ı key and select programme position 0 on the TV set. Example: Connect logic video recorder to the EURO 1 socket, as shown on page 56.
15. Connecting peripheral equipment Pay-TV decoder 56 EURO 1/2//3 VHS Video recorder Decoder (e.g. Premiere) Metz cable 087928919 Only for copying S-VHS/Hi8 films coming from the FRONT sockets or from EURO 1 (Scart or EURO output) to EURO 2 (phono input). EURO 1/3 Connections on the rear of the TV set EURO 1/3 EURO or EURO 1/3 EURO S-VHS/HI8 Video recorder Decoder (e.g.
Pay-TV decoder Video signal 15. Connecting peripheral equipment For the following explanation it is assumed that the Pay-TV decoder A (Premiere) is connected to the EURO 3 socket. The following settings must be made on the TV set: Press this key on the remote control.... 1. Select the Pay-TV programme position and call the station table The screen displays MENU return TV picture Explanation ? Help Connect the decoder as shown in the figure on page 56.
16. Technical data Mains voltage: 230 V AC 50/60 Hz Power consumption: Power consumption (to CENELEC/TC 59 X): Music power output to DIN 45324 at 4 Ohms and 1 kHz (sine output) Protos ca. 134 W 2 x 20 + 40W (2 x 10 + 20W) Taros Astral Spectral ca. 128 W 2 x 20 + 40W (2 x 10 + 20W) Carat Kreta Stratos ca. 135 W 2 x 20 + 40W (2 x 10 + 20W) PIPdevices ca. 145 W 2 x 20 + 40W (2 x 10 + 20W) Standby (all sets): ca. 1.
17. Glossary 2-channel sound transmission: Separate reproduction of 2 sound channels, e.g. 2 different languages. AF mode Defines the manner in which the audio signals are processed. Audio Latin for „I hear“ - The sound frequency range audible to the human ear is between 60 to 20,000 Hz approx. Camcorder A video camera with integrated video recorder. Cinch (phono) Single-pole plug connector for separate audio and/or video copying.
18. NEXTVIEW NEXTVIEW is an electronic programme magazine for all important TV stations. It is transmitted by various stations and also contains the programme information for other stations. Once the data have been collected, the TV set stores the programme magazine in a special memory, where it is subsequently updated at regular intervals if the TV set is not switched off with the main power switch.
18. Configuring NEXTVIEW Press this key on the remote control.... The screen displays Explanation The message shown in the picture in the centre column appears for all programme positions on which NEXTVIEW information is received. Your TV set displays this message in order to ask whether this programme position is to be used for collecting the NEXTVIEW data. If not, press the red key for „No“. The message continues to be displayed on all programme positions where NEXTVIEW information is received.
18. Using NEXTVIEW Press this key on the remote control.... The screen displays 1. Call NEXTVIEW in TV mode Select programmes OK View 09.29. Thus 12.00 ARD Tagesschau -12.15 12.00 ZDF Tagesschau -12.15 Today 12.00 RTL Punkt 12 -12.25 Preview 12.00 SAT1 Vera am Mittag -13.00 Sort 12.00 BR Rundschau -12.02 Programmes 0 9 from . . .
18. Using NEXTVIEW Selecting subjects Sorting programmes The NEXTVIEW system also permits you to divide the electronic programme magazine into sections for different subjects. This makes it possible to display only the programmes you find interesting. Press this key on the remote control.... The screen displays Select subjects green Choise of subjects no choise, show all programmes OK Confirm/ Delete TV TV picture Today Preview - + Sort ✔ feature film ✔ series ✔ reports Subjects P- P+ 2.
18. Recording a programme Press this key on the remote control.... 2. Recording a programme with a VCR C/ Select programmes OK View NEXTVIEW red This Evening Explanation Mi. 13:00:41 20.15 RTL 2 Kojak - Tod eines Polizisten -22.10 20.15 ARD 16. Fußball-WM '98 -00.00 Today 20.15 ZDF Man nennt es Liebe -21.15 Preview 20.15 RTL Alarm für Cobra 11 -21.15 Sort 20.15 SAT 1 Kommissar Rex -21.10 Programmes 0 9 from . . .
19. Data Logic What is Data Logic? 1. Connecting a Data Logic video recorder to your TV set Until now, your TV set and your video recorder were two separate and independent devices. Connect the AV-1 socket of the video recorder to the Euro-1 socket of your TV set, using a fully connected Scart cable. With the new "Data Logic", we have created a dialogue system with which the TV set and the video recorder can exchange data.
20. Index 9x multipicture. . . . . . . . . . . . . . . . . . . . . . . . . . . . . . . . . . 44 Multiple pages . . . . . . . . . . . . . . . . . . . . . . . . . . . . . . . . . . 35 Access to riddle solution (Hi Text). . . . . . . . . . . . . . . . . . . . 42 Aerial connection . . . . . . . . . . . . . . . . . . . . . . . . . . . . . . . . . 4 Allocating a station logo . . . . . . . . . . . . . . . . . . . . . . . . . . . 14 Audio . . . . . . . . . . . . . . . . . . . . . . . . . . . . . . . . . . . . . .
Notes Backlight on the TV set Safety note In rare, exceptional cases, the backlight remains off when switched on with the key. The reason for this is that the protective circuit has cut off the current to the lamp. If there is a technical fault in your TV set, the complete lamp assembly must be replaced by a trained technician! If this happens, and if you have pressed the key several times, you do not know whether the backlight is switched on or off.
TV. VIDEO. AUDIO. MECABLITZ Videorecorder Camcorder Quality – A matter of principle. With the trend-setting Metz technology you will allways make the correct choice. DVD See your Metz dealer. He will be happy to demonstrate the current Metz range. Audio Metz-Werke GmbH & Co KG Postfach 1267, D-90506 Zirndorf Internet: www.metz.de E-Mail: info@metz.de mecablitz 00/47/22 Availability and technical details subject to change without notice. Metz. Always first class. ķ 699 47 2070.