
Warranty


Do not discard any contents until after assembly is complete to avoid accidentally
discarding small parts or hardware.
2
Required Supply Circuit: 120V, 60Hz
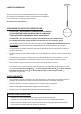
1. Feed wires through the mounting
bracket (A).
2. Securely connect wires as shown
using wire connectors. Connect white
to white, black to black, and connect
the green or copper ground wire to the
mounting plate ground as shown.
3. Secure mounting bracket (A) to the
ceiling using long screws.
1/2 Inch (12.7 mm)
WHITE WHITE
BLACK BLACK
GREEN/COPPER GREEN/COPPER
1/2 Inch (12.7 mm)
1/2 Inch (12.7 mm)
1/2 Inch (12.7 mm)
!
1/2 Inch (12.7 mm)
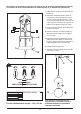
A
B
4. Secure ceiling cover (B) to the mounting
bracket (A) using short screws.
5. Determine the desired length of the
lamp cord, and secure length using
small screw (C) and screwdriver (D).
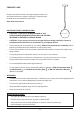
6. Install the speciedlightbulb.
7. Lift and turn the glass shade (E) to
secure into place.
ForusewithlightbulbswithaE26(medium)base.
DO NOT EXCEED THE SPECIFIED WATTAGE.
C
D
E