
User guide


32
CHAPTER 3
CONNECTING AND CONFIGURING THE I.LON
10 ETHERNET ADAPTER
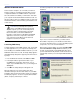
By following the steps outlined in this section, you can
quickly and easily configure your i.LON Ethernet Adapter
to communicate with your computer. Figure 3.6 shows the
i.LON 10 Ethernet Adapter (FT Model) from the top and
from the back, showing all hardware inputs and outputs.
Figure 3.6. The i.LON 10 Ethernet Adapter
Connecting the i.LON 10
To connect the i.LON 10 Ethernet Adapter, follow these
steps:
1. Remove power from the i.LON 10 Ethernet Adapter.
2. Connect the FTT Channel to the i.LON 10 Ethernet
Adapter’s orange Weidmuller connector.
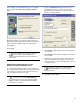
3. Connect the i.LON 10 Ethernet Adapter’s 10BaseT
Ethernet port to an Ethernet Hub/Switch (TCP/IP
network) that can communicate with your PC or use a
crossover Ethernet cable to connect the i.LON 10 to
your PC directly (Figure 3.7).
NOTE: See Chapter 1, “Planning and
Designing for RMS,” for additional examples
and diagrams for how to setup your i.LON 10
based network.
NOTE: See the section, “i.LON 10 Ethernet
Adapter Security,” in “Appendix B:
Advanced i.LON Configuration,” for information
about i.LON 10 security measures.
At this point, you are ready to configure an i.LON 10 for use
with RMS.
Configuring the i.LON 10
In order to configure RMS to use one or more i.LON 10
adapters, you should have basic networking knowledge
and experience; in addition, you must have Administrator
rights on the PC and network you will be using.
NOTE: If you are using the backbone of an
existing network at a venue, contact the
Network Administrator and/or venue representative
before accessing the network.
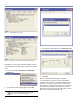
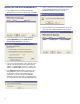
To begin, you must change your computer’s network
IP connection setting from dynamic to static. To do so,
perform the following steps:
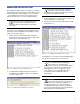
1. From the Start menu, click Control Panel, then
Network Connections. The Local Area Network
Connections dialog appears.
Laptop
Network Crossover Cable Standard Twisted Pair Cable
Ethernet Network Cat 5 Cable
Twisted Pair Network Cable
i.Lon 10
Static IP Address
Loudspeaker
(1-50)
Figure 3.7. A simple i.LON 10 network setup